
Use and Care Manual


3-3
10. DO NOT lay the tool down until it has come to a complete stop. Moving
parts can grab the surface and pull the tool out of control.
3.4 Air Die-Grinder
1. The Grinder attachment is designed to work with 1/4” grinder
accessories. Nine are included in the case: Four sanding wheels, 13/16”
O.D., 1” O.D., 1-3/16” O.D., and 1-9/16” O.D.; Five grinding stones, Ball
(13/16” O.D.), Wheel (1” O.D.), Cone (15/16” O.D.), Tree (9/16” O.D.),
and Tree (3/4” O.D.)
2. Before installing an accessory into the collet, make sure that the tool’s
trigger is in the locked (OFF) position.
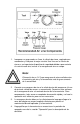
3. Select the accessory appropriate to your needs. Use one wrench to hold
the collet holder and the other wrench to open the collet nut.
4. Insert the shaft of the accessory into the open collet and use the
wrenches to tighten the collet nut.
5. Gently squeeze the trigger to start grinding before you touch the work
surface.
6. Allow the grinder to do the work. Apply additional pressure on trigger as
needed. DO NOT use excessive force against the surface you are
grinding. If you place too much pressure on the work-piece and the
grinder stalls, immediately release the trigger and pull the grinder away
from the work surface.
7. If the tool requires more force to accomplish the task, verify that the tool
is receiving sufficient, unobstructed airflow (CFM) and the maximum air
pressure (90 PSI) is being provided.
8. DO NOT attempt to raise air pressure to get more out of the tool.
Operating the tool at a higher than maximum rated pressure can result
in damage to the tool and/or accessory and possible injury to the
operator.
9. If the tool still does not have sufficient force at maximum pressure and
airflow, then a larger tool may be required.
10. DO NOT lay the tool down until it has come to a complete stop. Moving
parts can grab the surface and pull the tool out of control.