
Installation Guide
USER’S MANUAL PAGE 7JS-6000
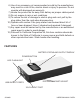
CONNECTING TO THE BATTERY
1) Identify polarity of battery posts. The positive battery terminal is
typically marked by these letters or symbol (POS,P,+). The negative
battery terminal is typically marked by these letters or symbol
(NEG,N,-).
2) Do not make any connections to the carburetor, fuel lines, or thin
metal parts.
3) Identify if you have a negative or positive grounded vehicle. This can
be done by identifying which battery post (NEG or POS) is connected
to the chassis.
4) For a negative grounded vehicle (most common): connect the RED
POSITIVE jumper clamp rst to the positive battery terminal, then
connect the BLACK NEGATIVE jumper clamp to the negative battery
terminal or vehicle chassis (if you are unsure about vehicle chassis,
just connect to battery terminal).
5) For a positive grounded vehicle (very uncommon): connect the
BLACK NEGATIVE jumper clamp rst to the negative battery
terminal, then connect the RED POSITIVE jumper clamp to the
positive battery terminal or vehicle chassis (if you are unsure about
vehicle chassis, just connect to battery terminal).
6) When disconnecting, disconnect in the reverse sequence, removing
the negative rst (or positive rst for positive ground systems).
JUMP STARTING
1) This unit is only for emergency use, not for frequent commercial
use! ENGINE START socket is ALWAYS activated! Do not attempt
to jumpstart your vehicle when the jump starter battery capacity is
below 20% (observe battery status indicator on the unit).
2) Turn off the vehicle ignition and all accessories (radios, lights, air
conditioners, etc.), and disconnect electronic devices.
3) Connect the jumper clamps to the correct polarity battery terminals.
4) Connect the EC5 plug of jumper cables to the ENGINE START
socket of jump starter.
5) Try starting the vehicle (turn on the ignition switch). Most vehicles will
immediately start. Stop if the vehicle does not start after 5 seconds