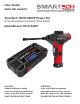
User Guide Guía del usuario Smartech TECH-5000P Power Kit Kit de alimentación Smartech TECH-5000P Model/Modelo TECH-5000P CAUTION: Read and follow all safety rules and operating instructions before every use of this product. SAVE THESE INSTRUCTIONS. ATENCIÓN: Lea y siga todas las reglasde seguridad e instrucciones de uso antes de cada uso de este producto. GUARDE ESTAS INSTRUCCIONES.
What’s included with the Smartech TECH-5000P Power Kit FULLY CHARGE IMMEDIATELY AFTER PURCHASE. Fully recharge after each jumpstarting, or every 3 months to ensure long battery life.
IMPORTANT SAFETY INSTRUCTIONS 1. Use the TECH-5000P Power Kit for jumpstarting a 12V LEAD-ACID battery only. Do not attempt to jump-start a vehicle with a non-rechargeable or defective battery. 2. Working in vicinity of a lead-acid battery is dangerous. Batteries generate explosive gases during normal operation. Use in well-ventilated area. Battery acid can cause permanent blindness. Avoid touching eyes while working near battery. 3.
11. Any repair must be carried out by the manufacturer or an authorized repair agent in order to avoid danger. TECH-5000P POWER BANK / JUMP STARTER The Power Bank / Jump Starter features a low voltage protection (for Power Bank / Jump Starter itself), spark proof, reverse polarity protection and short circuit protection. This Power Bank / Jump Starter can instantly jump start most single battery vehicles, up to 60+ (over 60) times on a full charge.
Battery Type Lithium-ion Polymer Battery Capacity 44.4WH Starting Current 250A Peak Current 500A Jump Start up to 5.5L Gas Engine USB Output 5V/2.4A, 5V/2.4A LED Flashlight 1W 19V Output 19V/3.
PRODUCT FEATURES AND LAYOUT LCD 15V/1A 12V Input Port Output Port ENGINE START Socket 19V Output Port Flashlight Button Power USB Output Button Ports LCD DISPLAY 1. 2. 3. 4. 5. 6. 7. 8. 9. 15V/1A input 5V/2.4A output Light steady on Light FLASH 5V/2.
SMART JUMPER CLAMPS Green LED Red LED BOOST Button EC5 Plug Positive Clamp Negative Clamp CHARGING This product is partially charged from the manufacturer. Fully charge the unit immediately after purchase. In order to prolong the product life, be sure to fully recharge the unit after each jumpstarting, or every 3 months even if this unit has not been used. If battery voltage in the TECH-5000P Power Kit is too low. The unit will shut off to prevent damage to itself.
CONNECTING TO THE BATTERY 1. 2. 3. 4. 5. 6. Identify polarity of battery posts. The positive battery terminal is typically marked by these letters or symbol (POS,P,+). The negative battery terminal is typically marked by these letters or symbol (NEG,N,-). Do not make any connections to the carburetor, fuel lines, or thin metal parts. Identify if you have a negative or positive grounded vehicle. This can be done by identifying which battery post (NEG or POS) is connected to the chassis.
4. 5. 6. Connect the EC5 plug of smart jump clamp to the ENGINE START socket of TECH-5000P Power BANK. Wait a few seconds, the green LED light on smart jump clamp should be lit. If not, please refer to “BOOST” OPERATION section. Try starting the vehicle (turn on the ignition switch). Most vehicles will immediately start. Stop if the vehicle does not start after 5 seconds of engine cranking.
Cautions: 1. Under normal circumstances, do not use the mandatory operations. The spark proof, reverse polarity protection and short circuit protection features are disabled after BOOST button is pressed. Pay very close attention to the polarity of the battery before using this mode. Do not allow the positive and negative battery clamps to touch or connect to each other as the item will generate sparks and high heat if not used properly. 2. LED AND BUZZER COMMUNICATION: No.
4 Slow flash Off No buzzer Have not turned on the ignition switch within the regulated time. To resolve this, you need remove clamps from vehicle battery, and connect again when No.1 condition occurs. 5 Fast flash Off Fast buzzer Red and black clamps are connected with each other. 6 Fast flash Off Fast buzzer Reverse connection of clamps. 7 Off Fast flash No buzzer Engine is started. 8 Off Fast flash No buzzer Vehicle’s battery voltage is higher than Jump Starter’s.
USB POWER Connect the USB device to the TECH-5000P Power Bank with the included multi-tip cable (For Apple® products, it’s better to use the original cable that came with the devise). Press Power utton / Flashlight button to start USB power, and press Power button to quit. When disconnected, the TECH-5000P Power Bank will automatically shut off. The number of times you can recharge a USB device will vary between devices. FLASHLIGHT lighting modes: Steady On – Strobe – SOS – Off.
SUPPLY TO 12V APPLIANCES The TECH-5000P Power Bank can run/charge 12VDC appliances that draw 10 amps or less. Two Options as follows: 1. Using the 12V Adapter: Connect the TECH-5000P Power Bank to a 12V appliance with the included 12V adapter accessory. You don’t need to press the power button as the Power Bank output is ALWAYS activated. When battery voltage of TECH-5000P Power Bank is too low, 12V appliances will stop running/charging. 12V ADAPTER 2.
TECH-5000P AIR PUMP Working Voltage:12V DC Current: 3.5A Peak Current: ≤7A Maximum Gas Pressure: 150PSI Hose Length: 5.31 inches (135mm) Working Temperature: -4˚F ~ 140˚F (-20˚C~+60˚C) Dimension: 2.44 X 7.16 X 8.90 inches (62mm X 182mm X 226mm) Weight: 1.
IMPORTANT SAFETY INSTRUCTIONS FOR THE TECH-5000P POWER KIT (AIR PUMP) WORK AREA 1. Keep your work area clean and well lit. Cluttered areas invite accidents. 2. Keep bystanders, children, and visitors away while operating an air pump. Distractions can cause you to lose control. 3. Operate air pump in an open area at least 18 in. away from any wall or object that could restrict the flow of fresh air to ventilation openings. ELECTRICAL SAFETY 1.
4. 5. 6. 7. 8. 9. times. Proper footing and balance enable better control of the air pump in unexpected situations. Use safety equipment. Always wear eye protection. Dust mask, non-skid safety shoes, hard hat, or hearing protection must be used for appropriate condition. debris which could cause severe eye injury. Do not use on a ladder or unstable support. Stable footing on a solid surface enables better control of the air pump in unexpected situations. Do not disassemble the air pump.
5. 6. 7. trained persons. Air pumps are dangerous in the hands of untrained users. Check for misalignment or binding of moving parts, breakage of parts, and any other condition that may affect the air pump’s operation. If damaged, have the air pump serviced before using. Many accidents are caused by poorly maintained tools. Use only accessories that are recommended by the manufacturer for your model.
SERVICE • personnel may result in a risk of injury. SPECIFIC SAFETY RULES 1. Know your air pump. Read operator’s manual carefully. Learn hazards related to this tool. Following this rule will reduce the 2. Risk of bursting. Do not operate air pump to result in output pressure greater than marked maximum pressure of item to be 3. To reduce the risk of electric shock, do not expose to rain. Store indoors.
10. Always disconnect the air supply and power supply before making adjustments, servicing an air pump, or when an air pump is not in use. 11. Do not attempt to pull or carry the air pump by the hoses. 12. Always follow all safety rules recommended by the manufacturer of your air pump, in addition to all safety rules for the air pump. Following this rule will reduce the risk of serious personal injury 13. Household use only. 14. Do not use air pump as a breathing device. 15.
. Inspect tool cords periodically and, if damaged, have repaired at your nearest Authorized Service Center. Constantly stay aware of cord location. Following this rule will reduce the risk of 21. 22. air pump is for reference only and is therefore not binding for exact values. 23. 24. Allow pump to cool for ten minutes after each ten minutes of while operating. 25. Save these instructions. Refer to them frequently and use them to instruct others who may use this air pump.
OPERATION 1. 2. 3. 4. 5. 6. 7. WARNING: Do not use this product if it is not completely assembled or if any parts appear to be missing or damaged. Use of this product that is not properly and completely assembled or with damaged or missing parts could result in serious personal injury WARNING: Always wear eye protection with side shields marked to comply with ANSI Z87. 1. Failure to do so could result in objects being thrown into your eyes resulting in possible serious injury.
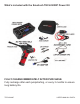
Air Pump features and layout Air Air Chuck Hose Wide Adaptor Ball Pin Adaptor Screwing Connector Accessory Storage Area On/Off Button Narrow Adaptor Gauge Air Pump Lock/Unlock Switch Fig.1 APPLICATIONS You may use this air pump for the purpose listed below: • Motorcycle, Vehicle, and Bicycle tires • • NOTE: The air pump is not designed for commercial applications. WARNING: Battery tools are always in operating condition.
POWERING THE AIR PUMP (3 OPTIONS) OPTION 1: (see Fig.1) Power the Air Pump with the TECH-5000P Power Bank and accessory cord. Using the included accessory cord, connect one end to the bottom of the Air Pump and the other end to the 12/V/10A output of the Power Bank. Fig.
OPTION 2: (see Fig.2) Power the Air Pump with the TECH-5000P Power Bank, car charger and 12V adapter. Using the included car charger and 12V adapter, connect the 12V adapter to the Engine Start socket on the Power Bank. Connect one end of the car charger to the 12V adapter and the other end to the bottom of the Air Pump. Fig.
OPTION 3: (see Fig.3) Power the Air Pump directly from your vehicle using the included car charger. Connect one end of the car charger to the bottom of the Air Pump and the other end directly to your vehicle 12V accessory outlet. Fig.
USING THE Air Pump • Connect the air hose to the air pump by screwing the hose into the end of the Air Pump. When screwing, use main body of the hose (part A in figure 4), do not use protective cap (part B in figure 4) for screwing as it is only for the protection of overheat. • Connect the other end of the air hose to the valve stem of the • • • • • • • balls including soccer, basketballs and footballs.
• • is reached, the reading may have a +/- 1.5PSI difference. (This is normal) After use, loosen the hose and remove from the air pump. WARNING: the hose will be very hot after use. Remove carefully. When not in use, adaptors provided with the air pump can be placed in the storage area on the top of the tool. WARNING: Improperly attached hoses or accessories can become detached under pressure and cause serious injury. Possible air leaks can cause faulty pressure readings.
WARNING: When servicing, use only identical replacement parts. Use of any other parts can create a hazard or cause product damage. WARNING: Always wear eye protection with side shields marked to comply with ANSI Z87.1. Failure to do so could result in objects being thrown into your eyes resulting in possible serious injury. GENERAL MAINTENANCE: Avoid using solvents when cleaning plastic parts. Most plastics are susceptible to damage from various types of commercial solvents and may be damaged by their use.
SMARTECH LIMITED WARRANTY FOR ONE YEAR from the date of sale this product is warranted against defects in material or workmanship when it is operated and maintained according to all supplied instructions. WITH PROOF OF SALE return a defective product to the retailer from which it was purchased for free replacement. This warranty is void if this product is ever used while providing commercial services or if rented to another person. rights which vary from state to state.