
Installation Guide

4
General Information
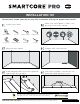
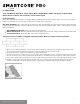
5. Install the second tile in the row by aligning and dropping the end tongue over the end groove of the first tile. Apply light
pressure to join the two tiles together.
6. If needed use a rubber mallet to fully engage the short side of the tile by lightly tapping on the top of the tile to engage and sit
flush with the adjacent tile. Maintain an expansion gap of approximately 5/16” from the wall. Repeat this process to complete
the first row. If the end is raised use a non-marking rubber mallet to lightly tap the end (tongue side) about 1” from the seam.
Do NOT tap d
irectly on the seam.
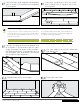
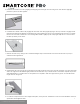
7. Start the second row by cutting a tile to the desired length. Keep in mind that tile must not be shorter than 6" (15cm) to
achieve the best appearance.
8. Install the first tile in the second row by inserting the long side tongue into the groove of the tile in the first row. This is best done
with a low angle of the tile. Maintain light pressure into the side seam as you rotate the tile to the subfloor. Repeat the process
with additional tiles to complete each row. Very little force is required to seat the tongue into the groove. You should feel th
e
tongue lock into the groove.
9. It is critical to keep the first two rows straight and square, as they are the “foundation” for the rest of the installation. Check for
squareness and straightness often.
4
For reference purposes only if printed or downloaded.