
Installation Guide

08072019
EXCLUSIVELY AT LOWE’S®
LEARN MORE AT LOWES.COM
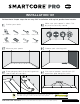
Repeat steps to finish the room Enjoy your new floor!
Use your spacers to maintain expansion
gap along walls.
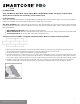
Connect the long end into the groove end
of the plank in the previous row at a low
angle and drop into place. Slide the plank
toward the previously installed plank on the
left until both short ends touch. You should
feel the planks lock together.
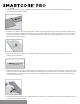
Lock the short ends together to complete
your first row. Cut the planks as needed to
fit the space.
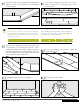
Start your second row. With a cut-off
that is more than 8" long or start with
a new plank.
Planks: Use the cut-o end from the previous
row to begin the next row. If the cut-o end is
less than 8", cut a new plank to be 8" or more to
start the next row.
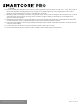
Tiles: Always begin a row with either a full tile or
a half tile so the joints are consistently staggered
in a “brick work” type pattern.
Remember to stagger end joints from row to row – 8+" for planks and 12+" for tiles.