
Installation Guide
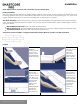
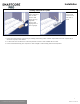

Step 1: Begin
installation
working from left
to right. Insert
spacers at ends
and edges where
planks meet wall.
Step 2: Lock
short end of plank
by inserting
tongue into
groove at an
angle and drop in
place. Continue
to end of first row.
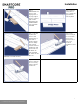
Step 3: Use
leftover plank
from first row as
starter for second
row. There must
be at least 20cm
between plank
end joints on
adjacent rows.
FOR TILE
INSTALLATIONS:
The distance
between end
joints should be
equal to 30cm for proper appearance.
Step 4: Lock long
edge of plank by
inserting tongue
into groove at an
angle and drop in
place. Slide plank
toward end of
previously installed
plank until the
tongue just
touches the
groove.
Installation
Safety Glasses, Broom or Vacuum and, if necessary, tools for subfloor repair.
Floating Installation
WPC / SPC plank flooring is designed to be installed utilizing the floating method. Do NOT secure the planks to the subfloor when using
the floating installation method. Do not install cabinets or fixed objects on top of the flooring. Proper expansion space 1/4”, (6.35 mm) is
required. Undercut all doorjambs. Do not fasten wall moldings and or transition strips to the planks.
Glue Down Installation: WPC / SPC products are approved for glue down installation over approved wood and concrete substrates.
Follow adhesive label application instructions. Maintain 1/4” (6.35 mm) perimeter expansion space. Refer to adhesive label for moisture
limits of the adhesive.
With IXPE/EVA attached pad: Shaw T-180, Shaw 200 & Shaw DP99
Without attached pad: Shaw 200 (residential/multi-family), Shaw 4100 (commercial, rolling load exposure & high traffic areas)
Cork backed products: Shaw 200, Shaw 1500, Shaw 4100 & Shaw 4151
Tile patterns must be installed in a staggered (offset) brick pattern. Minimum 1/3 offset 1/2 offset is preferred.
LAYOUT
3
For reference purposes only if printed or downloaded.