
Installation Guide


Installation
Hydronic Radiant Floors
: pump heated water from a boiler through tubing laid in a pattern under the flooring. Typically installed
in channels under a wooden subfloor (or) imbedded in concrete slabs. Requires the installer follow a specific nailing pattern to
avoid penetration of the heat system.
C. EXISTING FLOOR COVERINGS
Flooring can be installed over most existing hard-surface floor coverings, provided that the existing floor surface is fully adhered, clean,
flat, dry, structurally sound and free of deflection.
Existing sheet vinyl floors should not be heavily cushioned and not exceed more than one layer in thickness. Soft underlayment
and soft substrates will compromise the product's locking ability as well as diminish its indentation resistance.
Installation is NOT allowed over any type of carpet.
Do NOT install over wood floors adhered to concrete.
Never use solvents or citrus adhesive removers to remove old adhesive residue. Solvent residue left in and on the subfloor may
affect the new floor covering.
III. INSTALLATION
Tools: Tape Measure, Utility Knife, Jigsaw, Tapping Block or Rubber Mallet, Pull Bar, 1/4" Spacers, T-Square, Safety
Glasses, Broom or Vacuum and, if necessary, tools for subfloor repair.
Floating Installation
WPC / SPC flooring is designed to be installed utilizing the floating method. Proper expansion space 1/4” (6.35 mm) is required.
Undercut all doorjambs. Do not fasten wall moldings and or transition strips to the flooring.
Glue Down Installation: WPC / SPC flooring products is approved for glue down installation over approved wood and concrete
substrates. Follow adhesive label application instructions. Maintain 1/4” (6.35 mm) perimeter expansion space. Refer to adhesive label
for moisture limits of the adhesive.
Recommended adhesive:Shaw T-180 or comparable adhesive. If alternate adhesives are used, a bond test should be
performed to ensure compatibility.
Flooringmust be installed in a staggered (offset)pattern.
1. Before you start with the installation, it is important to determine the layout of the flooring. Proper planning and layout will
prevent having narrow flooring widths at wall junctures or very short length pieces at the end of rows.
2. As with all flooring products, install the flooring parallel to the longest exterior wall.
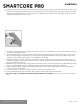
3. Determine if the starter row will need to be cut. (*In order to have a balanced floor layout, the width of the flooring for the first
and last row may need to be cut). The cut width of the flooring should be ½ the width of the flooring. If the first row of flooring
does not need to be trimmed in width, it will be necessary to cut off the unsupported tongue so that a clean, solid edge shows
towards the wall.
3
For reference purposes only if printed or downloaded.