
Installation Guide


5
General Information
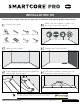
10. Continue installing tiles and make sure to achieve a random appearance with end pieces of minimum 6" - 15cm. Check that all
tiles are fully engaged; if a slight gapping is found, the gap can be tapped together by using a tapping block and a scrap of
flooring to cover the tapping block in order to avoid damages on the tiles.
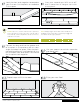
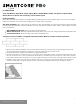
11. When fitting under door casings, if necessary, a flat pull bar may be
used to assist in locking the tiles. Doorjambs or at row ends
near walls where space is limited, the tongue can be “shaved” and glue containing “cyanoacrylate” can be applied to the
groove to join the tiles together.
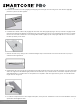
12. When fitting around obstacles or into irregular spaces, tiles can be cut easily and cleanly using a utility knife with a sharp blade.
It is often beneficial to make a cardboard tem
plate of the area and transfer this pattern to the tile.
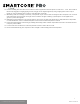
13. Protect all exposed edges of the flooring by installing wall molding and/or transition strips. Make sure that no tile will be secured
in any way to the subfloor.
14. For wet areas such as bathrooms caulk the perimeter of the floor with a silicone caulk.
15. Protect the finished flooring from exposure to direct sunlight to reduce fading and t
hermal expansion.
5
For reference purposes only if printed or downloaded. Revision: 06202019