
Installation Guide
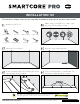
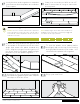
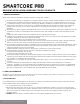
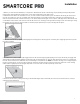
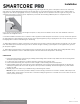
Table Of Contents

5
Installation
7. Install the first piecein the second row by inserting the long side tongue into the groove of the piece in the first row. This is best
done withalow angle.Maintain light pressure into the side seam as you rotate the flooringto the subfloor. Use a rubber mallet to
engage the shortsideby tapping lightly on the top of the flooring.Very little force is required to seat the tongue
into the groove. You
should feel the tonguelock into the groove. Repeat the process with the remaining additional pieces to complete each row.
8. It is critical to keep the first two rows straight and square, as they are the “foundation” for the rest of the installation. Check for
squareness and straightness often.
9. Continue installation and make sure to achieve a random appearance with end pieces of minimum 6" (15cm). Check that all pieces
are fully engaged; if a slight gapping is found, the gap can be tapped together by using a tapping
block and a scrap of flooring to cover
the tapping block in order to avoid damages to the flooring.
10. When fitting under door casings, if necessary, a flat pull bar may be used to assist in locking the joints. Doorjambs or at row ends
near walls where space is limited, the tongue can be “shaved” and glue containing “cyanoacrylate” can be applied to the groove to
join the pieces together.
11. When f
itting around obstacles or into irregular spaces, the flooringcan be cut easily and cleanly using a utility knife with a sharp
blade. It is often beneficial to make a cardboard template of the area and transfer this pattern to the flooring.
COMPLETION
1. Protect all exposed edges of the flooring by installing wall moulding and/or transition strips. Make sure that no flooring will be
secured in any w
ay to the sub floor.
2. For wet areas such as bathrooms; caulk the perimeter of the floor with a silicone caulk.
3. Protect the finished flooring from exposure to direct sunlight to reduce fading and thermal expansion.
4. Cutting resilient product into a fine point may lead to delamination. Use an ethyl cyanoacrylate based glue to help fuse the
resilient point together. Be sure to clean all glue from
the top surface immediately. Alcohol based glues may cause resilient
products to swell.
5. Adhering tape to the surface of your resilient flooring could damage the surface.
Do notuse tape to secure floor protection directly to the floor during construction or renovation. Instead, adhere tape to the
material used to protect the floor and secure it to the base molding along the wall. A material such
as ram board can also be
used to protect yourflooring.
5
For reference purposes only if printed or downloaded. Revision: 12112020