
Installation Guide

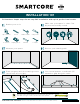
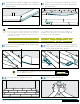
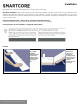
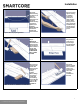
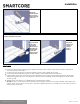
Table Of Contents

Step 9: Use
hammer and pull
bar to lock long
edges of flooring
on final row.
Step 1: Undercut
space under
door jamb to
allow flooring to
slide freely. Tap
long edge with
hammer and
tapping block to
lock long edge.
Step 2: Use
hammer and
pull bar to
lock this
piece of
flooring
Installation
Installing underneath door jambs:
COMPLETION
Protect all exposed edges of the flooring by installing wall molding and/or transition strips. Make sure that no plank will be
secured in any way to the subfloor.
For wet areas such as bathrooms caulk the perimeter of the floor with a flexible silicone caulk.
Protect the finished flooring from exposure to direct sunlight to reduce fading and thermal expansion.
Cutting resilient product into a fine point may lead to delamination. Use an ethyl cyanoacrylate based glue to help fuse the
resilient point together. Be sure to clean all glue from the top surface immediately. Alcohol based glues may cause resilient
products to swell.
Adhering tape to the surface of your resilient flooring could damage the surface.
Do notuse tape to secure floor protection directly to the floor during construction or renovation. Instead, adhere tape to the
material used to protect the floor and secure it to the base molding along the wall. A material such as ram board can also be
used to protect yourflooring.
6
For reference purposes only if printed or downloaded. Revision: 12112020