
Installation Guide

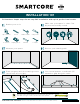
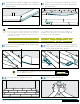
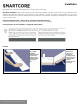
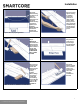
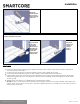
Table Of Contents

Step 1: Begin
installation
working from left
to right. Insert
spacers at ends
and edges where
flooring meet
wall.
Step 2: Lock
short end of
flooringby
inserting tongue
into groove at an
angle and drop
in place.
Continue to end
of first row.
Installation
all doorjambs. Do not fasten wall moldings and or transition strips to the flooring.
Glue Down Installation: WPC products are approved for glue down installation over approved wood and concrete substrates. Follow
adhesive label application instructions. Install flooring
into wet adhesive to achieve a permanent bond. Maintain 1/4” (6.35 mm)
perimeter expansion space. Refer to adhesive label for moisture limits of the adhesive.Roll flooring immediately after installation with a
100 lbs. 3‐section roller.
Recommended Adhesive(s):Shaw T-180 (or equivalent/comparable adhesive).
If alternative adhesives are used, a bond test should be performed to ensure compatibility.
Flooring patterns must be installed in a staggered (offset) pattern.
LAYOUT
4
For reference purposes only if printed or downloaded.