
Installation Instructions
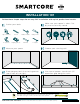

Step 3: Use
leftover plank
from first row as
starter for
second row.
There must beat
least 20cm
between plank
end joints on
adjacent rows.
FOR TILE
INSTALLATIONS:
The distance
between end
joints should be
equal to 30cm for properappearance.
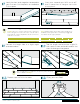
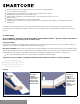
Step 4: Lock long
edge of plank by
inserting tongue
into groove at an
angle and drop
in place. Slide
plank toward end
of previously
installed plank
until the tongue
just touches the
groove.
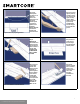
Step 5:
IMPORTANT!
Use hammer and
tapping block to
tap long edge of
plank to ensure a
tight fit. ANY
GAPPING CAN
COMPROMISE
THE LOCKING
SYSTEM!
Step 6: Attach a
scrap piece of
floor to bridge
the gap between
ends of planks.
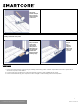
Step 7: Tap end
of plank with
hammer and
tapping block to
lock ends of
planks together.
Remove bridge
and continue
towards wall
until installing
the final plank in
the row. BE
SURE TO TAP
ON EDGE OF
VINYL SO AS
NOT TO DAMAGE LOCKING PROFILE.
Step 8: Use
hammer and pull
bar to lock final
piece in row.
Insert spacer at
end of row.
Continue
installation to
final row.
General Information
4
For reference purposes only if printed or downloaded.