
Technical Specs

07172018
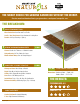
Waterproof Core: Never Swells
Fast and Easy DIY Install without Adhesives
Installs Directly Over Existing Hard Surface Floors
Installs in Large Rooms without Transition Strips
Minimal Floor Prep and No Acclimation
Hides Suboor Imperfections
Light Commercial/Heavy Residential Wear Layer
GREENGUARD Gold Certied for Healthy Home
Guaranteed for 3-Season Homes
Approved for On, Above, Below Grade Installation
SOLID WOODENG. WOOD LAMINATE
*See printout inside box for more detailed instructions. Don’t Forget: Rubber Mallet, Circular Saw + Spacers
Available Exclusively at
For Additional Help, Call 1-800-355-7429
MORE
QUESTIONS ?
WHY
?
STANDARD
OPTIONAL
Product Ratings
Residential Warranty Limited Lifetime
Commercial Warranty 5 Year, Light
Protective Finish UV Finish with Aluminum Oxide
Genuine Hardwood/Bamboo Veneer 1.2 MM
Visuals Hardwood + Bamboo
Bevel Micro Beveled Edges
Rigid Core Structure 4.8 MM SPC
Attached Underlayment No
Matching Trims/Mouldings Yes
Hardwood sq ft/carton 20.01 sq ft
Bamboo sq ft/carton 20.49 sq ft
Installation Glueless, Angle/Tap
Orthophthalates-Free Yes
Installation Grade On, Above, Below
STATS
Performance: 4.5
Comfort: 3.5
FAST & EASY GLUELESS INSTALLATION
Step 4: Lock long edge of plank by
inserting tongue into groove at an angle
and drop in place. Slide plank toward
end of previously installed plank until
the tongue just touches the groove.
BRIDGE
Step 6: Attach a scrap piece of oor to
bridge gap between ends of planks.
Step 5: IMPORTANT! Use hammer and
tapping block to tap long edge of plank
to ensure a tight t. ANY GAPPING CAN
COMPROMISE THE LOCKING SYSTEM!
BRIDGE
Step 7: Tap end of plank with hammer
and tapping block to lock ends of
planks together. Remove bridge and
continue towards wall until installing
the nal plank in the row. BE SURE TO
TAP ON EDGE OF VINYL SO AS NOT
TO DAMAGE LOCKING PROFILE.
Step 8: Use hammer and pull bar to lock
nal piece in row. Insert spacer at end of
row. Continue installation to nal row.
Step 9: Use hammer and pull bar to lock
long edges of planks on nal row.
INSTALLING UNDER DOOR JAMBS:
Step 1: Undercut space under door
jamb to allow plank to slide freely. Tap
long edge with hammer and tapping
block to lock long edge.
Step 2: Use hammer and pull bar to lock
short end of plank.
3
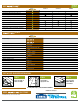
Insert Long Edge of
Plank at an Angle
STEP 1
Lower plank to
engage short end
STEP 2
Tap Joints with
Rubber Mallet to
Lock in Place
STEP 3
It’s really that simple – perfect for DIY installation!*