
Installation Guide
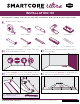
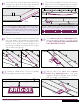
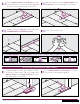
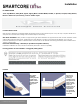

Table Of Contents

08212020
EXCLUSIVELY AT LOWE’S®
LEARN MORE AT LOWES.COM
For the second plank in the second row, lock
the long edge of the plank by inserting the
tongue into the groove of the plank in the
previous row. Slide flooring toward end of
previously installed flooring until the tongue
just touches the groove.
Use a rubber mallet and tapping block to
tap long edge of plank to ensure a tight
fit. ANY GAPPING CAN COMPROMISE
THE LOCKING SYSTEM!
Lock the short ends together by inserting
tongue into groove at an angle and drop
in place. Continue to end of first row.
Use a leftover plank from the first row to
start the second. Stagger planks by at least
8in between end joints on adjacent rows.
For tiles, always begin a row with either a full tile or a
half tile so the joints stagger in a “brick work” pattern.
To cut the flooring, measure and mark the flooring.
Then, use a t-square and utility knife to score and snap.
You will also need to back-cut the pad on the bottom of
the flooring. If you have diculty, you can use a jigsaw,
circular saw or miter saw.
Attach a scrap piece of floor to bridge
the gap between ends of planks.
Tap the end of the plank with a rubber
mallet and tapping block to lock ends
together. Remove bridge and continue
until you reach your final row.