
Installation Guide


4
4
Installation: SMARTCORE® Naturals flooring is
engineered
to be installed utilizing the floating
method.
Do not install
cabinets
or fixed
objects atop the flooring.
Proper
expansion space
is
required. Undercut
all
doorjambs.
Do not
fasten
wall
moldings
and or
transition
strips to the floor and
planks.
• Check groove on plank to make sure it is clean and free of debris.
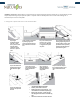
Step 1: Begin
installation working
from left to right.
Insert spacers at ends
and edges where
planks meet wall to
maintain
¼”
expansion
space
Step 2: Lock short end of plank
by inserting tongue into
groove at an angle and drop in
place.
Continue to end of first
ro
w
.
Step 3: Use leftover plank
from first row as starter
for second row. Minimum
8” stagger between plank
end joints.
Step
4: Lock long edge of
plank
by
inserting tongue into groove at
an angle and drop in
place.
Slide
plank
toward end of previously
installed plank
until the tongue
just touches the groove
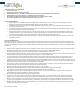
INSTALLATION UNDER DOOR JAMBS
Wooden jambs should be undercut.
Metal jambs require an expansion gap – use a
colored flexible caulk to fill the expansion gap.
If fitting under the jamb – Tap the long edge
with tapping block and hammer to lock the long
edge.
Use pull bar and hammer to lock the short end
Step 5: Use hammer and
tapping block to engage
plank and ensure tight
fit.
Step 6: Attach a scrap
piece to align planks and
bridge gaps between
planks,
Step 7: Tap end of
planks with hammer
and tapping block to
engage ends.
Step 8: Use hammer and pull
bar to engage final piece, insert
spacers and continue to next
row.
Step 9: Use hammer and
pull bar to lock planks on
final row