
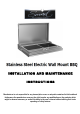
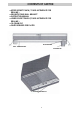
User Manual

!
8!
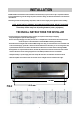
INSTALLATION
●
Use a suitable power drill. Drill 5 mm over the length of the plastic plug (See FIG 2 )
●
Clean out debris and dust from the holes.
●
Insert the plastic plug into the wall with the help of a small hammer (See FIG 2)
●
Separate the wall bracket from the BBQ by unscrewing the bolts ( Figure P1 ) on page 5. Take into consideration the
assembly position of the washers and bushers to assemble later on. (See FIG A).
●
Take the wall bracket (FIG 1) to the wall and fix to the wall with the appropriate 6 screws (See FIG 2)
●
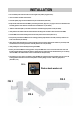
Verify that the two washers with the relevant bushes and fixing bolts are fitted to the front holes of the BBQ.
●
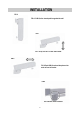
Lift the BBQ and locate the holding bush into the front position of the bracket (See FIG 3)
●
Lift up slowly and rotate the BBQ to 90° into working position (perpendicular to the wall) and line up with the rear
holes of the bracket (See FIG 4-5).
●
Insert the two bolts and washers you removed earlier into the rear holes (washer-bush–washer as per FIG A) of the
wall bracket and lock, locking the whole assembly with the two nuts. (See FIG 9)
●
Verify visually the correct assembly and fixing of the BBQ
●
Now try to move the BBQ to its resting position. Lift up the BBQ about 1-2 cm to clear the front hook of the wall
bracket and pull towards yourself (See FIG 6-7). Now the bush is released from the wall bracket and you can slowly
lower the BBQ so the rubber buffers come in contact with the wall (See FIG 8).
●
If everything is correct, now it is possible to open the BBQ once again and start using it. Make sure once it is in the
working position the bush's have locked into position and everything is secured . Check the guide photos
(See FIG 6, 7 & 8)
FIG A
Washer-bush-washer-nut
FIG 3
FIG 5
FIG 4