www.smart.com Operating instructions for audio system navigation/multimedia smart - A Daimler brand >> Audio system navigation/multimedia. Operating Instructions 4515849882 É4515849882dËÍ Order no. 6522 6824 13 Part no.
Symbols * $ % ! + X YY (Y page) Publication details Optional equipment Warning Environmental note Possible damage to the vehicle Tip Instruction Continuation symbol Page reference Internet Further information about smart vehicles and about Daimler AG can be found on the following websites: http://www.smart.com http://www.daimler.
Contents Index ............................................ 2 At a glance ..................................... 7 Introduction .................................. 5 General settings ............................ 21 Navigation ................................... 29 Telephone ..................................... 61 Audio .......................................... 75 Video ..........................................
2 Index 1, 2, 3 ... D 911 emergency call .......................... 63 A Address entry (example) ................... 34 Address entry menu ......................... 34 Adjusting the volume Click ...................................... 23 Confirmation tone ..................... 23 Switch-on volume ...................... 22 Alternative route Calculating .............................. 38 Viewing information .................. 38 Audio system navigation/ multimedia operating system .............
Index I Intersection Entering .................................. 36 L Last locations (navigation) .............. 51 M Main menu .................................... 10 Navigation ............................... 31 Map (navigation) Adjusting the scale .................... 53 Display ................................... 53 Moving .................................... 53 Map view ...................................... 54 Master device (mobile phone) Determining .............................
4 Index Route Alternative routes ..................... Calculating .............................. Route guidance Map view ................................. Route information (Expert mode) ....... Trip info ................................. Route options Checking/changing .................... Setting ................................... 38 37 44 47 48 37 33 S Screen Dimming .................................. 23 SD/MMC memory card Inserting ................................. 83 Removing .....................
>> Introduction. General information Guarantee The smart sales organization1 guarantees this accessory or replacement part for the duration of 24 months or 24,000 miles. Operating safety G WARNING In order to avoid distraction which could lead to an accident, the driver should enter system settings with the vehicle at a standstill and operate the system only when road and traffic conditions permit. Always pay full attention to traffic conditions first before operating system controls whilst driving.
6 >> Introduction. Declaration of conformity Vehicle components which receive and/ or transmit radio waves USA: "The wireless devices of this vehicle comply with Part 15 of the FCC Rules. Operation is subject to the following two conditions: 1) These devices may not cause harmful interference, and 2) These devices must accept any interference received, including interference that may cause undesired operation.
Operation ........................................ 13 Basic functions ................................. 17 >> At a glance. Audio system navigation/multimedia operating system ................................
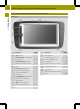
8 Audio system navigation/multimedia operating system >> At a glance.
Audio system navigation/multimedia operating system C Briefly pressing the control knob: • switches on audio system navigation/multimedia • mutes the audio/video source or the current navigation announcement Pressing and holding the control knob: • switches off audio system navigation/ multimedia Turning the control knob: • adjusts the volume Page 17 18 17 18 >> At a glance.
Audio system navigation/multimedia operating system 10 >> At a glance. Moving the front panel up/down Function D E Disc slot • Insert CDs/DVDs • Remove CDs/DVDs SD/MMC memory card slot • Insert SD/MMC memory cards • Remove SD/MMC memory cards Page Function F 82 82 Eject button Lit orange: CD/DVD is inserted Unlit: no CD/DVD inserted 83 83 To move the front panel down: press button B. X To move the front panel up: press button B again.
Audio system navigation/multimedia operating system 11 Selection Step Radio Switches on radio mode (Y page 76) Music Calls up the music main menu (Y page 86) Video Calls up the video main menu (Y page 98) Navigati on Switches on navigation mode (Y page 31) Cell phone Calls up the telephone menu (Y page 72) Extras Calls up the picture viewer (Y page 105) or Selecting general settings: RAudio settings (Y page 93) RVolume settings (Y page 22) RScreen settings (Y page 23) RClock settings (Y page
12 Audio system navigation/multimedia operating system >> At a glance. Overview Example: radio display : Status bar ; To switch radio mode off = Display/selection window ? Radio menu bar A Icon bar showing the activated functions for fast switching Status bar : shows the time and the current settings for radio operation. You can switch off radio operation by clicking closing button ;.
Operation 13 Important menu functions >> At a glance. The following illustration shows important symbols that are shown in many menus and can be selected by pressing.
Operation 14 Selecting a station X Call up the enter street menu (Y page 35). All letters are available in the menu. X Enter U, N, T. The letters are entered in entry line :. Press û or ü in the radio menu. The needle jumps left or right in the waveband and stops at the next station with adequate reception. X Repeat the operation step until the desired station is selected. >> At a glance. X Further setting options can be found in the "Selecting a station" section (Y page 77).
Operation Further entry options X To delete a character: press symbol ;. X To delete an entry: press symbol ; repeatedly until the entire entry has been deleted. To select a number/special character: press 123&#? 123&#?. X Select a number or special character. X Press ABC to return to entering letters. X To select an umlaut: press ÄÖÜÆØ ÄÖÜÆØ. X Select an umlaut. X Press ABC to return to entering letters.
Operation 16 >> At a glance. Further entry options X Select an umlaut. Press AB to return to entering letters. : Calls up umlauts X ; Calls up numbers and special X To delete a character: press the 1 symbol. To select a keyboard: call up the system settings menu (Y page 25) and select a keyboard (Y page 26). X To exit character entry: press &. To delete an entry: press the 1 symbol until the entire entry has been deleted.
Basic functions i The security code is set to "0000" at the factory. It is recommended that you change the security code (Y page 27). Safety note G WARNING Familiarize yourself with the most important steps before starting your journey. Never try out new functions whilst driving. This will distract you from the traffic conditions and you could cause an accident. Always operate the radio in such a way that you maintain control of your vehicle in all traffic conditions.
Basic functions 18 >> At a glance. Mute Audio and video source X Press W the control knob briefly. The audio or video source is muted. When the sound is switched off, you will see the , symbol in the status bar. i Navigation announcements will be heard even if the sound is muted. The , symbol may not be visible on very bright areas of the screen in video mode and in the picture viewer. Audio sources are muted automatically if you activate the Voice Control System for the navigation (Y page 57).
Basic functions Adjusting the balance Setting X-bass Call up the audio settings menu (Y page 93). X Press Balance. Balance X Press = or Ì to set the sound focus point. X Press OK. OK The settings are stored and you exit the menu. X X Call up the audio settings menu. X-bass. Press X-bass X Press = or Ì to set the frequency. >> At a glance. X 19 Press 9 or : to increase the Xbass level by level. X Press OK OK. The settings are stored and you exit the menu.
20
Volume settings ................................ 22 Clock settings .................................. 24 System settings ................................ 25 >> General settings. Screen settings ................................
Volume settings 22 Volume settings Calling up the volume settings menu Press Extras in the main menu (Y page 10). X Press Options in the extras menu. The general settings menu appears. X Press Volume settings. settings >> General settings. X Audio fadeout during a navigation announcement The volume of an audio source can be lowered during a navigation announcement. X Call up the volume settings menu (Y page 22). The entry on the right beside Navigation shows the current setting.
Screen settings Press = or Ì to adjust the volume. You can select values between 0 (switched off) and 50 (loud). or X Turn cVd the control knob. X X OK. To confirm the setting: press OK The volume settings menu appears. Adjusting the volume of the confirmation tone (beep) Some functions, such as storing a radio station, are acknowledged with a confirmation tone. You can adjust the volume of the confirmation tone. X Call up the volume settings menu (Y page 22).
Clock settings 24 Call up the screen settings menu (Y page 23). The entry on the right beside Dimming shows the current setting. X Select Dimming. Dimming A menu appears. >> General settings. X X Automatic setting: press Automatic first and then press &. The setting is accepted and the screen settings menu appears. Manual setting: press Manual. Manual A settings menu appears. X Press = or Ì to select a value between 0 (very dark) and 16 (bright) for the dimmer. X Press OK OK. The setting is accepted.
Press the available numbers (shown in white) one after another. The colon between the hours and minutes is entered automatically. X Press OK. OK The setting is accepted and the "Time entry" menu appears. X Setting the time format You can set the format to 24-hour or 12-hour (AM/PM). X Call up the "Time entry" menu (Y page 24). The entry on the right beside 12 hour mode shows the current setting. X Press 12 hour mode mode. The entry on the right beside 12 hour mode changes.
26 System settings Call up the system settings menu (Y page 25). The entry on the right beside Language shows the current setting. X Press Language Language. The list of languages appears. The currently selected language is identified by the O symbol. X Press 9 or : to scroll in the list. X Select the desired language. Audio system navigation/multimedia loads the language and switches back to the system settings menu. >> General settings.
System settings i The standby time is preset to 18 h. Setting a low standby time is recommended when, for example, the battery charge is low. If audio system navigation/multimedia is operated while the engine is switched off, the device also goes into standby mode after 30 minutes. You will see a warning message to this effect. Call up the system settings menu (Y page 25). The entry to the right of Standby time shows the current setting. X Press Standby time in the menu. A settings menu appears.
System settings 28 Press the cross. The cross moves across the screen. X Repeat this action until the system settings menu appears. >> General settings. X Loading the factory settings Audio system navigation/multimedia can be reset to the factory settings. Amongst other things, this will delete all personal data (e.g. station presets, entries in the destination memory and in the list of previous destinations in the navigation system, phone book entries).
Introduction .................................... 30 Destination input ............................. 33 Route guidance ................................. 43 Last locations .................................. 51 Favorites (destination memory) ............ 51 Map operation and settings ................. 52 Voice control system .......................... 57 >> Navigation. Basic settings ..................................
30 Introduction Introduction >> Navigation. Safety notes G WARNING For safety reasons, only enter a new destination when the vehicle is stationary. When you are driving, another passenger should enter the destination. Read the Operator's Manual and select the route before driving. Bear in mind that at a speed of just 30 mph (approximately 50 km/h), your vehicle is covering a distance of 44 feet (approximately 14 m) every second.
Introduction between Easy and Expert mode (Y page 32). Switching navigation mode on/off Switching on navigation mode To switch on navigation mode: press the t button. The main menu appears. Option 2: the navigation system shows the display that was exited before switching off. Navigation main menu >> Navigation. X 31 Navigation. Press Navigation You will see the navigation start screen. The The driver is responsible for safe driving and to follow traffic regulations.
Basic settings 32 Basic settings Easy and Expert modes Introduction >> Navigation. You can select Easy or Expert mode when switching on navigation mode (Y page 31) or switch between the two modes in the settings menu.
Destination input 33 Expert mode: press Standard, Standard 2 Alternative 1 or Alternative 2. The route options appear. X Press one of the route options. Depending on the previous setting, use or avoid the route options. >> Navigation. X Settings menu (example: Expert mode) X Depending on the current mode, press Easy or Expert. Expert Setting the route options and route type Note The route options and route type (Expert mode) determine the route calculation.
34 Destination input have entered a country and a city or zip code. traffic conditions, cause an accident and injure yourself and others.
Destination input X Press the country entry in the "Entering a new destination" menu (Y page 34), e.g. Germany. Germany You see the country list. Press 9 or : to scroll in the list. X Press the desired country. The country is selected and is now entered in the "Entering a new destination" menu. X Entering the city X i You can set the keyboard (Y page 26). X Press 1xxxx Berlin. Berlin You can now enter the street name. Option 2 Enter B.
Destination input 36 >> Navigation. characters in navigation mode" section (Y page 14). After entering UNT, UNT the desired street is shown in the first three entries. X Press Unter den Linden Linden. You can now enter a house number or an intersection. Option 2 X X UNT. Enter UNT Press More hits and select Unter den Linden from the list. You can now enter a house number or an intersection.
Destination input the address as your home address (Y page 37) Rstore the address as a favorite (Y page 51) Rview the destination on the map (Y page 37) Rcheck/change the route options for the address (Y page 37) X Rstore Entering and saving your home address You can either enter your home address for the first time (option 1) or edit a previously stored home address (option 2). X Option 1: enter the address, e.g. a city, street and intersection.
38 Destination input The map shows: calculated, you will hear Route calculation completed. completed The map shows the following routes on the right: >> Navigation. Rthe destination address (at the top) Rthe route as a blue line Rthe selected route option (e.g. standard) with the distance and estimated journey duration to the destination Rstandard (light blue) 1 (green) Ralternative 2 (light brown) Each route is shown with the distance and estimated journey time to the destination.
Option 1 Enter a zip code, e.g. 10117. 10117 Instructions for entering characters can be found in the "Entering characters in navigation mode" section (Y page 14). As soon as the first number has been entered, the first three cities found can be selected. X Press 10117 Berlin Berlin. You can now enter the street name. X Option 2 Enter the first number, e.g. 1. As soon as the number has been entered, More hits can be selected. X Press More hits hits.
Destination input 40 Entering geo-coordinates (Expert mode) >> Navigation. X Press the globe at the bottom right of the "Entering a new destination" menu (Y page 34). The "Enter coordinates" menu appears. You can enter the geo-coordinates as degrees or in decimal notation. X To confirm the entry: press OK OK. The detailed information menu appears (Y page 36). Selecting a destination from "Last locations" Audio system navigation/multimedia automatically stores the last destinations entered.
Destination input To call up further destination information (if available): press 9 or :. X To display an address: press ã. X To move the destination on the map: press the crosshair and move it on the map. X To select a destination: press Add destination The detailed information menu appears (Y page 36). 41 : Home address symbol X X Press 9 or : to scroll in the list. Press a destination address. The detailed information menu appears (Y page 36). Further information, e.g.
Destination input 42 Option 1: calling up from the navigation main menu >> Navigation. X Press All points of interest or select a category first (Y page 43). A menu appears. Searching for a point of interest in the "Sports complex" category Selection Instructions At a specific location X Nearby X Along the Route (available when the route has been calculated) X Proceed as described under Nearby.
Route guidance X Press All points of interest or select a category first (Y page 43). The "Entering a point of interest in " menu appears. X Option 1: enter a point of interest and press Display selection. selection X Option 2: press All points of interest. interest The points of interest are displayed and shown on the left of the map. X Selecting a point of interest. The detailed information menu appears (Y page 36).
44 Route guidance >> Navigation. Displaying the map during route guidance Example: map during route guidance Function Explanation Route guidance display with arrow indicating the direction of travel (example shows an arrow pointing straight ahead and a distance of 100 m) The upcoming change of direction is shown with an arrow indicating the direction of travel and the distance. The route guidance display can also be seen in other operating modes, e.g. radio mode.
Function Explanation Speed Limit Assist (Expert mode) The maximum permissible speed is shown when the corresponding map data is available and the Speed limit function is not deactivated (Y page 56). A warning tone sounds if the maximum permissible speed is exceeded and one of the Warning at x km/h settings is activated. i The maximum permissible speed display may differ from the actual traffic situation, e.g. as a result of incorrect map data.
Route guidance 46 >> Navigation. distance before the next change of direction are shown. Destination reached When you reach your destination, a checkered flag is displayed on the righthand side of the display and route guidance is ended automatically.
Route guidance 47 Press Speech output. output The "Speech output" menu appears. X Press Street names. names Depending on the previous setting, the function is switched on or off. Adjusting the volume for navigation announcements Turn cVd the control knob during a navigation announcement. or X Set the volume of traffic announcements compared to the volume of the active audio source (Y page 18).
Route guidance 48 distance to next destination (intermediate stop, final destination) Restimated time of arrival at next destination (intermediate stop, final destination) X To close trip info: press &. >> Navigation. Rremaining i The information can also be shown by X X Press Immediately or another selection option to determine when the block should start. The route section is blocked. The route is recalculated. To delete blocks: press 1 at the bottom right in the "Length of avoided route" list.
Route guidance Press Add dest.. dest. The new destination menu appears. X Select destination entry. X Changing the order of the destinations within the route X Entering an address (Y page 34) Last locations (Y page 40) Current position (if available) Deleting a destination from the route X Points of interest (Y page 41) X Select option 1. Favorites (Y page 40) Press OK in the detailed information menu (Y page 36). The destination is entered in the edit route menu.
50 Route guidance >> Navigation. (Y page 83), the route taken is recorded. The route is saved as a GPX file in the "GPS tracks" folder on the SD/MMC memory card. You can view the route later, in Google Earth for example. Feature specific to simultaneous playback of SD/MMC memory cards or USB devices: RPlayback may be interrupted occasionally. RIf audio system navigation/multimedia is switched off and back on, the first music track of the data carrier will be played.
Favorites (destination memory) Last locations Favorites (destination memory) Introduction Storing your home address Enter your home address as a destination, e.g. as a city, street and house number (Y page 34). X Before route calculation is started, press as home address in the detailed information menu and store the address (Y page 36). X Deleting all destinations X Press Last locations in the navigation main menu (Y page 31). The last locations list appears.
Map operation and settings 52 >> Navigation. entry" in the "At a glance" chapter (Y page 15). X Press OK and save the destination to the favorites with a new name. Deleting a destination from the favorites Deleting all destinations : Home address symbol X X Press New favorite. favorite Select an option from the menu. Selection Step Enter address X Enter the destination address, e.g. as a city, street and house number (Y page 34).
Map operation and settings 53 Setting the map scale When the map is displayed (Y page 44), press W or X. The section of the map is then zoomed in or zoomed out. X Press the % symbol to return to the original auto zoom view. >> Navigation. X Moving the map X Press the map (Y page 44) and move the map using your finger. The map moves in the corresponding direction. Display Calling up the display menu X Press d in the navigation main menu (Y page 31). The settings menu appears.
54 Map operation and settings >> Navigation. Explanation of functions Function Explanation Step Display type Options for different displays during route guidance X Options for different map orientations X Map view X X Press Display type. type Select Map only, only Turn Icons or Compass. Compass Press Map view. view Select Align map to north, north automatically, Align map automatically Dynamic map or 3D map map.
Map operation and settings 55 Program settings Calling up the program settings menu Press d in the navigation main menu (Y page 31). The settings menu appears. X Press Program settings settings. The program settings menu appears. >> Navigation.
56 Map operation and settings >> Navigation. Explanation of functions Function Explanation Step Units Selects km-display (metric) or mi-display (imperial) for the map mi = miles X Press Units. Units The setting switches between metric and imperial. Info Shows the respective map data version for all countries contained in the map X Press Info. Info Press 9 or : to scroll in the list.
Press d in the navigation main menu (Y page 31). The settings menu appears. X Press POIs on map map. The points of interest in the map menu appears. It shows the available categories. X are shown in the individual displays and are announced in some menus. The voice control system confirms important commands and gives instructions when entries are unsuccessful. If you speak the command unclearly or speak a non-existent or incorrect command, the device responds with "Please repeat your comment".
Voice control system 58 >> Navigation. You can start the Voice Control System in this way from any navigation display. The commands depend on the respective navigation menu. With the Voice Control System, almost all functions are available as with manual entry. Switching the Voice Control System off Say "Cancel". The Voice Control System is switched off. or X Press a menu option. The Voice Control System is switched off and the selected function is carried out.
Voice control system ? _ ^ ? ^ ? _ ^ ? ^ ? _ ^ ? _ ^ ? ^ ? Please select. Entering the city The enter city menu appears. Name the city or say change country, enter zip code, enter coordinates or back. Berlin The system shows a numbered list of city names in the display. Please select an entry number from the list. Say the number. Name the street or say change zip code, city center, point of interest, cancel or back. Unter den Linden. The system shows a numbered list of street names in the display.
60
Telephony via the Bluetooth® interface .. 63 Telephone operation .......................... 66 Using the phone book ......................... 68 Using call lists ................................ 70 Telephone settings ............................ 72 >> Telephone. General notes ...................................
62 General notes General notes >> Telephone. Introduction Telephony via the Bluetooth® interface is available in conjunction with a Bluetooth®-capable phone. With a suitable mobile phone, you can use the hands-free system via the Bluetooth® interface and download contacts from the mobile phone, e.g. via PBAP (Phone Book Access Profile). For more information on suitable mobile phones and on connecting Bluetooth®capable mobile phones to audio system navigation/multimedia, contact your smart Center.
Telephony via the Bluetooth® interface Making emergency calls without entering a PIN is only possible using the mobile phone. The following conditions must be fulfilled in order to make a 911 emergency call: Rthe mobile phone must be switched on. network must be available. Ra valid and operational SIM card must be inserted in the mobile phone. Rthe PIN must have been entered. If you cannot make an emergency call, you must arrange rescue measures yourself. The 911 emergency call number is a public service.
Telephony via the Bluetooth® interface 64 Searching for and registering a mobile phone Press Cell phone in the main menu (Y page 10). The telephone menu appears. X Press Options in the telephone menu. The "Bluetooth® settings" menu appears. X Press New device in the menu. >> Telephone. X mobile phone and connect the mobile phone. The following messages are shown one after another in the audio system navigation/multimedia display when registering: RCalling...
Telephony via the Bluetooth® interface registered mobile phone if no phone call is active. X Press Cell phone in the main menu (Y page 10). The telephone menu appears. X Press Options in the telephone menu. The "Bluetooth® settings" menu appears. X Press Device list in the menu. X To connect: press symbol :. The Connecting... message appears. When the mobile phone is connected, the Phone connected message appears.
Telephone operation 66 X Press symbol ; in example 2. The selected mobile phone is entered in the telephone device list as a master device. To de-register all mobile phones: press 1 in the telephone device list. all. Please confirm to delete all X Press OK OK. The Deleted message appears. X Telephone operation >> Telephone. Incoming call Rejecting or accepting a call Reconnecting automatically When a call is being received, the Incoming call... message is shown.
Telephone operation 67 Functions available during a call Transferring a hands-free call to the mobile phone The display shows either the phone number or the name. The following information is shown in the display during a call: Press Number Number. An input menu appears. X Type in the phone number. Press and hold 0 to enter "+". The phone number is shown at the top left. X of connection (hands-free, mobile phone) Rname or phone number of the caller Rcall duration Press the symbol on the bottom right.
Using the phone book 68 Using the phone book >> Telephone. Introduction Audio system navigation/multimedia shows the mobile phone's phone book (Contacts I) and the audio system navigation/multimedia phone book (Contacts II). The contacts in the phone book in the mobile phone are automatically downloaded when the mobile phone is connected (Y page 63). They are updated after every call and after the mobile phone is connected again.
Using the phone book 69 Audio system navigation/multimedia phone book (Contacts II) X Press a phone number and then press ;. The Calling... message appears. Storing a contact in the audio system navigation/multimedia phone book (Contacts II) X X Press Contacts II in the phone book. The radio phone book appears. Press the memory card symbol when the available phone numbers are displayed. An input menu appears. Calling and editing a contact X Press a contact in the phone book.
Using call lists >> Telephone. 70 X To call the contact: press :. The Calling.... message appears. X To edit the contact: press ;. The input menu for the name appears. X Press OK OK. The Deleted message appears. Using call lists Change the contact name. Instructions for entering characters can be found in the "Entering characters in the phone book" section (Y page 15). X Press OK. OK The input menu for the phone number appears. X Change the phone number. X Press OK.
X Select a call list, e.g. Missed calls. calls The calls are displayed. Example: contact details X Press ;. The Calling... message appears. Saving a contact in the phone book of audio system navigation/multimedia Select an entry in the call list and then press the memory card symbol. or X Press the memory card symbol in the contact details display. X Calling a contact Option 1 X Press ; briefly to select the highlighted entry. The Calling... message appears. Option 2 X Select an entry.
Telephone settings 72 Telephone settings Calling up the "Bluetooth® settings" menu X Press Cell phone in the main menu (Y page 10). The telephone menu appears. >> Telephone. X You can change the PIN. The PIN is a fourdigit number sequence. Press PIN edit in the "Bluetooth® settings" menu. An input menu appears. Select the numbers one by one by pressing briefly. The numbers are entered at the top left. X To delete: briefly press1 to delete the last number. Press and hold 1 to delete the entry.
Telephone settings 73 Editing Bluetooth® device names >> Telephone. The Bluetooth® device name enables Bluetooth® connection to Bluetooth® mobile phones and Bluetooth® audio devices. The Bluetooth® device name for audio system navigation/multimedia is smart Radio. Radio You can change this device name. X Press Bluetooth name in the "Bluetooth® settings" menu. An input menu appears. Enter a name.
74
Radio mode ...................................... 76 >> Audio. Music mode ...................................... 81 Audio settings ..................................
Radio mode 76 Radio mode Introduction i Portable electronic devices in the vehicle may seriously impair radio reception. Switching wavebands Press symbol ? in the radio display. The settings menu appears. X Press Band in the menu. The entry on the right beside Band shows the current setting. A list of available wavebands is shown. X Switching radio mode on/off Switching to radio mode >> Audio. X Press Radio in the main menu (Y page 10). The radio display appears.
Radio mode Selecting a station using the station search function X Press û or ü in the radio display (Y page 76). The needle jumps left or right in the waveband and stops at the next station with adequate reception. Selecting a station using the waveband scan Press symbol B in the radio display (Y page 76). The station preset memory appears (Y page 77). X Press the magnifying glass symbol in the station preset memory. The "Station search" menu appears. X "Station search" menu X X scanning....
Radio mode 78 >> Audio. X X Enter the desired frequency by pressing the numbers. The frequency is shown at the top right, the dot is entered automatically. Press OK and confirm the frequency entered. If the smart radio finds the respective station, the display shows Playing 98.3 MHz, MHz for example. The radio display then appears. : Entry line ; To delete an entry = To enter numbers and special characters ? To enter umlauts X Enter a station name.
Radio mode Storing stations automatically (travel store) This function automatically assigns stations that can be received to the preset memory for the FMT and AMT wavebands. The entire waveband is searched, starting at the lowest frequency. The 12 stations with the best reception quality are stored to the preset positions according to their reception quality. The station with the best reception is stored at preset position 1. X Press B in the radio display (Y page 76). The station preset memory appears.
Radio mode 80 Press d in the radio display (Y page 76). The settings menu appears. X Press Regional in the menu. Depending on the previous status, the function is switched on O or off ª. X Press & and return to the radio display. X >> Audio. Program type category (PTY) PTY is a service offered by several stations in RDS. You can use it to select stations with a certain program type. X Press d in the radio display (Y page 76). The settings menu appears.
Music mode Switching radio text on/off Setting the sensitivity Press d in the radio display (Y page 76). The settings menu appears. X Press Radio text in the menu. Depending on the previous status, the function is switched on O or off ª. X Press & and return to the radio display. If the station supports radio text and information is available, this is shown when the function is switched on. Longer text information is shown as scrolling text.
Music mode 82 Inserting and removing a CD/DVD Notes If the CD/DVD has a printed side, this must face upwards when the CD/DVD is inserted. If neither side is printed, the side to be played should face downwards. The system may not be able to play CDs/DVDs with copy protection. >> Audio. i If a medium contains other files in addition to music files, the loading time before the first track starts to play may be longer. Inserting a CD/DVD Press the 8 button on the front panel.
Music mode Inserting an SD/MMC memory card Press the 8 button on the front panel. The front panel is folded down and uncovers the slot for the SD/MMC memory card (on the right beside the SD logo). X Insert an SD/MMC memory card into the slot. The side with the contacts must face downwards and point towards the slot. X Press the 8 button on the front panel again. The front panel moves up and closes the SD/MMC memory card slot. X Removing the SD/MMC memory card Press the 8 button on the front panel.
84 Music mode could therefore take a long time before playback starts. Media files must be smaller than 256 GB. Operation via a USB/AUX port USB/AUX port The ports are in the glove box on the lefthand side. For more details and a comprehensive list of supported devices, please contact a smart center. Connecting an audio device to AUX Connect the audio device to AUX port ; using a 3.5 mm stereo jack plug. X Please see the respective operating instructions for how to operate the external audio source.
Music mode Bluetooth® audio profile The Bluetooth® audio device must support the A2DP and AVRCP Bluetooth® audio profiles.
Music mode 86 data media, press ; in the basic display. Option 2: selecting a data medium in the music main menu >> Audio. A CD/DVD or an SD/MMC memory card is inserted or a data medium is connected to audio system navigation/multimedia. X Press Music in the main menu (Y page 10). The music main menu appears. Example: SD memory card mode i For USB mode and SD/MMC memory card mode, the cover is shown on the display if the corresponding data is contained in the ID3 tag.
Music mode previous track (if the current track has only been playing for a shorter time). If you have activated the Mix playback option, the tracks are played in a random order. Depending on the data medium, all the tracks on the medium, the tracks with certain playback criteria or the tracks in a folder are played. 87 Option 2 X Press somewhere on playback bar : in the following picture. i This function is not available for iPod®.
Music mode 88 i Selection criterion Media data is not available for iPod®. Selecting playback criteria Press the symbol at the bottom left in the corresponding basic display. The track list appears. X Press magnifying glass symbol ;. X : Alphabetical track search >> Audio. ; To search by playback criteria = To select the next highest folder level X Press folder symbol =. The folder structure appears. Press one of the playback criteria.
Music mode 89 Enter characters. Instructions for entering characters can be found in the "At a glance" section (Y page 15). The search entry is entered in the upper line. X Press OK and confirm the entry. A list shows the entries found. X Press 9 or : to scroll in the track list. X Select a title. The track is played. >> Audio.
Music mode 90 Playback options Available playback options i This function is not available for Bluetooth® audio devices. Playback options Data medium Playback Mix RAudio CD, audio DVD MP3/WMA-DVD RiPod®/iPhone® RUSB device RSD/MMC memory card You hear the tracks in random order. Depending on the data medium, the tracks in the folder, the tracks that match the current criteria or all the tracks on the entire medium are played.
Music mode 91 Permissible file systems Data medium and supported audio formats CD/DVD with music files mp2, mp3, wma USB devices (sticks, hard drives) SD/MMC memory card aac, m3u, mp3, ogg, pls, wav, wma, wpl Bluetooth® audio device with Bluetooth® audio profile A2DP mp3, wma RISO9660/Joliet standard for CDs for audio DVDs RFAT16 for SD memory cards, FAT32 for SDHC memory cards RFAT32 for USB storage media (USB sticks, USB hard discs) RUDF >> Audio.
92 Music mode >> Audio. Permissible bit and sampling rates Audio format Bit rate Sampling rate MP3 32 kbit/s to 320 kbit/s 32 kHz, 44.1 kHz, 48 kHz MPEG-1, Audio Layer 2 (single-channel audio) 32 kbit/s to 192 kbit/s 32 kHz, 44.1 kHz, 48 kHz MPEG-1, Audio Layer 2 (dual-channel audio) 64 kbit/s, 96 kbit/s to 384 kbit/s 32 kHz, 44.1 kHz, 48 kHz MPEG-2, Audio Layer 2 (single-channel audio) 8 kbit/s to 192 kbit/s 32 kHz, 44.
Audio settings select the settings intended for that system (Y page 95). permission, these restrictions do not apply. Discs with copy protection are not compatible with the audio CD standard and therefore may not be able to be played by audio system navigation/multimedia. Playback problems may occur when playing copied discs. There is a wide range of data carriers, disc-writing software and writers available.
Audio settings 94 Selecting a sound profile Call up the audio settings menu. The entry on the right beside Sound presets shows the current setting. X Select Sound presets. presets A list appears. The O icon indicates the current setting. X Select Off or Pop Pop, Classical or Vocal Vocal. The setting is accepted and the list closes automatically. >> Audio.
Audio settings 95 To select a volume increase: press Level Level. A settings menu appears. X Press = or Ì to select a level from 0 (none) to 5 (maximum). X Press O and confirm the selection. The settings menu closes. X Surround sound system* Audio settings Setting X-bass level 0 Sound profile Unlit Equalizer Unlit Dyn. Noise covering (DNC) Calibrated Level Dyn. Noise covering 5 * optional >> Audio.
96
Video mode ...................................... 98 >> Video. Picture viewer ................................
Video mode 98 Video mode Safety note G WARNING Only when the vehicle is stationary should you: a data carrier Reject a disc There is a risk of being distracted from the road and traffic conditions if you insert or eject a disc while the vehicle is in motion. >> Video. Rinsert DVD playback conditions If video DVDs do not conform to the NTSC or PAL TV standards, they may create picture, sound or other problems during playback.
Video mode X Press a data medium symbol. The data medium is read. The DVD menu appears if CD/DVD was selected and a video DVD is inserted.
Video mode 100 Switching off video mode X Press 1 in the basic display. The main function last active is shown.
Video mode Selecting video files This function cannot be selected during video DVD/video CD playback. Press 9 or : to scroll in the list. X Press a video file. X Press Ì at the bottom left. The video file is played. X i You can move to the next higher folder using the folder symbol at the bottom right. The list is exited automatically when playback of the next video file starts. Fast forwarding/rewinding X Show the navigation menu (Y page 99).
102 Video mode Overview Data medium Functions in the settings menu Video DVD, video CD RSelecting an audio track subtitles RSearching (by track, chapter, playback time) RRepeating A -> B RRepeating (track, chapter, off) RPlayback information RSelecting full screen automatically RSetting the camera angle >> Video.
Video mode Selecting repeat X To enter a playback time: press Search in the settings menu. X Press Time in the menu. X Enter the playback time in the input menu, e.g. 01:05 for 1 hour and 5 minutes. X Press OK. OK Playback is continued from the corresponding position. X Selecting mix This function can be used for data media with video files (video DVD/video CD), USB devices and SD/MMC memory cards. Option 1 X Press Mix in the settings menu (Y page 101).
104 Picture viewer Notes on video mode Data media and video formats Data medium Video formats supported >> Video. Video DVD, video avi, mpg, mpeg, mp2 CD, super video CD with video files USB devices (sticks, hard drives) SD/MMC memory card 3gp, asf, avi, m4v, mp4, mpeg, mpg, wma, wmv, H.264 i Due to differing video codecs (coding/ decoding process), not all "avi" or "mpeg" video files can be played.
Picture viewer Supported picture formats Video DVD, video jpeg, jpg CD and super video CD with video files USB devices (sticks, hard drives) SD/MMC memory card jpeg, jpg, bmp, tif, gif, png Picture format Explanation jpeg, jpg JPEG image file bmp Bitmap image file tif Tagged Image File gif Graphical rotate Format File png Portable Network Graphic Function restrictions Calling up the picture viewer Select Extras from the main menu (Y page 10). X Press Photo in the menu.
Picture viewer 106 Full-screen display: press the picture. X To show the menu: press the picture again. X Picture lists X Press B in the picture viewer (Y page 105). The list of pictures appears. >> Video. Displaying pictures : To search for a picture file ; To scroll in the list = To select the next highest folder level You can view the pictures individually or as a slide show. X To display the next or previous picture: press û or ü in the picture viewer (Y page 105).
107
108