X-Port™ 20 Switch (XP20-2000i) Installation Guide for a 2000i with an NEC MT860 or NEC MT1060 Projector 99-00486-00 Rev B0
FCC Warning This equipment has been tested and found to comply with the limits for a Class A digital device, pursuant to Part 15 of the FCC Rules. These limits are designed to provide reasonable protection against harmful interference when the equipment is operated in a commercial environment. This equipment generates, uses and can radiate radio frequency energy and, if not installed and used in accordance with the manufacturer’s instructions, may cause harmful interference to radio communications.
Contents Installing the X-Port 20 Switch in a 2000i-DV/DVX..........................1 To install the X-Port 20 switch .................................................................. 1 To connect a Guest Laptop....................................................................... 7 Contacting SMART Technical Support ............................................8 General Inquiries ........................................................................................... 8 Warranty .......................
99-00486-00 Rev B0
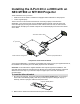
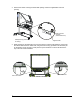
Installing the X-Port 20 in a 2000i with an NEC MT860 or MT1060 Projector These instructions show you how to: • install an X-Port 20 switch in a 2000i that’s equipped with an NEC 860 or 1060 projector • connect a guest laptop The X-Port 20 unit is an RS-232 serial switch for connecting a laptop to the interactive whiteboard. A user can then write over the displayed laptop image with a pen tray stylus and control the laptop by touching the interactive screen.
3. Remove the sticker covering the lower DB9 opening. Place the supplied label over this opening. Com put er 2 DB9 Connector Opening (Sticker Removed) 2000i (Back Leg Removed for Clarity) Supplied Label 4. While propping up the Electronics tray with one hand (so it doesn’t fall suddenly), remove the two button head screws on either side, using the 5/32" hex key (provided in the accessory kit for the 2000i).
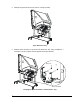
5. Carefully swing the Electronics tray down so it hangs vertically. Open Electronics Tray 6. Install the X-Port 20 switch on the studs in the Electronics Tray. Using a Phillips No. 1 screwdriver, secure it in place with the supplied screws and washers.
7. Unplug the DB9 cable from the serial controller and plug it into the gender changer on the XPort 20 switch. Unplug DB9 cable from here Serial Controller X-Port 20 Switch Plug DB9 cable into gender changer 8. Attach the loose end of the DB9 female-female ribbon cable to the serial controller using the supplied screws. Then tie wrap the ribbon cable and serial cable in place as shown.
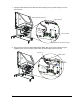
. If you don’t have a Room Control Module installed, attach the supplied MOD6 cable to the audio amplifier and the X-Port 20 switch. Then go to step 12. Supplied MOD6 Cable Audio Amplifier 10. If you have a Room Control Module installed, disconnect the MOD6 cable (that runs between the audio amplifier and the Room Control Module) from the audio amplifier and connect it to the X-Port 20 switch (either of the two MOD6 connectors is fine).
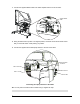
11. Connect the supplied MOD6 cable to the audio amplifier and the X-Port 20 switch. Supplied MOD6 Cable 12. Swing the Electronics tray back to its original position, and insert the two button head screws that you removed earlier. Avoid pinching any cables. 13. Connect the supplied three-cable laptop harness to the rear of the 2000i. Audio Amplifier Connector BNC Connectors Red Green Blue H BNC x 5 Cable DB9 Connector V 3.
To connect a Guest Laptop 1. Extend the laptop end of the umbilical from the rear of the 2000i until it reaches the laptop/videoconferencing shelf. 2. Connect the three cables that comprise the laptop end of the umbilical − the Computer 2 Audio, Computer 2 Video and Computer 2 Serial − to the appropriate connectors on the guest laptop. 3. If the laptop is off, turn it on. 4. Press the Display Source button to switch to the guest-laptop video source.
Customer Support SMART’s Technical Support team welcomes your call. However, you may want to contact your local reseller first if you experience problems with any SMART product. SMART’s resellers can readily provide you with quick advice so you can enjoy the benefits of the X-Port 20 switch for the Rear Projection SMART Board 2000i interactive whiteboard without delay. Contacting SMART Technical Support All SMART software includes free telephone, fax and e-mail support.