
User manual

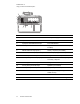
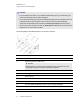


Table Of Contents
- Contents
- Important information
- Chapter 1: About your interactive whiteboard system
- Chapter 2: Installing your interactive whiteboard system
- Chapter 3: Using your interactive whiteboard system
- Appendix 4: Integrating other devices
- Chapter 5: Maintaining your interactive whiteboard system
- Chapter 6: Troubleshooting your interactive whiteboard system
- Before you start
- Determining your interactive whiteboard system’s status
- Resolving interactive whiteboard issues
- Resolving projector issues
- Resolving ECP issues
- Accessing the service menu
- Transporting your interactive whiteboard system
- Appendix A: Remotely managing your system through a network interface
- Appendix B: Remotely managing your system through an RS-232 serial interface
- Connecting your room control system to the ECP
- Projector programming commands
- Appendix C: Remote control code definitions
- Appendix D: Hardware environmental compliance
- Index

C H A P T E R 3
Using your interactive whiteboard system
21 smarttech.com/kb/170401
Adjusting the image
Refer to these notes when adjusting the projected image as described in the included SMARTBoard
880i6 and 885i6 interactive whiteboard system installation guide (smarttech.com/kb/170499).
l While adjusting the projected image size, shape and location, use the projector’s default
background so that you can see the full projected image clearly. Don’t use other images, which
might be cropped or scaled by the projector and could result in a misleading projected image
size, shape and location.
l Use the mechanical adjustments described in the installation document to make all physical
image adjustments. Don’t use the projector’s on-screen menu options during the projector
alignment process.
l Be aware that as you tilt the projector up or lower its mounting boom to raise the image, the entire
projected image increases or decreases in size, especially at the bottom of the projected image.
l When adjusting keystone (tilt), ensure that the top and bottom edges of the image are horizontal
before you position the left and right edges of the image relative to your interactive whiteboard.
l When you move the projector forward or backward on the boom to make the image larger or
smaller, you might need to tilt or turn the projector slightly to keep the image square. Loosen the
lever slightly to aid in this adjustment.
l To fine-tune the image, you might need to repeat all steps described in the installation document
in smaller increments.
Projector connection diagram
You can connect a variety of peripheral devices to your projector, including DVD/Blu-ray players,
VCRs, document cameras, digital cameras and high-definition sources, as well as peripheral device
outputs, such as a secondary projector or a flat-panel display and powered speakers.
N O T E
You might need to purchase third-party adapters to connect certain peripheral devices.