Installation and User’s Guide SMART Hub SE240
Product Registration If you register your SMART product, we’ll notify you of new features and software upgrades. Register online at www.smarttech.com/registration.
Important Information WARNING Failure to follow the installation instructions shipped with the SMART Hub SE240 could result in personal injury and damage to the product. WARNING Ensure that any cables extending across the floor to the SMART Hub SE240 are properly bundled and marked to avoid a trip hazard. WARNING Make sure an electrical socket is near the SMART Hub SE240 and remains easily accessible during use.
ii Important Information
Table of Contents Important Information i About the SMART Hub SE240 1 SMART Hub SE240 Features ......................................................................................................... 1 SMART Hub SE240 Firmware Features ......................................................................................... 2 Standard Accessories .....................................................................................................................
Customer Support 87 Online Support .............................................................................................................................. 87 Training ......................................................................................................................................... 87 Contacting SMART Technical Support .......................................................................................... 87 General Inquiries.................................................
About the SMART Hub SE240 The SMART Hub SE240 is a device you connect to SMART Board™ interactive whiteboards, SMART Boards for Flat-Panel Displays, Actalyst™ interactive overlays and Sympodium™ interactive pen displays.
The SMART Hub SE240 supports the following input and output formats: Computer Input Video Source Input Output • VGA • NTSC/PAL/SECAM SDTV (480i, 576i) • XGA • SVGA • EDTV (480p, 576p) • XGA • WXGA • SXGA • XWGA • SXGA • MAC The SMART Hub SE240 includes 256 MB DDR RAM, and its two fans cool the appliance while producing less than 30 dB noise at 16.4' (5 m).
Cables and Adapters SMART Technologies provides the following cables with the SMART Hub SE240: • 6' (1.8 m) DVI male to VGA male cable • 6' (1.8 m) DVI male to DVI male cable • DVI male to VGA female adapter to connect the SMART Hub SE240 to a projector or display using a VGA cable If your SMART product has a serial connector rather than a USB connector, your SE240S model will ship with a USB to serial adapter so that you can connect the SMART Hub SE240 to your SMART product.
4 About the SMART Hub SE240
Installing the SMART Hub SE240 Before installing the SMART Hub SE240, review the following topics. This chapter contains installation instructions as well as environmental and safety information. • Environmental Requirements (this page) • Before Installing the SMART Hub SE240 (this page) • Installing the SMART Hub SE240 (page 5) Environmental Requirements Before installing the SMART Hub SE240, review the following environmental requirements.
Additional Cables Required The SMART Hub SE240 comes with the cables and accessories documented on page 2. You may need the following additional cables: • a USB cable to connect the SMART Hub SE240 to your SMART product NOTE: Your SMART product comes with a USB cable if it has a USB connector.
To mount the SMART Hub SE240 on a 19" (48.3 cm) rack 1. Attach the mounting brackets to the sides of the SMART Hub SE240 using the screws provided with the unit. There are several methods to attach the brackets to the side of the SMART Hub SE240 for rack mounting. Use the method that works best for your rack. The following diagram shows a method in which you use two brackets and align the base of the mounting brackets with the back of the unit: 2. Mount the SMART Hub SE240 to the rack.
To mount the SMART Hub SE240 on a wall 1. Align the base of the mounting brackets with the bottom of the unit. 2. Attach the mounting brackets to the sides of the SMART Hub SE240 using the screws provided with the unit. 3. Mount the SMART Hub SE240 to the wall. NOTE: Use screws and anchors appropriate for the wall on which you’re mounting the SMART Hub SE240. IMPORTANT When mounting the SMART Hub SE240 on a wall, ensure that the side of the unit with the fans is on top.
To mount the SMART Hub SE240 on a table- or shelf-top 1. Align the base of the mounting brackets with the bottom of the unit. 2. Attach the mounting brackets to the sides of the SMART Hub SE240 using the screws provided with the unit. 3. Mount the SMART Hub SE240 to the table- or shelf-top. NOTE: Use screws appropriate for the table- or shelf-top on which you’re mounting the SMART Hub SE240.
To mount the SMART Hub SE240 under a shelf 1. Align the base of the mounting brackets with the top of the unit. 2. Attach the mounting brackets to the sides of the SMART Hub SE240 using the screws provided with the unit. 3. Mount the SMART Hub SE240 under the shelf. NOTE: Use screws appropriate for the shelf under which you’re mounting the SMART Hub SE240.
Connecting the SMART Hub SE240 After mounting the SMART Hub SE240, connect it to your SMART product and peripheral devices. To connect the SMART Hub SE240 1. Connect the SMART Hub SE240 to your SMART product.
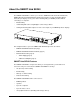
3. Connect the SMART Hub SE240 to your network. 12V DC Computer Audio R Composite Video Audio In L Audio Out 1 Computer 2 Computer 1 Video In USB R 1 Reset Network Computer 2 A RS-232 B 2 Video Out L S-video R Audio In L Cat 5 Cable 4.
5. Connect the SMART Hub SE240 to a power supply. 12V DC Computer Audio Composite Video R Audio In L Audio Out 1 Computer 2 Computer 1 Video In USB R 1 Reset Network Computer 2 A RS-232 B 2 L S-video R Audio In Video Out L Power Supply (provided with the SMART Hub SE240) NOTE: For instructions on connecting computers and video sources to the SMART Hub SE240, see page 22 and page 24. 6. Turn on your SMART product and its projector or display.
14 Installing the SMART Hub SE240
Configuring the SMART Hub SE240 This chapter explains how to configure the SMART Hub SE240 after installation. It includes information on connecting the SMART Hub SE240 to computers, video sources and a network.
To orient your SMART product using the SMART Hub SE240’s firmware 1. Press Menu, and then press Orient. OR Press both pen tray buttons simultaneously. (This option is only available for SMART products with pen trays.) 2. If multiple SMART products are connected to the SMART Hub SE240, press the surface of the SMART product you want to orient. The orientation screen appears. 3. Using a pen from your SMART product’s pen tray, press, hold and release the center of the first target. 4.
3. Using a pen from your SMART product’s pen tray, press, hold and release the center of the first target. 4. Repeat step 3 for each target. The orientation data saves to Notebook software. You’ve oriented your SMART product. NOTE: For more information on orienting your SMART product using Notebook software, see Notebook software online Help. Configuring Multiple SMART Hub SE240 Units If you have more than one SMART Hub SE240, you don’t have to configure each unit separately.
5. Press Administration. 6. Ensure the Enable USB storage device support check box is selected. 7. Press Export Settings. A dialog box appears. 8. Select the SMART Hub SE240 system settings check box to export configuration settings and the E-mail Contacts check box to export contacts. 9. Press OK. A dialog box appears. 10. Press OK. You’ve exported the configuration settings from one SMART Hub SE240 unit to a USB storage device.
To import configuration settings from a USB storage device 1. Connect the USB storage device to the SMART Hub SE240. 2. Press Menu. The Welcome Center appears. 3. Press Settings. The Settings dialog box appears. 4. If a password is required to change the configuration settings, type the password in the box at the bottom of the menu, and then press OK. NOTE: For information on the configuration settings password, see page 20. 5. Press Administration. 6.
9. Press OK. A dialog box appears. 10. Press Restart to end the current session and start a new session using the imported configuration settings. You’ve imported configuration settings from a USB storage device to a SMART Hub SE240 unit. Securing Configuration Settings You can assign a password to the configuration settings. Users must enter this password to change the configuration settings. TIP If you forget the password, contact SMART Technical Support. To secure configuration settings 1.
3. Press Administration. 4. Select the Require password to access system settings check box to require users to enter a password to change the configuration settings. The Settings password dialog box appears. NOTE: If the Require password to access system settings check box was previously selected, press Set Password to open the Settings Administrator Password dialog box. 5. Type the password in the Password and Confirm boxes. 6. Press OK. 7.
Connecting Computers to the SMART Hub SE240 You can connect two computers to the SMART Hub SE240. NOTE: You can connect additional computers to the SMART Hub SE240 through LinQ software (see page 33). After connecting a computer to the SMART Hub SE240, you can view its input on your SMART product’s display and do the following: • Draw digital ink notes. • Freeze the display. • Take screen captures. • Use the on-screen keyboard and right-click features of the SMART Hub SE240 firmware.
3. If a password is required to change the configuration settings, type the password in the box at the bottom of the menu, and then press OK. NOTE: For information on the configuration settings password, see page 20. 4. Press Input Configuration. 5. Open the DVI 1 tab if you are configuring the SMART Hub SE240 for the first computer. OR Open the DVI 2 tab if you are configuring the SMART Hub SE240 for the second computer. 6.
Connecting Video Sources to the SMART Hub SE240 You can connect up to two video sources to the SMART Hub SE240. Video sources include DVD players, VCRs and similar devices. After connecting a video source to the SMART Hub SE240, you can view its input on your SMART product’s interactive screen and do the following: • Draw digital ink notes. • Freeze the display. • Take screen captures. For more information, see page 71.
4. Press Input Configuration. 5. Press S-Video if you’re configuring the SMART Hub SE240 for the first video source. OR Press Composite if you’re configuring the SMART Hub SE240 for the second video source. 6. If desired, clear the Add a button for this input in the shortcut menu check box to remove the button for the video source input from the shortcut menu. NOTE: For information on the shortcut menu, see page 46. 7. In the Input device name box, type a name for the video source. 8. Press Apply All.
To configure the display settings 1. Press Menu. The Welcome Center appears. 2. Press Settings. The Settings dialog box appears. 3. If a password is required to change the configuration settings, type the password in the box at the bottom of the menu, and then press OK. NOTE: For information on the configuration settings password, see page 20. 4. Press Display Configuration.
6. In the Aspect ratio list, select an aspect ratio: – Standard preserves the computer or video source input’s aspect ratio. (Letterboxing) (Pillar-boxing) Computer or Video Source Input – SMART Product Output Full screen changes the computer or video source input to match your SMART product’s aspect ratio.
– Cropped crops the computer or video source input to match your SMART product’s aspect ratio. Computer or Video Source Input – SMART Product Output Enhanced widescreen changes the computer or video source input to a widescreen (16:9) aspect ratio. Computer or Video Source Input SMART Product Output 7. In the Enter sleep mode after list, select the number of minutes you want to pass before the SMART Hub SE240 times out. 8.
Configuring Networking and Conferencing Settings Connect the SMART Hub SE240 to a network to take advantage of its networking and conferencing features.
6. Press Network Address (if this tab doesn’t currently appear). 7. Select the Use DHCP (automatically detect network settings) option to configure networking settings automatically. OR Select the Manually specify network settings and addresses option to configure networking settings manually, and then type the appropriate information (as supplied by your network administrator) in the following boxes: – IP address – Subnet mask – Default gateway – DNS server 1 – DNS server 2 8. Press Apply All.
5. Press E-Mail (SMTP). 6. In the SMTP server name box, type the name of the SMTP server (for example, mail). 7. In the Port number box, type the port number of the SMTP server (for example, 25). NOTE: 25 is the default port number for SMTP. 8. In the Domain name box, type the domain name of the SMTP server (for example, yourcompany.com). 9. Press Apply All. You’ve configured the SMTP settings of the SMART Hub SE240. To configure network management (SNMP) settings 1. Press Menu.
5. Press Management, Room Control. 6. Select the Enable remote management of SMART Hub SE240 check box to enable the SNMP settings of the SMART Hub SE240. 7. Select the Use the settings password as the SNMP read/write strings option to use the general settings password for the SNMP read/write strings.
To configure LinQ software 1. Press Menu. The Welcome Center appears. 2. Press Settings. The Settings dialog box appears. 3. If a password is required to change the configuration settings, type the password in the box at the bottom of the menu, and then press OK. NOTE: For information on the configuration settings password, see page 20. 4. Press Network and Conference. 5. Press Conferencing. 6. Select the Enable sharing with LinQ software check box to connect to LinQ software client computers. 7.
To configure Bridgit conferencing software IMPORTANT To use the Bridgit conferencing software features in the SMART Hub SE240, you must do one of the following: • Purchase and install Bridgit server software. • Purchase a subscription for the Bridgit conferencing service. • Install a trial version of Bridgit software for 30 days, and then purchase the server software or service from SMART Technologies. • Be invited to a conference by a person or organization with Bridgit software.
7. In the Bridgit server box, type the URL of the Bridgit conferencing software server (for example, bridgit.yourcompany.com). 8. In the Default conference box, type a default, easy-to-identify name for all Bridgit software conferences created with the SMART Hub SE240. 9. In the Viewing password box, type a password that participants must enter to view Bridgit software conferences created with the SMART Hub SE240. 10.
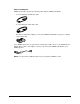
To connect the computer or room control system to the SMART Hub SE240 Connect the SMART Hub SE240 to the computer or room control system using the female RS-232 connector. Female RS-232 Connector IMPORTANT The female RS-232 connector is for room control only. To enable the SMART Hub SE240’s room control mode 1. Press Menu. The Welcome Center appears. 2. Press Settings. The Settings dialog box appears. 3.
5. Select the Enable room control with RS-232 check box. 6. Press Apply All. You’ve enabled the SMART Hub SE240’s room control mode through the serial interface. To configure your serial interface settings The SMART Hub SE240’s serial interface settings aren’t configurable. Therefore, configure your computer’s serial communication program, such as Microsoft® HyperTerminal, or your room control system’s serial communication settings to the following values.
5. Press Network and Conference. 6. Press Management, Room Control. 7. Select the Enable room control via telnet check box. 8. In the Port number text box, type the port number for TELNET. NOTE: 23 is the default port number for TELNET. 9. Press Apply All. You’ve connected a computer or room control system to the SMART Hub SE240 through TELNET.
Power State Commands The following table presents the power state commands. Command Description on Turns on the SMART Hub SE240. off Turns off the SMART Hub SE240. NOTE: Alternatively, use the command off now. Requests the SMART Hub SE240 power state.
Video and Audio Commands The following table presents the video and audio commands.
IMPORTANT The initial version of the SMART Hub SE240 firmware does not support these other languages. A later version of the firmware will support these languages. For instructions on updating to the latest version of the firmware, see page 75. In addition, you can view the SMART Hub SE240’s system information, including the firmware version, Internet Protocol (IP) address and Media Access Control (MAC) address. To set the SMART Hub SE240’s user interface language 1. Press Menu.
To view system information 1. Press Menu. The Welcome Center appears. 2. Press Settings. The Settings dialog box appears. 3. If a password is required to change the configuration settings, type the password in the box at the bottom of the menu, and then press OK. NOTE: For information on the configuration settings password, see page 20. 4. Press System and Language. 5. View the system information. You’ve viewed the system information. To disable system hardware settings 1. Press Menu.
4. Press Administration. 5. Clear the Enable RJ45 Ethernet port check box to disable networking settings. 6. Clear the Enable USB storage device support check box to disable USB storage device settings. 7. Press Apply All. You’ve disabled system hardware settings.
44 Configuring the SMART Hub SE240
Using the SMART Hub SE240 This chapter explains how to use the features of the SMART Hub SE240 with your SMART product. The SMART Hub SE240’s features include Whiteboard, Bridgit conferencing software and the ability to connect to computers and video sources.
Welcome Center The Welcome Center allows you to create or open Whiteboard files, Bridgit software conferences, and computer and video source sessions, as well as open the Settings dialog box to configure the SMART Hub SE240 (see page 15) and end the current session (see page 74). The Welcome Center appears when you start a SMART Hub SE240 session. If you’re in a Whiteboard file, Bridgit software conference, or computer or video source session, open the Welcome Center by pressing Menu in the toolbar.
Toolbar The toolbar appears at the bottom of the display in Whiteboard files, Bridgit software conferences, and computer and video source sessions. The buttons in the toolbar differ depending on the type of session. Whiteboard Toolbar Computer or Video Source Toolbar NOTE: See the quick reference included with the SMART Hub SE240 for descriptions of the toolbar buttons. To minimize the toolbar, press Minimize .
SMART Keyboard If there’s no keyboard connected to the SMART Hub SE240, you can use SMART Keyboard to type information. To open SMART Keyboard Press Keyboard . SMART Keyboard appears. NOTE: SMART Keyboard uses the QWERTY layout. Right-Click If you connect a computer to the SMART Hub SE240 (see page 68) and there’s no mouse connected to the SMART Hub SE240, you can simulate a right-click by pressing Right-Click and then pressing the interactive screen with your finger.
Online Help The SMART Hub SE240 includes online Help. To view the online Help Open the Welcome Center, and then press Help. The Help Topics window appears. Starting a SMART Hub SE240 Session There are two situations in which you need to start a new SMART Hub SE240 session. Situation Procedure Your SMART product is off. Turn on your SMART product as documented in its user’s guide. Your SMART product is on but the display is blank.
When you start a new session, the Welcome Center appears. Whiteboarding Whiteboard allows you to capture notes and drawings in digital ink on your SMART product. Use Whiteboard for brainstorming, note taking and other activities for which you want to use your SMART product’s digital ink tools without connecting to a computer. Getting Started To use Whiteboard, create or open a Whiteboard file.
To create a Whiteboard file 1. Press Menu. The Welcome Center appears. 2. Press Whiteboard.
3. Press Whiteboard. OR Press New File. A new file opens. You’ve created a new Whiteboard file.
To open a Whiteboard file 1. Connect the USB storage device that contains the Whiteboard file to the SMART Hub SE240. 2. Press Menu. The Welcome Center appears. 3. Press Whiteboard. 4. Press Open File. The Open dialog box appears. 5. In the Look in list, select the USB storage device’s drive letter.
6. Browse to and select the file. 7. Press Open. The file opens. You’ve opened an existing Whiteboard file.
To draw digital ink 1. Pick up a pen from your SMART product’s pen tray. OR Press Pen . The pen toolbar appears. 2. In the pen toolbar, select the appropriate color and thickness options. 3. Draw digital ink. To erase digital ink 1. Pick up the eraser from your SMART product’s pen tray. OR Press Eraser . 2. Erase digital ink.
To add a page to the Whiteboard file Press Add Page . A new page appears after the currently selected page. To delete a page from the Whiteboard file Open the page you want to delete, and then press Delete Page . The page deletes. NOTE: If there’s only one page in the file, pressing Delete Page deleting it. clears the page rather than Saving or E-mailing a Whiteboard File You can save your Whiteboard file on a USB storage device or e-mail it in one of the following formats: 56 • Whiteboard file (.
After saving a file on a USB storage device, you can open, view and edit it in Whiteboard or on a computer with Notebook software. To save a Whiteboard file 1. Connect a USB storage device to the SMART Hub SE240. 2. Press Save . The Save dialog box appears. 3. In the Look in list, select the USB storage device’s drive letter. 4. Browse to the folder where you want to save the file. NOTE: Create a new folder for the file by pressing New Folder . 5. In the File name box, type a file name. 6.
To e-mail a Whiteboard file 1. Press E-mail . The E-mail dialog box appears. 2. In the Recipient list, select the recipient. OR In the E-mail address box, type the recipient’s e-mail address. NOTES – Add a new recipient or edit the list of recipients by pressing the appropriate button in the upper-right corner of the E-mail dialog box: Add a New Recipient Edit the List of Recipients – 58 If you’re using SMART Keyboard to enter e-mail addresses, press Shift to view the key for the @ symbol.
3. In the Save as type list, select a file type: – Whiteboard File (.notebook) – JPEG Archive (.zip) – Portable Document Format (.pdf) NOTE: If you select JPEG Archive (.zip) file, the SMART Hub SE240 saves each page in the Whiteboard file as a JPEG image file inside an archive file. 4. Press Send E-mail. You’ve e-mailed the Whiteboard file. Collaborating Bridgit conferencing software is a client/server application that lets you collaborate with anyone, anywhere in the world.
To create a Bridgit software conference 1. Press Menu. The Welcome Center appears. 2. Press Collaborate. 3. Press Create Conference. The Create Conference dialog box appears. 4. In the Conference box, type a name for the conference. NOTE: You define the default name in this box in the SMART Hub SE240 settings (see page 29). 5. In the Password and Confirm boxes, type a password for the conference (if you want to assign a password to the conference).
6. Press Create. The Bridgit software conference screen appears. Do not proceed to step 7. OR The Password Required dialog box appears if the server administrator has assigned a password for creating conferences. Proceed to step 7. 7. In the Creation Password box, type the password for creating conferences, and then press OK. The Bridgit software conference screen appears. You’ve created a Bridgit software conference.
To join a Bridgit software conference 1. Press Menu. The Welcome Center appears. 2. Press Collaborate. 3. Press Join Conference. The Conference Connection dialog box appears.
4. Select the Bridgit software conference you want to join, and then press Join. The Join Conference dialog box appears if the Bridgit software conference owner has assigned a password for joining the conference. Proceed to step 5. OR The Bridgit software conference screen appears. Don’t proceed to step 5. 5. In the Password box, type the password, and then press OK. The Bridgit software conference screen appears. You’ve joined an existing Bridgit software conference.
To share your display 1. Press Share This Display or Share . A blue border appears around your display. NOTE: If you’re a participant in another person’s Bridgit software conference, the other person must approve your request before you can share your display. 2. Open a Whiteboard file or a computer or video source session. For information on Whiteboard files, see page 50. For information on computer and video source sessions, see page 68 and page 71.
To view another participant’s display Other participants can share their displays. When they do, a red border appears around the display. Depending on how the owner or presenter configures the Bridgit software conference settings (see page 66), you can draw digital ink on the participant’s display or request remote control of the other participant’s display. To request remote control of another participant’s display Press Request Remote Control .
To relinquish remote control of another participant’s display Press Relinquish Remote Control . You’ve relinquished remote control of the other participant’s display. To chat with other participants 1. Press Participant List . The Participant List dialog box appears. 2. Press . 3. Type a message. 4. Press Send. You’ve sent a chat message to all participants in the Bridgit software conference.
To configure the Bridgit software conference settings 1. Press Options . The Conference Options dialog box appears. 2. Select the Allow others to draw check box to allow other participants to draw digital ink notes when you’re sharing your display. 3. Select the Allow others to share their desktop check box to allow other participants to share their displays. 4. Select the Allow others to use chat check box to allow other participants to chat. 5.
To leave a Bridgit software conference Press Exit Conference . OR 1. Press Menu. The Welcome Center appears. 2. Press Collaborate. 3. Press Exit Conference. You’ve left the Bridgit software conference. Connecting to Computers and Video Sources You can connect the SMART Hub SE240 to up to two computers and two video sources (see page 22 and page 24).
To connect to a local computer 1. Press Menu. The Welcome Center appears. 2. Press Computer Access. 3. Press one of the computer input buttons. NOTE: The default label of the first DVI input button is Computer 1, and the default label of the second DVI input button is Computer 2. However, you can change these labels. For more information, see page 22. The computer’s input appears. You’ve connected to a local computer.
To connect to a LinQ software client computer 1. Start LinQ software on the client computer. NOTE: You can download LinQ software for client computers from the SMART Technologies website. 2. Press Menu. The Welcome Center appears. 3. Press Computer Access. 4. Press one of the buttons in the LinQ Connected Clients group box. The computer’s input appears. You’ve connected to a LinQ software client computer.
To connect to a video source 1. Press Menu. The Welcome Center appears. 2. Press Watch Video. 3. Press one of the video source input buttons. NOTE: The default label of the S-video input button is Video 1, and the default label of the composite input button is Video 2. However, you can change these labels. For more information, see page 24. The video source’s input appears. You’ve connected to a video source.
To erase digital ink 1. Pick up the eraser from your SMART product’s pen tray. OR Press Eraser . 2. Erase digital ink. To clear the display Press Clear. Your digital ink notes clear from the display. To freeze the display Press Freeze. The display freezes. NOTE: To unfreeze the display, press Resume. IMPORTANT Pressing Freeze only freezes the image on the display. It does not pause the computer or video input. To take a screen capture 1. Press Capture. 2. Press Menu. The Welcome Center appears.
3. Press Whiteboard. 4. Press Whiteboard. A Whiteboard file opens. The last page in the file contains a screen capture of the display.
Ending a SMART Hub SE240 Session When you’ve finished using the SMART Hub SE240, you can end your session. Ending your session: • closes open Whiteboard files • closes open Bridgit software conferences • disconnects LinQ software client computers To end a SMART Hub SE240 session 1. Press Menu, and then press End Session. The End Session dialog box appears. 2. Press Yes. The Save Changes? dialog box appears. 3. Press Save to save the changes. OR Press E-mail to e-mail the changes.
Maintaining the SMART Hub SE240 In this chapter, you’ll find the following information and procedures to keep the SMART Hub SE240 operating reliably. • Updating the SMART Hub SE240 Firmware (this page) • Maintaining the SMART Hub SE240 Hardware (page 80) Updating the SMART Hub SE240 Firmware SMART Technologies periodically releases firmware updates that introduce new functionality or correct known issues with existing functionality.
NOTE: You need a Windows computer with Internet access that you can connect to the SMART Hub SE240 through a USB cable. The computer must have a monitor or be a laptop so that you can view and interact with the wizards during the update process. To install the SMART Hub SE240 updater 1. In your browser, go to www.smarttech.com/SE240firmware. 2. Click Download, and then follow the on-screen instructions. 3. After the file finishes downloading, open it. The SMART Hub SE240 Update wizard appears. 4.
To connect the SMART Hub SE240 to the computer 1. Press and hold down Reset on the SMART Hub SE240 until the indicator light turns solid yellow. 2. Connect a USB cable from the second USB B receptacle on the SMART Hub SE240 to your computer. Second USB B Receptacle The Found New Hardware wizard appears. 3. Select the No, not this time option, and then click Next. 4. Select the Install the software automatically option, and then click Next. The Hardware Installation window appears.
5. Click Continue Anyway. 6. Click Finish. The Found New Hardware wizard closes. You’ve connected the SMART Hub SE240 to the computer. NOTE: You only need to complete the new hardware installation procedure once. To update the firmware 1. In Windows Explorer, browse to C:\Program Files\SMART Hub SE240 Update Wizard, and then double-click SMART Hub SE240 x.x.x.x-Updater.exe, where x.x.x.x is the current version of the firmware. The SMART Hub SE240 Update wizard appears. 2. Click Next. 3.
8. Click Finish. The SMART Hub SE240 Update wizard closes. 9. Reset the SMART Hub SE240 (see page 81). NOTE: The initial reset after updating the firmware may take several minutes. You’ve updated the SMART Hub SE240 firmware to the latest version. Updating the Firmware Through a USB Storage Device You can also update the firmware through a USB storage device. To update the firmware through a USB storage device 1. Connect the USB storage device to a computer with Internet access. 2.
8. Press Administration. 9. Press Firmware Update. A dialog box appears. 10. Select the Bootloader check box, and then press OK. 11. Press Restart. 12. Repeat steps 5 to 11 for the application file. NOTE: The initial reset after updating the firmware may take several minutes. You’ve updated the SMART Hub SE240 firmware to the latest version. Maintaining the SMART Hub SE240 Hardware The SMART Hub SE240 hardware requires little maintenance.
Troubleshooting the SMART Hub SE240 In this chapter, you’ll find the following information and procedures to help you troubleshoot and resolve problems with the SMART Hub SE240. • Connecting the SMART Hub SE240 (this page) • Resetting the SMART Hub SE240 (this page) • General SMART Hub SE240 Troubleshooting (page 82) Connecting the SMART Hub SE240 The following image presents the connections for the SMART Hub SE240.
The current SMART Hub SE240 session ends, and the Welcome Center appears. NOTE: If the Welcome Center doesn’t appear after 30 seconds, press and release Reset again. General SMART Hub SE240 Troubleshooting Use this table to help troubleshoot general issues with the SMART Hub SE240. Symptom/Observation Action/Solution Your SMART Board interactive • Ensure the SMART Hub SE240 is properly connected to your whiteboard or other product SMART product. See page 11. doesn’t respond to touch.
Symptom/Observation Action/Solution You’re unable to use the SMART Hub SE240’s networking features (Bridgit conferencing software, LinQ software and e-mail). • Ensure the SMART Hub SE240 is properly connected to your network. See page 11. • Press Menu to open the Welcome Center, press Settings, and then assign an IP address to the SMART Hub SE240 and enable networking features. See page see page 29 and page 42.
84 Troubleshooting the SMART Hub SE240
Regulatory Compliance Waste Electrical and Electronic Equipment Regulations Waste Electrical and Electronic Equipment regulations apply to all electrical and electronic equipment sold within the European Union. When you dispose of any electrical or electronic equipment, including SMART products, we strongly encourage you to contact your local WEEE recycling agency for recycling and disposal advice. Your SMART product required the extraction and use of natural resources for its production.
86 Regulatory Compliance
Customer Support Online Support Visit www.smarttech.com/support to view and download user’s guides, “how-to” and troubleshooting articles, software and more. Training Visit www.smarttech.com/trainingcenter for training materials and information about our training services. Contacting SMART Technical Support SMART Technical Support welcomes your call. However, if you experience difficulty with your SMART product, you may want to contact your local reseller first.
Warranty Product warranty is governed by the terms and conditions of SMART’s “Limited Equipment Warranty” that shipped with the SMART product at the time of purchase. Registration To help us serve you, register online at www.smarttech.com/registration. 88 Customer Support Part No.
Index # digital ink notes clearing, 72 drawing, 55, 71 erasing, 55, 72 displays clearing, 72 freezing, 72 relinquishing remote control of, 66 requesting remote control of, 65 sharing, 64 stop sharing, 64 viewing another participant’s, 65 disposal, 85 DNS servers, 30 downloads, 76 drills, 5 drivers, 77–78 dust, 5 DVD players, 24–25, 71 DVI, 3, 6, 11, 22, 39 19" (48.
firmware, 75–80 flash drives, See USB storage devices fluid resistance, 5 French, 40 maintenance, 75–80 menus Settings, 15–43 shortcut, 46 Welcome Center, 46 MIB files, 32 Microsoft HyperTerminal, 37 Minimize button, 47 mounting, 6–10 mouse devices, 82 multiple units, 17–20 mute, 48 G gateways, 30 German, 40 H hardware, 80 hardware settings, 42–43 Help, See online Help home, See Welcome Center humidity, 5 HyperTerminal, 37 N network connections, 12, 29–32, 43 Notebook software, 16–17, 57, 68 notificatio
R S-video cables, 6, 24 SXGA, 2 Sympodium interactive pen displays, 1 See also SMART product connections system maintenance, 75–80 system settings, 40–43 rack mounting, 7 radiated emissions, 5 RCA cables, 6, 24 recycling, 85 Registering Your Slate, 88 regulatory compliance RoHS directives, 85 WEEE equipment regulations, 85 releases, See versions remote control, 65–66 Reset button, 81–82 resolution, 26 right-click, 48 room control, 35–40 RS-232, See serial connectors RS-45, See network connections T table
wizards driver installer, 77–78 firmware updater, 78–79 update installer, 76 WXGA, 2 X XGA, 2 XWGA, 2 Z zip files, 56 92 Index
SMART Technologies 1207 – 11 Avenue SW, Suite 300 Calgary, AB T3C 0M5 CANADA www.smarttech.com/support wwww.smarttech.com/contactsupport Support +1.403.228.5940 or Toll Free 1.866.518.