
User Manual

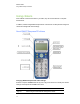
Table Of Contents
- Important information
- Chapter 1: About the SMART Response system
- Chapter 2: Getting started
- Using your SMART Response system
- Environmental requirements
- Computer requirements
- Connecting hardware and activating SMART Response software
- Activating SMART Response software
- Selecting how students answer questions
- Starting SMART Response LE software the first time
- Asking instant questions
- Setting up Teacher Tools
- Creating a class list
- Editing a class list
- Chapter 3: Using SMART Response software
- About SMART Notebook software
- Creating assessments
- Adding questions to the assessment
- About question types
- Adding questions using the Insert Question wizard
- About intelligent expression grading
- Creating answer keys
- Importing questions from a Word document
- Example Word document question formats
- Importing questions from an XML or SQZ file
- Importing questions from a PDF file
- PDF document formatting
- Importing questions from ExamView HTML
- Exporting ExamView tests
- About ExamView HTML question importing
- Setting answers for imported questions
- Adding choices to a question
- Tagging questions
- Starting and connecting to a class
- Connecting to the class
- Disconnecting students from a class
- Using clickers
- Completing assessments
- Chapter 4: Reviewing, printing and exporting assessment results
- Chapter 5: Maintaining your SMART Response system
- Appendix A: Hardware environmental compliance
- Waste Electrical and Electronic Equipment Regulations (WEEE directive)
- Restriction of Certain Hazardous Substances (RoHS directive)
- Batteries
- Packaging
- Covered electronic devices
- China’s Electronic Information Products regulations
- U.S. Consumer Product Safety Improvement Act
- California Air Resources Board – Airborne Toxic Control Measure
- Restriction of Certain Chemicals (REACH directive)

2. Press the Enter button to join the last class.
OR
Press the Down button to select Find a class, and then press Enter.
The clicker scans for classes, and then displays a list of classes within range. Press the Up
and Down buttons to select the correct class, and then press Enter.
A connecting message appears, followed by a message asking for an ID number.
3. Press the number buttons to enter your ID number, and then press Enter.
If the ID is valid, a message appears asking you to confirm your name.
N N O T E
If the teacher selected the Lock Sign In option, a message appears on the clicker indicating
that the student can't sign in at this time, and then a Retry option appears.
4. Press the Enter button to connect.
A welcome message appears.
g To connect XEclickers in Sign In mode
After you start a class, tell your students to follow this procedure.
1. Press the clicker's Power button for one second.
A message appears asking if you want to join the last class the clicker was connected to or find
a different class.
2. Use the soft keys to join the last class.
OR
Use the soft keys to find a class, and then select the class.
A connecting message appears, followed by a message asking for an ID number.
3. Press the number buttons to enter your ID number, and then press the soft key to sign in.
If the ID is valid, a message appears asking you to confirm your name.
N N O T E
If the teacher selected the Lock Sign In option, a message appears on the clicker indicating
that the student can't sign in at this time, and then a Retry option appears.
4. Press the soft key to connect.
A welcome message appears.
C H A P T E R 3
Using SMARTResponse software
68