
User Manual

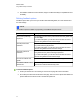
Table Of Contents
- Important information
- Chapter 1: About the SMART Response system
- Chapter 2: Getting started
- Using your SMART Response system
- Environmental requirements
- Computer requirements
- Connecting hardware and activating SMART Response software
- Activating SMART Response software
- Selecting how students answer questions
- Starting SMART Response LE software the first time
- Asking instant questions
- Setting up Teacher Tools
- Creating a class list
- Editing a class list
- Chapter 3: Using SMART Response software
- About SMART Notebook software
- Creating assessments
- Adding questions to the assessment
- About question types
- Adding questions using the Insert Question wizard
- About intelligent expression grading
- Creating answer keys
- Importing questions from a Word document
- Example Word document question formats
- Importing questions from an XML or SQZ file
- Importing questions from a PDF file
- PDF document formatting
- Importing questions from ExamView HTML
- Exporting ExamView tests
- About ExamView HTML question importing
- Setting answers for imported questions
- Adding choices to a question
- Tagging questions
- Starting and connecting to a class
- Connecting to the class
- Disconnecting students from a class
- Using clickers
- Completing assessments
- Chapter 4: Reviewing, printing and exporting assessment results
- Chapter 5: Maintaining your SMART Response system
- Appendix A: Hardware environmental compliance
- Waste Electrical and Electronic Equipment Regulations (WEEE directive)
- Restriction of Certain Hazardous Substances (RoHS directive)
- Batteries
- Packaging
- Covered electronic devices
- China’s Electronic Information Products regulations
- U.S. Consumer Product Safety Improvement Act
- California Air Resources Board – Airborne Toxic Control Measure
- Restriction of Certain Chemicals (REACH directive)

6. Use SMART Notebook's tools to add text, images or Adobe Flash Player compatible files from
the Gallery.
Defining feedback options
Feedback options allow you to show your students their individual grades, the correct answers and
the class average.
N N O T E
The feedback options available vary depending on the SMART Response mode.
Feedback option Description
After you stop collecting
responses
The students can see how they answered and see their grades after
you click Stop.
If you select this option, you can also choose to show the correct
answers with grades and show class average.
After all questions are
answered
The students can see how they answered and see their grades after
they finish answering all questions.
If you select this option, you can also choose to show the correct
answers with grades and show the class average.
After each question is
answered
The students can see how they answered each question and see
their grades after they finish answering all questions.
If you select this option, you can also choose to show the correct
answers with grades and show class average.
Don't show students their
grades
The students can't see how they answered or their grades.
Don't allow students to save
assessment
Students using SMARTNotebook SE software can't save the
assessment to their binders after they finish.
g To define feedback options
1. Create your assessment. See Creating an assessment on page 42 for more information.
2. On the Response tab for the assessment's title page, select one of the options described in the
previous table from the Show results to students drop-down list.
C H A P T E R 3
Using SMARTResponse software
44