
User Manual


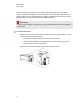
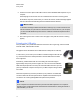
Table Of Contents
- Important information
- Chapter 1: About the SMART Response system
- Chapter 2: Getting started
- Using your SMART Response system
- Environmental requirements
- Computer requirements
- Connecting hardware and activating SMART Response software
- Activating SMART Response software
- Selecting how students answer questions
- Starting SMART Response LE software the first time
- Asking instant questions
- Setting up Teacher Tools
- Creating a class list
- Editing a class list
- Chapter 3: Using SMART Response software
- About SMART Notebook software
- Creating assessments
- Adding questions to the assessment
- About question types
- Adding questions using the Insert Question wizard
- About intelligent expression grading
- Creating answer keys
- Importing questions from a Word document
- Example Word document question formats
- Importing questions from an XML or SQZ file
- Importing questions from a PDF file
- PDF document formatting
- Importing questions from ExamView HTML
- Exporting ExamView tests
- About ExamView HTML question importing
- Setting answers for imported questions
- Adding choices to a question
- Tagging questions
- Starting and connecting to a class
- Connecting to the class
- Disconnecting students from a class
- Using clickers
- Completing assessments
- Chapter 4: Reviewing, printing and exporting assessment results
- Chapter 5: Maintaining your SMART Response system
- Appendix A: Hardware environmental compliance
- Waste Electrical and Electronic Equipment Regulations (WEEE directive)
- Restriction of Certain Hazardous Substances (RoHS directive)
- Batteries
- Packaging
- Covered electronic devices
- China’s Electronic Information Products regulations
- U.S. Consumer Product Safety Improvement Act
- California Air Resources Board – Airborne Toxic Control Measure
- Restriction of Certain Chemicals (REACH directive)

Choose a location for the receiver that’s as high as possible and in plain view of the students’
clickers. For permanent installations, use a USB extender to mount the receiver high on a wall. To
minimize interference from other radio-frequency equipment, position the receiver away from other
wireless products, such as 2.4 GHz routers and cordless telephones.
W W A R N I N G
To prevent product damage or personal injury, route the USB cable where it will not be stepped on
or tripped over.
g To connect the receiver
1. Position the receiver in an unobstructed location away from other wireless products, such as
2.4 GHz routers and cordless telephones.
o
For temporary installations, place the receiver on top of your desk.
o
For permanent installations, mount the receiver on a wall or on the front of a piece of
furniture using two screws (not provided).
Orient the receiver with the long side or edge facing the class as shown.
C H A P T E R 2
Getting started
12