
User's Manual
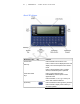
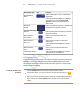
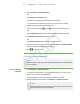
Table Of Contents
- Important information
- About SMART Response
- Installing SMART Response
- Getting started
- Using SMART Response
- About SMART Notebook
- Creating Assessments
- Adding questions to the assessment
- About question types
- About intelligent expression grading
- Adding questions using the Insert Question wizard
- Importing questions from a Word document
- Example Word document question formats
- Importing questions from an XML or SQZ file
- Importing questions from a PDF file
- Adding choices to a question
- Tagging questions
- Starting and connecting to a class
- Disconnecting students from a class
- Using clickers
- Completing assessments
- Reviewing, printing and exporting assessment results
- Maintaining SMART Response
- Hardware environmental compliance
- Waste Electrical and Electronic Equipment Regulations (WEEE directive)
- Restriction of Certain Hazardous Substances (RoHS directive)
- Batteries
- Packaging
- Covered Electronics Devices
- China’s Electronic Information Products regulations
- U.S. Consumer Product Safety Improvement Act
- California Air Resource Board – Airborne Toxic Control Measure
- Restriction of Certain Chemicals (REACH directive)
- Customer support

5 6
To connect in Sign In
mode
1. Press the clicker's Power button for one second.
A message appears asking if you want to join the last class the clicker was
connected to, or find a different class.
2. Press the Enter button to join the last class.
OR
Press the Down button to select Find a class, and then press Enter.
The clicker scans for classes, and then displays a list of classes within range.
Press the Up and Down buttons to select the correct class, and then press Enter.
A connecting message appears, followed by a message asking for an ID number.
3. Press the number buttons to enter your ID number, and then press Enter.
If you've entered a valid ID, a message appears asking you to confirm your name.
N O T E
If the teacher selected the Lock Sign In option, a message appears on the
clicker indicating that the student can't sign in at this time, and then a Retry
option appears.
4. Press the Enter button to connect.
A welcome message appears.
When all of your students are connected, you can start asking questions. Refer to
Creating Assessments on page 37 for information about using SMART Notebook to ask
questions and create assessments.
N O T E
If a student attempts to sign in using an ID that another student is already using,
the clicker displays a message indicating that they are unable to sign in and
allows them to retry.
Locking Sign In
You can block students from signing in to your class. Select the Lock Sign In button to
block students from signing in before you're ready or to block late students from signing
in. When you start a class, Sign In is unlocked by default. If you stop and restart SMART
Response or open a new class list, Sign In is unlocked.
| C H A P T E R 4 – U S I N G S M A R T R E S P O N S E