P L E A S E T H I N K B E F O R E Y O U P RI N T SMART Board™ SBID 6052i Interactive Display Installation and User’s Guide
Product Registration If you register your SMART product, we’ll notify you of new features and software upgrades. Register online at www.smarttech.com/registration. Keep the following information available in case you need to contact SMART Technical Support.
Important Information Warnings and Cautions Consider the following warnings and cautions when using your interactive display. Electric Shock Warnings WARNINGS To prevent electrical shock hazards that could lead to fire or electrocution, respect the following warnings. • Do not expose this interactive display to rain or moisture. • Do not use this interactive display’s polarized plug with an extension cord receptacle or other outlets unless the prongs can be fully inserted.
ii | – IM POR TA NT I NF O R MAT ION General Usage Warnings WARNINGS • The lamps in the interactive display contain mercury. Please dispose of them according to local regulations. • If the interactive display glass is broken, do not come in contact with the liquid crystal. Handle with care. • Rest your eyes periodically by focusing on an object at least 5' (1.5 m) away. CAUTIONS • Handle with care when transporting. Save packaging for transporting.
ii i | – IM POR TA NT I NF O R MAT ION • Do not mount the interactive display face up, face down or upside down for an extended period of time as it could cause permanent damage to the interactive display. • When using a LAN cable, do not connect to a peripheral device with wiring that might have excessive voltage. Power Connectors Use the power cord provided with this display and according to the table below. If a power cord isn't supplied with this equipment, please contact your supplier.
iv | – IM POR TA NT I NF O R MAT ION NOTES • For optimum performance, allow 20 minutes for warm-up. • Position the interactive display at a 90° angle to windows and other light sources to minimize glare and reflections. • Adjust the interactive display’s brightness, contrast and sharpness controls to enhance readability.
Contents Important Information ..............................................................................................i Warnings and Cautions ....................................................................................i 1 Introduction ........................................................................................................... 1 Components of the SMART Board Interactive Display................................... 2 Interactive Display Requirements ...............................
vi | CO N T EN TS Troubleshooting Wireless Remote Control Issues........................................ 36 Troubleshooting Interactivity Issues ............................................................. 37 6 Maintaining Your Interactive Display ................................................................... 43 Cleaning the LCD Screen ............................................................................. 43 Maintaining Interactive Display Ventilation .......................................
Chapter 1 Introduction Your SMART Board™ interactive display includes all the features of SMART’s proprietary DViT™ (Digital Vision Touch) technology on an NEC LCD monitor so that you can select, write and erase on the interactive surface. You can control computer applications, make notes in digital ink, write over videos and graphs, and save all of your work.
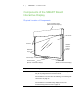
2 | CH A P T E R 1 – I NT R O DU CT IO N Components of the SMART Board Interactive Display Physical Location of Components Touch Connection Panel (Behind Interactive Display) LCD Screen Cameras Wireless Remote Control Sensor Reflective Tape Pencil Ledge Terminal Panel (Bottom of Interactive Display) Control Panel (Bottom of Interactive Display) Component Description LCD Screen The screen is 45 3/8" W × 25 3/8" H (115 cm × 64.5 cm), with a 52" (32 cm) diagonal and 16:9 screen format.
3 | CH A P T E R 1 – I NT R O DU CT IO N Cameras The interactive display includes two cameras in the top left and top right corners of the LCD screen. The cameras are under the top cover of the interactive display, and they track finger and pencil positions across the LCD screen. IMPORTANT Do not attach items such as adhesive notes to the screen because they will interfere with the cameras.
4 | CH A P T E R 1 – I NT R O DU CT IO N Wireless Remote Control Sensor The wireless remote control sensor, in the lower-right corner of the bezel of the interactive display, gathers input from the wireless remote control. For information on the wireless remote control sensor, see The Wireless Remote Control Sensor on page 17. IMPORTANT Do not cover or block this area or you could have reduced use of the wireless remote control.
5 | CH A P T E R 1 – I NT R O DU CT IO N Other Accessories Contact your authorized SMART reseller to order any of the following accessories for your interactive display: SMART Mobile Stand for Interactive Displays Allows mobility and 15 3/4" (40 cm) of height adjustment. Order No. FSSBID 100. Optional Laptop Shelf Features an adjustable tilt angle of up to 35º from horizontal. Shelf telescopes outward. Order No. FSSBID LTS.
6 | CH A P T E R 1 – I NT R O DU CT IO N Interactive Display Requirements Environmental Requirements Environmental Requirement Parameter Operating Temperature 41°F to 95°F (5°C to 35°C) Storage Temperature -40°F to 120°F (-40°C to 49°C) Humidity 5% to 80% relative humidity, non-condensing Water and Fluid Resistance • Intended for indoor use • Don’t pour or spray liquids directly on the electronic components Electrostatic Discharge (ESD) • Designed to withstand electrostatic shock Conducted an
Chapter 2 Installing the Interactive Display This chapter describes considerations and concerns for trained, professional installers installing the interactive display on a wall-mount or mobile cart. Once the interactive display has been installed, see the next chapter Setting Up the Interactive Display on page 11 for instructions on connecting the computer and interactive display.
8 | CH A P T E R 2 – I NS T A L L I N G T H E I N T E R A C T I V E D I S P L A Y Selecting the Mounting Location Consider the following when you select a location for your interactive display. • If you want to install the interactive display on a wall, the wall must be strong enough to support the interactive display and the mounting accessories. The interactive display weighs 132 lb. (60 kg). • Do not install the interactive display in locations where a door or gate can hit it.
9 | CH A P T E R 2 – I NS T A L L I N G T H E I N T E R A C T I V E D I S P L A Y Mounting the Interactive Display Trained, professional installers are required to install the interactive display. The SMART product warranty doesn’t cover damage caused by improper installation, remodelling or natural disasters. Failure to comply with recommendations in this guide could void the warranty.
10 | CH A P T E R 2 – I NS T A L L I N G T H E I N T E R A C T I V E D I S P L A Y • When using mounting accessories, they must comply with the VESA-compatible (FDMlv1) mounting method. • Use M6 screws of the appropriate length. • The recommended fasten force is 470–635 N·cm. Mounting interfaces that comply with the UL1678 standard in North America are recommended. • Refer to the instructions included with the mounting equipment for detailed information.
Chapter 3 Setting Up the Interactive Display The following chapter includes information on connecting external equipment, connecting the power cord, attaching the cable cover and installing batteries into the pencil and remote control.
12 | CH A P T E R 3 – S ETTI NG UP THE INTE RACTIVE DI SPL AY Making Power and Computer Connections Touch Connection Panel USB 2.0 Cable Touch Connection Panel Power Cord Display Power Cord Display VGA Cable Internet Connection Computer Power Cord To make power and computer connections 1. Connect the supplied VGA cable from your computer or SMART hub’s video output connection to the terminal pane. For more information, see Connecting External Equipment with the Terminal Panels on page 18. 2.
13 | CH A P T E R 3 – S ETTI NG UP THE INTE RACTIVE DI SPL AY Turning On Your Interactive Display To turn on the interactive display 1. Turn on the computer. 2. Press the main power switch on the bottom terminal panel to turn on the interactive display. For more information about the bottom terminal panel, see page 18. Your computer’s logon screen or desktop appears on the screen. If you don’t see either, refer to the Troubleshooting on page 29.
14 | CH A P T E R 3 – S ETTI NG UP THE INTE RACTIVE DI SPL AY 2. Follow the on-screen instructions. You will be prompted to enter your product activation key. You must register your interactive display online using the serial number found underneath the pencil ledge. 3. Click the SMART Board icon in the notification area (Windows computers) or the Dock (Mac computers), and then select Check for Updates. The SMART Product Update window appears. 4.
15 | CH A P T E R 3 – S ETTI NG UP THE INTE RACTIVE DI SPL AY 4. Follow the on-screen instructions to update to the latest versions of both SMART Meeting Pro Premium and SMART Product Drivers. Enabling the Pencil Once you install SMART Product Drivers, you can interact with your computer’s desktop and applications by touching the screen with a finger or other object.
16 | CH A P T E R 3 – S ETTI NG UP THE INTE RACTIVE DI SPL AY Using the Pencil The pencil provides more precise touch contact for both drawing and mouse-actions. To use the pencil Drag the pencil nib across the screen to create digital ink. OR Press an item or icon on the desktop as you would click a mouse. If your pencil doesn’t draw digital ink or allow interaction with the desktop, see Troubleshooting Pencil Issues on page 41.
17 | CH A P T E R 3 – S ETTI NG UP THE INTE RACTIVE DI SPL AY TIP If you don't intend to use the wireless remote control for a long period of time, remove the batteries. The Wireless Remote Control Sensor The wireless remote control sensor is located in the lower-right corner of the interactive display. It allows remote control of the LCD monitor from a distance of 23' (7 m). For more information on the wireless remote control range, see Wireless Remote Control Range on page 24.
18 | CH A P T E R 3 – S ETTI NG UP THE INTE RACTIVE DI SPL AY Connecting External Equipment with the Terminal Panels The interactive display’s terminal panels enable you to connect external equipment to the interactive display.
19 To connect external equipment | CH A P T E R 3 – S ETTI NG UP THE INTE RACTIVE DI SPL AY 1. Turn off your interactive display. 2. Ensure your external equipment is connected to its power source and is turned off. 3. Connect the interactive display to the external equipment with an approved cable, ideally supplied with the external equipment. 4. Turn on the interactive display and the external equipment.
20 | CH A P T E R 3 – S ETTI NG UP THE INTE RACTIVE DI SPL AY
Chapter 4 Using the Interactive Display This chapter includes information on how to use your interactive display, turning your interactive display on and off, turning your LCD screen on and off, controlling your computer by pressing the screen, using the remote control, and more.
22 | CH A P T E R 4 – U S IN G T H E I NT E R A C TI V E D IS P LA Y Turning the Interactive Display On and Off Turning On the Interactive Display To turn on the interactive display 1. Set the interactive display’s main power switch to on. This is on the terminal panel, see page 2. 2. Press the power button on the control panel. OR Press the power button on the remote control. 3. Turn on the computer. Turning Off the Interactive Display To turn off the interactive display 1. Turn off your computer. 2.
23 | CH A P T E R 4 – U S IN G T H E I NT E R A C TI V E D IS P LA Y Using the Touch Interactive Screen Using the interactive display, you can perform normal computer operations by pressing the with your finger and you can write in digital ink using the supplied pencil. CAUTIONS To left-click To right-click To write or draw • Write with light pressure on the surface. Writing with excessive force can damage the screen.
24 | CH A P T E R 4 – U S IN G T H E I NT E R A C TI V E D IS P LA Y CAUTIONS • Do not subject the wireless remote control to strong shock. • Do not allow water or other liquids to splash the remote control. If the remote control gets wet, wipe it dry immediately. • Avoid exposing the wireless remote control to heat or steam. • Do not open the wireless remote control except for the battery compartment.
25 | CH A P T E R 4 – U S IN G T H E I NT E R A C TI V E D IS P LA Y Wireless Remote Control Buttons The table below explains the function of the most commonly used buttons. POWER ON Switches the power on/standby Input buttons (8) Selects input signal for the display.
26 | CH A P T E R 4 – U S IN G T H E I NT E R A C TI V E D IS P LA Y Selecting a Video Source You can change the video source of the LCD monitor. To change a video source Press the INPUT button on the LCD monitor’s control panel until the LCD monitor displays the video source you want. OR Press the INPUT button on the remote control until the LCD monitor displays the video source you want. NOTE Your interactive display includes a VGA cable to connect your computer to your interactive display.
27 | CH A P T E R 4 – U S IN G T H E I NT E R A C TI V E D IS P LA Y Changing Settings in the On-Screen Menu You can adjust many of the LCD monitor’s settings using the on-screen menu, including the brightness, contrast, and many more. To change settings in the on-screen menu 1. Press the MENU button. The on-screen menu appears. 2. Press the up or down arrows to select the settings you want to change. 3. Press SET. 4. Press the up or down arrows to select the setting you want from the sub-menu.
28 | CH A P T E R 4 – U S IN G T H E I NT E R A C TI V E D IS P LA Y
Chapter 5 Troubleshooting This chapter helps you identify and resolve various issues in the field. If issues persist, contact SMART technical support. For SMART contact information, see Technical Support on page 49.
30 | CH A P T E R 5 – T R O U B L E S H O O T I N G Troubleshooting Quick Reference Table Symptoms Cause Solution There is no image on your screen. Your computer is in Standby mode. Touch the panel to activate your computer. OR See Making Power and There is no power to your computer, interactive display or Computer Connections on page 12. touch connection panel. OR Your computer isn’t connected to the interactive display. There is a persistent image An image displayed for too on your screen. long.
31 | CH A P T E R 5 – T R O U B L E S H O O T I N G Symptoms Cause Solution Your pencil doesn’t draw digital ink. The pencil battery is dead. To install a battery in the pencil on page 15. OR The pencil nib is worn. OR See To replace the pencil nib on page 45. The pencil isn’t responding or is behaving unexpectedly. See To test your pencil on page 41. Troubleshooting Power Issues Complete the following steps if you can’t turn on the interactive display. To troubleshoot power issues 1.
32 | CH A P T E R 5 – T R O U B L E S H O O T I N G Troubleshooting Picture Issues Complete the following steps if your interactive display doesn’t display an image correctly or any image at all. You can resolve these issues with the computer display settings, the control panel settings or the wireless remote control (see page 23). For additional troubleshooting suggestions, see the NEC MultiSync S521 User’s Manual (document 145185).
33 | CH A P T E R 5 – T R O U B L E S H O O T I N G Troubleshooting No Picture on the Screen To troubleshoot no picture issues 1. Turn off the LCD monitor, turn off the interactive display, and then turn off the computer. 2. Disconnect the video cable (Usually VGA) that connects the interactive display’s bottom terminal panel to the computer. 3. Check the video cable for bent or pushed-in pins. If the cable is damaged, replace it. 4.
34 To remove a persistent image | CH A P T E R 5 – T R O U B L E S H O O T I N G 1. Turn off the interactive display and the computer. 2. Leave the interactive display and the computer off for the same length of time as the persistent image was on-screen. For example, if the interactive display displayed an image for one hour and a residual image remains, don’t turn on the computer and the interactive display until after a minimum of one hour.
35 | CH A P T E R 5 – T R O U B L E S H O O T I N G Troubleshooting Audio Issues Complete the following steps to resolve issues with the audio output. NOTE Speakers aren’t included with the interactive display. You must add external speakers for audio output. To troubleshoot audio issues 1. Confirm that the audio cable is connected correctly. 2. Confirm that mute isn’t activated. 3. Confirm that the volume isn’t set to its minimum setting.
36 To interpret a flashing red LED | CH A P T E R 5 – T R O U B L E S H O O T I N G If the LED flashes red six times, and then the LCD monitor turns off, the internal temperature of the LCD monitor is higher than its normal operating temperature. Do not turn on the monitor again until the internal temperature has reduced to its normal operating temperature. OR If the LED flashes red more than six times, the LCD monitor could have detected a component failure. Please contact SMART technical support.
37 | CH A P T E R 5 – T R O U B L E S H O O T I N G Troubleshooting Interactivity Issues Follow these steps if you can see your computer’s desktop on your interactive display, but you are unable to interact well (or at all) with the desktop. These are commonly on of the following issues: • Touch connection panel issues where your touch on the interactive display has no effect.
38 To troubleshoot using LED status and diagnostic lights | CH A P T E R 5 – T R O U B L E S H O O T I N G 1. Observe the status lights on the touch connection panel. Status LED Diagnostic LED 2. Use the following table Diagnostic Status LED LED Touch Connection Panel Condition Off Off Touch connection panel is turned off or power cable is disconnected. Off Flashing green Software is starting or touch Don’t touch your panel until connection panel is initializing. initializing is complete.
39 | CH A P T E R 5 – T R O U B L E S H O O T I N G Diagnostic Status LED LED Green OR Touch Connection Panel Condition Solution Flashing orange Touch connection panel is updating firmware. Wait for the update to finish. Flashing orange No USB connection. Check the cable between the touch connection panel and the computer. Alternating green and orange Flashing green CAUTION Do not disconnect the cable. Disconnecting the cable could cause computer memory loss.
40 | CH A P T E R 5 – T R O U B L E S H O O T I N G 4. Press Next (Windows computers) or Continue (Mac computers). The pencil test window opens. If you want to test the pencil, see To test your pencil on page 41. 5. Press Next (Windows computers) or Continue (Mac computers). The Eraser Test window appears. 6. Press Next (Windows computers) or Continue (Mac computers). The Calibration window opens. IMPORTANT The Calibration window can take a minute or more to open.
41 | CH A P T E R 5 – T R O U B L E S H O O T I N G Troubleshooting Pencil Issues If your interactive display responds to your touch, but not to your pencil, follow the steps below. To trouble shoot pencil issues 1. Examine the pencil nib. If the nib is worn, replace it. See Replacing the Pencil Nib on page 45. 2. Change the battery in the pencil. See Replacing the Pencil Battery on page 44. 3. Perform a pencil test. To test your pencil 1.
42 | CH A P T E R 5 – T R O U B L E S H O O T I N G
Chapter 6 Maintaining Your Interactive Display Properly maintained, your interactive display will provide years of use.
44 To clean the LCD screen | CH A P T E R 6 – M AIN T AIN IN G YOU R IN TE RAC T IVE DI SPL AY • Do not use a cleaning solution or glass cleaner, as they can deteriorate or discolor the screen. • Avoid touching the silver reflective tape on the border between the screen and the bezel and ensure it stays dry. Damage to this strip affects touch interactivity. 1. Shut off the computer, and then disconnect the power sources. 2. Wipe the LCD screen with a lint-free, non-abrasive cloth.
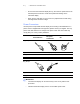
45 | CH A P T E R 6 – M AIN T AIN IN G YOU R IN TE RAC T IVE DI SPL AY Replacing the Pencil Nib CAUTION Replace the pencil nib when it wears down. If a pencil nib wears down too far, you could scratch or damage the screen’s anti-glare coating. Nib New Pencil Nib To replace the pencil nib Worn Pencil Nib 1. Carefully unscrew the cap surrounding the pencil nib. 2. Pull gently on the nib to remove it from the pencil. 3. Insert the new nib, and then replace the cap.
46 | CH A P T E R 6 – M AIN T AIN IN G YOU R IN TE RAC T IVE DI SPL AY Removing Your Interactive Display To safely remove your interactive display, use three or more trained, professional installers. Removing the Interactive Display • Follow the instructions included with the stand or mounting apparatus. • Avoid pinching fingers. • Do not place the interactive display on a sloping or unstable cart, stand or table, because the interactive display can fall resulting in serious damage.
Appendix A Hardware Environmental Compliance SMART Technologies supports global efforts to ensure that electronic equipment is manufactured, sold and disposed of in a safe and environmentally friendly manner. Waste Electrical and Electronic Equipment Regulations (WEEE Directive) Waste Electrical and Electronic Equipment regulations apply to all electrical and electronic equipment sold within the European Union.
48 | AP PENDI X A – HA RD WAR E E NVI RON MEN T AL COM PLI ANC E Batteries Batteries are regulated in many countries. Check with your reseller to find out how to recycle used batteries. There are special regulations that must be met when shipping a product that has a lithium ion battery packaged with the product or shipping a lithium ion battery.
49 | AP PENDI X B – C U S T O M E R S U P PO R T Appendix B Customer Support Online Information and Support Visit www.smarttech.com/support to view and download user’s guides, how-to and troubleshooting articles, software and more. Training Visit www.smarttech.com/trainingcenter for training materials and information about our training services. Technical Support If you experience difficulty with your SMART product, please contact your local reseller before contacting SMART Technical Support.
50 | AP PENDI X B – C U S T O M E R S U P PO R T General Inquiries Address SMART Technologies 3636 Research Road NW Calgary, AB T2L 1Y1 CANADA Switchboard +1.403.228.5940 or Toll Free 1.866.518.6791 (U.S./Canada) Fax +1.403.228.2500 E-mail info@smarttech.com Warranty Product warranty is governed by the terms and conditions of SMART’s “Limited Equipment Warranty” that shipped with the SMART product at the time of purchase. Registration To help us serve you, register online at www.smarttech.
Index A G audio troubleshooting, 35 volume, 26 general inquiries, 50 H B batteries, 48 cautions, 16 install into pencil, 15 installing into the remote control, 16 C cameras location, 3 contact information, 50 control panel location, 2, 3 locking, 27 covered electronic devices, 48 customer support, 49 D documentation, 49 draw, 23 E environmental compliance, See hardware environmental compliance erase, 23 European Union regulations, 47 hardware environmental compliance, 47–48 I Important Information,
52 | IN DE X P T packaging, 48 retain for moving, 46 pencil battery, 15 enabling, 15 erase, 23 replace nib, 45 troubleshooting, 41 using, 16 write, 23 power connectors, iii management, 22 turning off, 22 turning on, 22 power connectors, 12 technical support, 49 terminal panel connections, 18 location, 2, 3 touch connection panel location, 3 training, 49 troubleshooting articles, 49 audio, 35 interactivity, 37 pencil, 41 picture, 32 power, 31 quick reference, 30 wireless remote control, 35 turn off the
Toll Free 1.866.518.6791 (U.S./Canada) or +1.403.228.5940 www.smarttech.