
User manual


C H A P T E R 5
Maintaining your room system
33
3. Type the room system administrator account’s user name and password and then press
ENTER.
The Settings screen appears.
4. Press OEM Settings and then press SMART Board Settings.
SMARTSettings appears.
5. Press SMART Hardware Settings.
6. Select the interactive flat panel you want to calibrate.
7. Select Advanced Settings from the drop-down list.
8. Press Calibrate.
The calibration screen appears. This can take a few moments.
N O T E
If the calibration screen doesn’t appear on the selected interactive flat panel, move it to the
selected interactive flat panel by pressing the spacebar on the keyboard or the Orientate
button on the interactive flat panel’s colour select module.
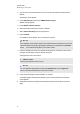
9. Press the red target with the tip of an interactive flat panel pen. Hold the tip at the centre of
the target until the target turns green and then lift the pen.
The target moves to the next location.
I M P O R T A N T
Hold the pen perpendicular to the screen.
N O T E
You can calibrate a target again by pressing the Keyboard button or the Right-click
button on the interactive flat panel’s colour select module.
10. Continue pressing targets until the calibration is complete.
A message appears stating that the calibration was successful and then the orientation
screen appears.
11. Orientate the interactive flat panel (see Orientating the interactive flat panels on the next
page).