
User manual


C H A P T E R 3
Configuring your room system’s software
16
3. If you’re configuring the software for a small room without the table microphone upgrade kit,
select Usethecamera microphone and then click OK.
OR
If you’re configuring the software for a small room with the table microphone upgrade kit, a
medium room or a large room, select Use the table microphone and then click OK.
I M P O R T A N T
o
You are unable to change this setting later, so ensure that you select the correct
option.
o
If you originally configured the software for a small room without the table microphone
upgrade kit and subsequently want to configure it for a small room with the table
microphone upgrade kit, you must set the room system to its factory defaults (see
Resetting the room system to factory defaults on page 65).
A dialogue box prompting you to check the display settings appears.
4. Click OK.
Control Panel opens and a second dialogue box appears.
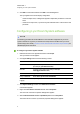
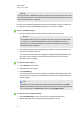
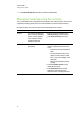
5. Configure the displays as follows:
ConsoleLeft interactive flat panel Right interactive flat panel
(large rooms only)
1366 × 768
1920 × 1080 (1080p)1920 × 1080 (1080p)
I M P O R T A N T
o
Align the top of all displays as shown in the above diagram.
o
Set the console as the main display by clicking its thumbnail and then selecting
Makethismy main display.
o
Position the console to the right of the interactive flat panels as shown in the above
diagram.
o
You are unable to change these settings later, so ensure that you configure the
displays correctly.
T I P
To determine which display is which, press Identify. Each display’s number appears
briefly on the display.