LightRaise™ 40wi interactive projector User’s guide
Product registration If you register your SMART product, we’ll notify you of new features and software upgrades. Register online at smarttech.com/registration. Keep the following information available in case you need to contact SMART Support. Serial number: Date of purchase: FCC warning This equipment has been tested and found to comply with the limits for a Class A digital device, pursuant to Part 15 of the FCC Rules.
Important information Read the following warnings carefully. Failure to read the warnings below or to follow the installation instructions included with your SMART product could result in personal injury or product damage and may void your warranty. WARNING l Failure to follow the installation instructions shipped with your SMART product could result in personal injury and damage to the product.
Contents Important information i Chapter 1: About your interactive projector 1 LightRaise 40wi interactive projector features Optional accessories How your interactive projector works Chapter 2: Installing your interactive projector 1 3 3 5 Choosing a location Routing the cables Installing SMART Notebook software 5 8 9 Chapter 3: Using your interactive projector 11 Using your projector Focusing the image Adjusting the image Projector connection diagram Using your interactive pen 11 21 22 22 24 C
C ON T EN T S Troubleshooting audio issues Locating the serial number Chapter 7: Remotely managing your interactive projector Accessing web page management Home Control panel Control panel II Network settings E-mail alerts Password settings Simple Network Management Protocol (SNMP) Chapter 8: Connecting your room control system to your interactive projector Command inventory Value-based command methods Power state controls Source selection controls General source controls Additional VGA source controls Add
Chapter 1 About your interactive projector LightRaise 40wi interactive projector features Interactive projector Interactive pen Remote control Pen holder USB charging cable Optional accessories Hardware mounting kit How your interactive projector works This chapter describes the features and components of your LightRaise™ 40wi interactive projector.
CHAPT ER 1 About your interactive projector Interactive projector The features of your projector include the following: l Wall-mounted, projection engine that uses DLP® technology by Texas Instruments™, providing BrilliantColor™ performance and quality Gamma 2.2 correction with Bright Room, Dark Room, sRGB, User and SMART Presentation modes. l Interactive features that allow you to use the pen as a mouse device and to write in digital ink l 3D-ready using DLP Link™ technology l NTSC, NTSC 4.
CHAPT ER 1 About your interactive projector Pen holder Store your interactive pen in the holder when you’re not using it and when you’re charging it with a USB charging cable. The holder is also a convenient place to store the remote control. USB charging cable Charge your interactive pen with the included USB charging cable. Optional accessories These accessories aren’t included with your projector, but you can order them from your authorized SMART reseller.
Chapter 2 Installing your interactive projector Choosing a location Choosing a height Routing the cables Installing SMART Notebook software 5 6 8 9 See the printed installation guide and mounting template that came with your LightRaise 40wi interactive projector for information on installing your projector. You can access these documents by visiting the LightRaise 40wi support page on the SMART website: smarttech.com/SupportLightRaise40wi.
CHAPT ER 2 Installing your interactive projector Choose a location that’s far from bright light sources, such as windows and strong overhead lighting. Bright light sources can cause distracting shadows on the projection surface and can reduce the contrast of the projected image. Consider what your projection surface is when you’re selecting a location for your interactive projector. You can install it so the image falls on an existing dry-erase whiteboard or a wall surface.
CHAPT ER 2 Installing your interactive projector o If you’re using a dry-erase whiteboard as the projection surface, measure inside the frame. 2. Measure the height of the projected image that you want. N OTES o Ensure the available height of the projection surface is equal to or greater than the height in the table. o If you’re using a dry-erase whiteboard as the projection surface, measure inside the frame. 3.
CHAPT ER 2 Installing your interactive projector Routing the cables Connect all the cables to your interactive projector and let them hang loose. After you’ve connected all the cables, connect the power cable to a power outlet and turn on your interactive projector so you can see where the projected image falls. Align the image and make other image adjustments before you route the cables around the projected image.
CHAPT ER 2 Installing your interactive projector Installing SMART Notebook software You must install SMART Notebook collaborative learning software on the computer connected to your interactive projector to access all of its features. You can install the software from the DVD that came with your interactive projector and you can visit smarttech.com/software to download software updates.
Chapter 3 Using your interactive projector Using your projector Using the remote control Adjusting projector settings Focusing the image Adjusting the image Projector connection diagram Using your interactive pen Interacting with your computer Understanding pen status lights Charging your interactive pen Writing or drawing with SMART Ink 11 12 13 21 22 22 24 24 25 25 26 This chapter describes how to use your interactive projector, use your remote control, retrieve system information, access the projector
CHAPT ER 3 Using your interactive projector Using the remote control The projector remote control enables you to access on-screen menus and change projector settings. Use the Power button on the remote control to put the projector into Standby mode or to turn it on. You can also use the Input button on the remote control to switch sources on the projector. Number Function Description 1 2 3 Input Menu (Left), (Right), (Up) and (Down) arrows Hide Select a video and audio input source.
CHAPT ER 3 Using your interactive projector Adjusting projector settings The remote control’s Menu button enables you to access the on-screen display to adjust the projector settings. I MPOR TA N T Keep your remote control in a safe place because there is no other way to access menu options. N OTE Some projector settings aren’t available for all video sources.
CHAPT ER 3 Using your interactive projector Setting Use Notes White Peaking Adjusts the image color brightness from 0 to 10 while providing more vibrant white shades. Adjusts the color performance of the display from 0 to 3. Adjusts the Red, Green, Blue, Cyan, Magenta and Yellow colors on the projector from 0 to 100 to provide custom color and luminance output. A value closer to 0 creates a natural image and a value closer to 10 enhances brightness.
CHAPT ER 3 Using your interactive projector Setting Use Projector Functions menu 3D On/Off Turns the DLP Link technology 3D feature on or off. 3D Format 3D Invert Left-Right Displays the current 3D format (Interleaved or Under-over). Selects the 3D Invert setting (L-R or R-L). Auto Signal Detect Enables or disables signal searching of input connectors. Lamp Reminder Turns the lamp replacement reminder on or off. Lamp Mode Adjusts lamp brightness to Standard or Economy.
CHAPT ER 3 Using your interactive projector Setting Use Notes Keystone Adjusts image keystone settings Aspect Ratio Adjusts the image output to Fill Screen, Match Input or 16:9. The default is 0. The keystone can be adjusted from -40 to +40. Use this setting only after you make all physical image alignment adjustments to straighten the vertical lines of the image. The default is Fill Screen.
CHAPT ER 3 Using your interactive projector Setting Use Notes Set to Default? Resets projector settings to their default values. If you select Yes, all projector settings reset to their defaults, reversing any menu changes you made. This action is irreversible. USB1 Source N/A USB2 Source N/A Native DLP Resolution Selects 16:10 or 16:9. Don’t adjust this setting unless you want to reset all of the applied settings, or unless you’re advised to by a SMART Support specialist.
CHAPT ER 3 Using your interactive projector Setting Use Notes System Set to Presenter or Whiteboard Functionality mode. The default is Presenter mode. In Presenter mode, the pointer follows the pen as you point it at the projected image and move it. Displays the interactive pen battery In Whiteboard mode, the pointer only moves when you press the pen tip against the projection surface, or you press the left-click button on the pen.
CHAPT ER 3 Using your interactive projector Setting Use Gateway Displays the projector’s default network gateway in values between 0.0.0.0 and 255.255.255.255. Displays the projector’s primary domain name number in values between 0.0.0.0 and 255.255.255.255. Displays the projector’s MAC address in xx-xx-xx-xx-xx-xx format. Displays the projector’s workgroup You can set the projector’s workgroup name as set by an administrator name using the remote management (maximum 12 characters).
CHAPT ER 3 Using your interactive projector Setting Use Resolution Displays the projector’s most recently If there is no current video input source detected video source signal signal, this setting displays the last resolution and refresh rate. known source signal resolution and refresh rate. Displays the projector’s digital display processor (DDP) firmware version in x.x.x.x format. Displays the projector microprocessor unit (MPU) firmware version in x.x.x.x format.
CHAPT ER 3 Using your interactive projector Focusing the image To focus the projected image, use the focus lever located on the projector lens. g To focus and adjust the image Move the focus lever up or down until the image is in focus.
CHAPT ER 3 Using your interactive projector Adjusting the image l While adjusting the projected image size, shape and location, use the projector’s default background so that you can see the full projected image clearly. Don’t use other images, which might be cropped or scaled by the projector and could result in a misleading projected image size, shape and location. l Use the mechanical adjustments described in the installation document to make all physical image adjustments.
CHAPT ER 3 Using your interactive projector Letter Connector Connect to: 1 Power Mains power supply 2 3.5 mm phone jack audio input (×2) Audio sources associated with primary and secondary computers 3 3.
CHAPT ER 3 Using your interactive projector Using your interactive pen You can use the pen to interact with your computer and write in digital ink. The pen has a power switch, a left-click button and status lights to help you understand its status. Interacting with your computer There are two interactive modes that you can select in the on-screen display (OSD) menu: Presenter and Whiteboard mode. In Presenter mode, you can interact with your computer from a distance.
CHAPT ER 3 Using your interactive projector Understanding pen status lights Your interactive pen has a green light and an amber light. Use the table below to determine the status of the pen. Status light Description Green Amber Flashing (0.3 sec off, 1 sec on) Off Pen is ready to use. It’s pointed at the projected image and connected with the projector. You can interact with your computer if the USB connection between the projector and computer is working. Off Flashing (0.
CHAPT ER 3 Using your interactive projector N OTE If the pen’s power switch is on when you charge the pen, a message might appear asking you to install USB device drivers. If this occurs, ignore the message and close the message window. Writing or drawing with SMART Ink SMART Ink enables you to write or draw digital ink over open application files, folders, websites and any other open window on your computer.
Chapter 4 Integrating other devices Video format compatibility Native video format HD and SD signal format compatibility Video system signal compatibility Connecting peripheral sources and outputs 27 28 29 29 30 This chapter provides information on integrating your LightRaise 40wi interactive projector with peripheral devices.
CHAPT ER 4 Integrating other devices Resolution Mode Aspect ratio Refresh rate (Hz) Match Input appearance Match Input appearance (16:10 aspect ratio mode) (16:9 aspect ratio mode) 1024 × 768 XGA 60 4:3 60.004 Pillarbox Pillarbox 1024 × 768 XGA 70 4:3 70.069 Pillarbox Pillarbox 1024 × 768 XGA 75 4:3 75.029 Pillarbox Pillarbox 1024 × 768 XGA 85 4:3 84.997 Pillarbox Pillarbox 1024 × 768 MAC 19" 4:3 74.
CHAPT ER 4 Integrating other devices HD and SD signal format compatibility Signal format Aspect ratio Horizontal frequency (kHz) Vertical frequency (Hz) Match Input appearance 480i 567i 720p 720p 1080i 1080i 4:3 5:4 16:9 16:9 16:9 16:9 15.73 15.63 44.96 35 33.7 28.1 59.94 50 59.94 50 59.94 50 Full screen Letterbox Letterbox Letterbox Letterbox Letterbox N OTE Your projector is HD ready. Its native resolution supports a pixel-perfect display of 720p source content when it’s in 16:9 mode.
CHAPT ER 4 Integrating other devices Connecting peripheral sources and outputs Follow these instructions if you have a peripheral device to connect to your interactive whiteboard system, such as a DVD/Blu-ray player. WARNING Measure the distance between the projector and the peripheral device you want to connect. Make sure each cable is long enough, has plenty of slack and can be placed safely in your room without presenting a trip hazard. g To connect a peripheral source or output to your projector 1.
Chapter 5 Maintaining your interactive projector Cleaning the projector When cleaning the projector’s mirror When cleaning the projector’s lens Replacing the projector lamp module Resetting the lamp hours This chapter describes how to clean and prevent damage to your LightRaise 40wi interactive projector. Follow this procedure to replace the remote control battery.
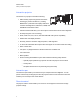
CHAPT ER 5 Maintaining your interactive projector g To replace the remote control battery 1. Hold down the side release on the left side of the battery holder and pull the battery holder completely out of the remote control. 2. Remove the old battery from the battery holder and replace it with a CR2025 coin-cell battery. I MPOR TA N T Align the positive (+) and negative (–) signs on the battery terminals with the correct signs on the battery holder. 3. Insert the battery holder into the remote control.
CHAPT ER 5 Maintaining your interactive projector I MPOR TA N T l When cleaning the interactive projector o Wipe the exterior of the projector with a lint-free cloth. o If necessary, use a soft cloth moistened with a mild detergent to clean the projector housing. l Do not use abrasive cleaners, waxes or solvents. When cleaning the projector’s mirror l Use a bellows bulb or air blower bulb (commonly found in audio-visual supply stores) to blow off dust.
CHAPT ER 5 Maintaining your interactive projector l If the lamp shatters or bursts, leave the room. Ventilate the area by opening windows and doors. Next, do the following: o Avoid touching the glass fragments because they can cause injury. o Wash your hands thoroughly if you have come into contact with lamp debris. o Thoroughly clean the area around the projector, and discard any edible items placed in that area because they could be contaminated.
CHAPT ER 5 Maintaining your interactive projector You need a Phillips No. 2 screwdriver and a flat screwdriver to complete these procedures. g To remove the old lamp module 1. Wait at least 30 minutes for the projector to cool down. 2. Disconnect the power cable from the projector. 3. Remove the lamp cover from the projector, and then put it in a safe place.
CHAPT ER 5 Maintaining your interactive projector g To finish the projector lamp module installation 1. Turn on the projector. 2. Adjust the projector image if necessary (see Adjusting the image on page 22). 3. Access the service menu to reset the lamp hours (see Resetting the lamp hours below). 4. Activate the projector’s alert e-mails and lamp warnings if they’ve been deactivated (see E-mail alerts on page 59 and Control panel on page 54).
CHAPT ER 5 Maintaining your interactive projector The SMART [Model] Settings menu appears. 4. Select 37 to confirm that Lamp Hour is reset to zero.
Chapter 6 Troubleshooting your interactive projector Determining your interactive projector’s status Determining if your interactive projector is connected to your computer Determining your interactive pen’s status Troubleshooting issues with interactive features Interactive pen function Pointer behavior Pointer accuracy Double-click function Resolving image issues Loss of signal Partial, scrolling or incorrectly displayed image Unstable or flickering image Unaligned projected image Accessing the service m
CHAPT ER 6 Troubleshooting your interactive projector Determining your interactive projector’s status The projector’s status lights can help you determine its status. The table below describes the various states of the projector. N OTE Interactive features also depend on the pen status.
CHAPT ER 6 Troubleshooting your interactive projector Projected image Interactive features Status and related troubleshooting Projector Power light Projector Service light Solid green Off Correct None There’s an issue with the interactive features. Solid amber Flashing red None N/A There’s an issue with the projector lamp. See The “Lamp Failure” message appears on page 50. Off Flashing red None None The projector’s operating temperature has been exceeded.
CHAPT ER 6 Troubleshooting your interactive projector Determining if your interactive projector is connected to your computer SMART Product Drivers enables you to view information about your interactive projector and can help you determine if your interactive projector is connected to your computer. g To determine if your computer is connected to the interactive projector 1.
CHAPT ER 6 Troubleshooting your interactive projector Determining your interactive pen’s status Use the table below to determine the status of your interactive pen. Status light Description Green Amber Flashing (0.3 sec off, 1 sec on) Off Pen is ready to use. It's pointed at the projected image and connected with the projector. You can interact with content if the USB connection between the projector and computer is working. Off Flashing (0.
CHAPT ER 6 Troubleshooting your interactive projector Troubleshooting issues with interactive features If you’re experiencing issues with the interactive features of your projector, you can troubleshoot the following common issues. Interactive pen function Begin by checking the connection between your interactive projector and your computer: l Ensure that the USB cable is properly connected to your computer. l Ensure that your computer detects the projector.
CHAPT ER 6 Troubleshooting your interactive projector l Press the Input button on the remote control to switch it away from the computer input, and then select the computer input again. This re-synchronizes the computer's video signal. l Ensure your computer display settings match the projector's native resolutions of 1280 × 800 (16:10 aspect ratio) or 1280 × 720 (16:9 aspect ratio). l Ensure your computer display settings are not stretching, scaling or modifying the video signal.
CHAPT ER 6 Troubleshooting your interactive projector g To resolve signal loss issues 1. Wait approximately 45 seconds for the image to synchronize. Some video signals require a longer synchronization period. 2. Ensure that the image signal is compatible with the projector (see Video format compatibility on page 27). 3.
CHAPT ER 6 Troubleshooting your interactive projector Unstable or flickering image If the projector’s image is unstable or flickering, the frequency or tracking settings on your input source could be different from the settings on your projector. I MPOR TA N T Write down your setting values before adjusting any of the settings in the following procedure. g To resolve your unstable or flickering image 1. Check the display mode of your computer’s graphics card.
CHAPT ER 6 Troubleshooting your interactive projector Accessing the service menu C A U TI ON l To prevent tampering or unintentional changes, only system administrators should access the service menu. Do not share the service menu access code with casual users of your interactive projector. l Do not adjust any settings in the service menu other than those listed in this guide. Changing other settings can damage or affect the operation of your projector and may invalidate your warranty.
CHAPT ER 6 Troubleshooting your interactive projector g To reset all projector settings 1. Using the remote control, press the following buttons quickly to access the service menu: Down, Up, Up, Left, Up. 2. Scroll to Factory Reset, and then press Enter on the remote control. 3. Scroll to Exit, and then press Enter on the remote control to exit the projector service menu.
CHAPT ER 6 Troubleshooting your interactive projector 5. Connect the power cable, and then turn on the projector. 6. Adjust the fan speed using the service menu. 7. If the previous steps don’t resolve the issue, put the projector into Standby mode, disconnect the power cable, and then contact your authorized SMART reseller. The “Lamp Failure” message appears If the “Lamp Failure” message appears, one of the following issues is occurring: l The lamp is overheating, likely due to blocked air vents.
CHAPT ER 6 Troubleshooting your interactive projector Troubleshooting audio issues If the audio isn’t working, you can troubleshoot the following common issues. Microphone function You might experience issues using balanced microphones with your interactive projector. Ensure you use an unbalanced microphone. For more information, see the LightRaise 40wi microphone connection addendum (smarttech.com/kb/170208).
Chapter 7 Remotely managing your interactive projector Accessing web page management Home Control panel Control panel II Network settings E-mail alerts Password settings Simple Network Management Protocol (SNMP) 53 54 54 57 57 59 59 60 This chapter describes how to manage your interactive projector from a remote location.
CHAPT ER 7 Remotely managing your interactive projector Home The Home menu displays basic projector information and enables you to select the OSD language. N OTE You can view basic projector information but you’re unable to change it (with the exception of the OSD language) from the Home menu.
CHAPT ER 7 Remotely managing your interactive projector Submenu setting Description Brightness Contrast Adjusts projector brightness from 0 to 100. Adjusts the difference between the lightest and darkest parts of the image from 0 to 100. Adjusts the display data frequency of the projected image from -5 to 5 to match the frequency of your computer’s graphics card. Synchronizes your projector’s display timing with your computer’s graphics card from 0 to 31.
CHAPT ER 7 Remotely managing your interactive projector Submenu setting Description Aspect Ratio Adjusts the image output to Fill Screen, Match Input or 16:9. l l Fill Screen produces an image that fills the entire screen by stretching and scaling. Match Input matches the projector’s aspect ratio to the input’s aspect ratio.
CHAPT ER 7 Remotely managing your interactive projector Control panel II This menu enables you to manage the 3D features, USB source control, audio features and interactive features. Submenu setting Description 3D on/off 3D invert 3D format USB1 source USB 2 source Line volume Turns the DLP Link technology 3D feature on or off. Selects the 3D Invert setting (L R or R L). Displays the current 3D format (Interleaved or Under-over).
CHAPT ER 7 Remotely managing your interactive projector Submenu setting Description IP Address Displays or allows you to set the projector’s IP address in values between 0.0.0.0 and 255.255.255.255. Displays or allows you to set the projector’s subnet mask number in values between 0.0.0.0 and 255.255.255.255. Displays or allows you to set the projector’s default network gateway in values between 0.0.0.0 and 255.255.255.255.
CHAPT ER 7 Remotely managing your interactive projector E-mail alerts This menu enables you to enter your preferred address for receiving e-mail alerts and adjust related settings. Submenu setting Description E-mail Alert Selects Enable to turn on or Disable to turn off the E-mail Alert function. Displays or allows you to set the e-mail address of the e-mail alert recipient. Displays or allows you to set the e-mail address of the e-mail alert “copy to” recipient.
CHAPT ER 7 Remotely managing your interactive projector N OTES l The first time you enable the password settings, the default password value is four numbers, for example, 1234. l If you forget the projector password, refer to Accessing the service menu on page 48 to set the projector setting to factory defaults. Simple Network Management Protocol (SNMP) Your interactive projector supports a list of SNMP commands as described in the management information base (MIB) file.
Chapter 8 Connecting your room control system to your interactive projector Command inventory Value-based command methods Absolute values and adjustment values Video source specification values Power state controls Source selection controls General source controls Additional VGA source controls Additional Composite video source controls Audio controls Network controls System controls By connecting a computer or room control system to the RS-232 serial interface of your interactive projector, you can selec
CHAPT ER 8 Connecting your room control system to your interactive projector l Type commands exactly as they appear in the left column of the tables, with the proper value or setting in the center column. N OTES l Send a command only after the projector sends a command prompt. l Commands aren’t case sensitive. l Check your entries carefully before entering your commands. l Press ENTER after typing each command. l After the projector executes a command, it generates a response.
CHAPT ER 8 Connecting your room control system to your interactive projector >set brightness-15 brightness=55 Video source specification values You can use the source input field described in Source selection controls on next page in a command to set an absolute value or adjustment value to a source other than the active source. You can do this while the selected source is inactive, but the source device must be connected or you will receive an invalid command response.
CHAPT ER 8 Connecting your room control system to your interactive projector This table describes the power state fields. Field Description Powering On Cooling Confirm off The projector is turning on. The projector is on. The projector is cooling. Confirm off is a non-selectable power state that is returned during stage one of the two-button Off sequence. The projector is off but still receiving power (Standby mode). Idle Source selection controls These commands switch input sources.
CHAPT ER 8 Connecting your room control system to your interactive projector Command Response get brightness get contrast get whitepeaking get degamma get red get green get blue get cyan get magenta get yellow get videofreeze get cc brightness=[current brightness setting] contrast=[current contrast setting] whitepeaking=[current whitepeaking setting] degamma=[current degamma setting] red=[current red color setting] green=[current green color setting] blue=[current blue color setting] cyan=[current cyan
CHAPT ER 8 Connecting your room control system to your interactive projector N OTE Typically, cc1 displays U.S. English subtitles, while cc2 displays other regional languages, such as French or Spanish, depending on television channel or media setup. Additional VGA source controls Your VGA source supports all the general source controls described in General source controls on page 64, as well as the commands listed in this section.
CHAPT ER 8 Connecting your room control system to your interactive projector N OTE Some of these commands are invalid with HDMI input and VGA video sources, and will return the response “invalidcmd=[command]”. These commands inform you of the current Composite video source settings.
CHAPT ER 8 Connecting your room control system to your interactive projector Command Command target range Response get micvolume [target] micvolume=[current] No set micvolumecontrol[target] micvolumecontrol=[current] No get micvolumecontrol micvolumecontrol=[current] No set sysoutputsw[target] sysoutputsw =[current] No get sysoutputsw sysoutputsw =[current] No set micenable[target] micenable=[current] No get micenable micenable=[current] No set speakerenable[target] spkrenable=[curr
CHAPT ER 8 Connecting your room control system to your interactive projector Field target micvolume Possible Values l l l +val -val =0 to 40 Description The + or – symbol increases or decreases the volume. If you type a number between -20 and 20, the volume is set to that level.
CHAPT ER 8 Connecting your room control system to your interactive projector Network controls These commands inform you of the current network settings.
CHAPT ER 8 Connecting your room control system to your interactive projector Command Response get projectionmode get startupscreen get resolution get language get groupname get projectorname get locationinfo get contactinfo get modelnum get videomute get serialnum projectionmode=[current projection mode] startupscreen=[current startup screen setting] resolution=[current input resolution] language=[current language setting] groupname=[current projector group name] projectorname=[current projector name] l
CHAPT ER 8 Connecting your room control system to your interactive projector Command Command target range Response set aspectratio [target] =fill aspectratio=[target] =match set projectionmode [target] =16:9 =front projectionmode=[target] =ceiling =rear set startupscreen [target] =rear ceiling =smart startupscreen=[target] =usercapture set language [target] =preview =Chinese (Simplified) language=[target] =Chinese (Traditional) =Czech =Danish =Dutch =English =Finnish =French =German =Greek =
CHAPT ER 8 Connecting your room control system to your interactive projector These commands control the current system settings. These commands are available when the projector is in Standby mode and when it is on. Command Command target range Response set restoredefaults set lamphrs [target] [none] =0 restoredefaults=done lamphrs=0 N OTE The Network and VGA Out setting’s features are off by default. Select On to activate these features.
Appendix A Hardware environmental compliance SMART Technologies supports global efforts to ensure that electronic equipment is manufactured, sold and disposed of in a safe and environmentally friendly manner. Waste Electrical and Electronic Equipment regulations (WEEE directive) Waste Electrical and Electronic Equipment regulations apply to all electrical and electronic equipment sold within the European Union.
APPENDIX A Hardware environmental compliance There are special regulations that must be met when shipping a product that has a lithium ion battery packaged with the product or shipping a lithium ion battery. When returning a SMART Technologies product which contains a lithium ion battery or returning a lithium ion battery, call SMART Technologies RMA for information on the special shipping regulations. l 1.866.518.6791, Option 4 (U.S./Canada) l 1.403.228.
Index 3 DVDs 30 3.
INDEX lithium ion batteries 76 location 5, 58 M MAC address 70 MAC support 27 mute control 12, 67 N native video formats 28 network communication 23, 57, 70 S S-video connections 23, 29, 56, 64 SD signal compatibility 29 signal loss 45 SMTP 59 startup screen 56 subnet mask 58, 70 SVGA support 27 SXGA support 27 T trap destination address 58 P packaging 76 passwords 48, 59 peripheral sources 30 pillarboxing 27, 29 power 23, 54, 63 projector adjusting the image of 22 cleaning 32 connection diagram for 2
SMART Technologies smarttech.com/support smarttech.