Installation Guide TM SMART Board Interactive Whiteboard
Product Registration If you register your SMART product, we’ll notify you of new features and software upgrades. Register online at www.smarttech.com/registration Keep the following information available in case you need to contact Technical Support: Serial Number Date of Purchase FCC Warning This equipment has been tested and found to comply with the limits for a Class A digital device, pursuant to Part 15 of the FCC Rules.
Important Information Please read this manual carefully before setting up and using the SMART Board™ for Flat-Panel Displays interactive whiteboard (SBFPD). WARNING Make sure an AC socket outlet is near the SBFPD and remains easily accessible during use. Assurez-vous qu’une prise secteur se trouve à proximité du SBFPD et demeure facilement accessible durant l’utilisation. Asegúrese de que hay una toma de corriente alterna cerca del SBFPD y que es fácilmente accesible para su uso.
AVERTISSEMENT POUR LES CLIENTS EUROPÉENS Le SBFPD doit être utilisé uniquement avec les systèmes de distribution d’alimentation européens TN et TT. Le SBFPD ne convient pas aux systèmes de distribution d’alimentation plus anciens de type IP utilisés dans certains pays européens. “Ce système (type IT) est largement utilisé isolé de la terre, dans certaines installations en France, avec une impédance à la terre, à 230/400V, et en Norvège, avec limiteur de tension, neutre non distribué, à 230V ligne à ligne.
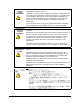
Other Precautions For operating safety and to avoid damage to the interactive whiteboard and its parts, please read the following information carefully. • If you transport the interactive whiteboard, we strongly urge you to completely repackage it using the original packaging. This packaging was designed with optimal shock and vibration protection.
iv Important Information 99-00667-00 B0
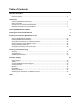
Table of Contents Important Information i Other Precautions ........................................................................................................................... iii Introduction 1 Interactive Whiteboard Technology ................................................................................................. 1 About This Guide ............................................................................................................................
vi Table of Contents 99-00667-00 B0
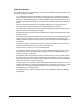
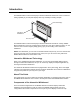
Introduction The SMART Board for Flat-Panel Displays interactive whiteboard adds touch-screen control and writing capability to your flat-panel display while only minimally increasing its depth. Flat-Panel Display Interactive Whiteboard Pen Tray The SMART Board for Flat-Panel Displays interactive whiteboard includes an overlay, SMART Board software and a pen tray equipped with an eraser and color pens.
The Overlay The overlay, which includes embedded digital cameras in the top-left and top-right corners, is mounted onto your flat-panel display. Cameras Overlay The Pen Tray The pen tray attaches to your overlay and includes four colored pens and an eraser. To write over the computer image, just pick up a pen and write on the interactive whiteboard as you’d write on a standard whiteboard.
• Floating Tools – a virtual palette of writing tools that increases the screen’s interactive functionality, even if you don’t have a pen tray • SMART Board Control Panel – allows you to customize the writing tools and to change the SMART Board software settings • Aware – an application for the Windows operating system that makes a number of conferencing, graphics, word processing and presentation programs work seamlessly with the interactive screen TIP Aware applications (sometimes referred to as Ink
Important Information about Compatibility Each SMART Board for Flat-Panel Displays interactive whiteboard comes with a SMART USB adapter cable that connects the interactive whiteboard to your computer. The adapter cable works only with version 8.1.3 (or later) of SMART Board software for Windows operating systems or version 8.1.2 (or later) of SMART Board software for Macintosh computers.
Installing SMART Board Software For the SMART Board for Flat-Panel Displays interactive whiteboard to function properly, you must have SMART Board software running on a connected computer. CAUTION Don’t connect the SMART USB adapter cable to the computer until after you’ve installed SMART Board software! If you do this by accident, the Found New Hardware wizard appears. Click the Cancel button in the wizard, and then unplug the SMART USB adapter cable from the computer.
6 Installing SMART Board Software 99-00667-00 B0
Installing the Interactive Whiteboard IMPORTANT The installation procedure varies depending upon whether you ordered your interactive whiteboard with or without a pen tray. To install your SMART Board for Flat-Panel Displays interactive whiteboard, you’ll have to: 1. mount the overlay on the flat-panel display (see below) 2. attach either a pen tray (page 16) or a controller (page 19) 3.
2. With the assistance of another person, carefully remove the flat-panel display from the wall mount or the stand, and place it facedown on a flat surface. Adapter Plate Flat-Panel Display Adapter Plate Bolts NOTE: The appearance of your flat-panel display and its adapter plate can vary from the diagrams shown in this section. In addition, the number of bolts attaching the adapter plate to your flat-panel display can be four, six or eight.
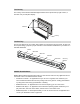
5. Place the mounting bracket’s center section on a flat surface with the arrows pointing upwards and the text “Install Left Hanger Here” on your left. Mounting Bracket Center Section Text Up Arrow 6. Attach the left hanger bracket to the left side of the mounting bracket’s center section using T-handles and carriage bolts. T-handle Carriage Bolt T-handle Carriage Bolt NOTE: When you install a hanger bracket, make sure the U-shaped slot opens at the top of the bracket.
7. Attach the second hanger bracket in the same way. 8. Place the mounting bracket over the flat-panel display with the left hanger bracket on your right side. The left bracket goes on your right because you are looking at the back of the flat-panel display. The hanger brackets should face towards the flat surface so that the horizontal section of each bracket makes a U-shape, as shown in the figure below.
10. Add a supplied washer to each of the exposed adapter plate bolt holes. Don’t add washers to the two holes covered by the mounting bracket. The washers compensate for the mounting bracket’s thickness. Washers Adapter plate bolt holes 11. Attach the adapter plate over the mounting bracket and the washers using the bolts you removed in step 3. Adapter Plate Mounting Bracket NOTE: The bolt type varies between different flat-panel displays.
12. Loosen the T-handles on the hanger brackets. Push these brackets towards the flat surface and then tighten the T-handles. T-handles Hanger Bracket 13. With the assistance of another person, mount the flat-panel display onto a wall mount or onto a stand. CAUTION Don’t lift the flat-panel display by the mounting bracket. Wall Mount NOTE: Your wall mount may appear different from the one illustrated. Flat-Panel Display 14.
16. Place the overlay facedown on a flat surface. IMPORTANT In the next step, you’ll attach two adjustment handles to the overlay. However, take a moment to familiarize yourself with how to tighten and loosen these handles before you attach them. 17. Attach a washer and an adjustment handle to the overlay’s two mounting plates, leaving approximately 1/4" (0.6 cm) of space between the washer and the mounting plate.
18. With the assistance of another person, mount the overlay onto the flat-panel display by sliding the adjustment handles into the U-shaped slots in the hanger brackets. Flat-Panel Display Hanger Bracket Overlay NOTE: The adjustment handle and the washer must slide behind the hanger brackets. Ensure the handles are aligned with the hanger brackets’ U-shaped slots, and temporarily tighten the handles.
19. With the assistance of another person, and while supporting the overlay, loosen both adjustment handles, vertically adjust the overlay so that you can see most of the flat-panel display’s screen, and then tighten the handles. You will vertically adjust the overlay more accurately in step 21. Overlay Adjustment Handle Flat-Panel Display 20.
21. With the assistance of another person, and while supporting the overlay, loosen both adjustment handles, vertically adjust the overlay so that you can see all of the flat-panel display’s screen, and then tighten the handles. Overlay Adjustment Handle Flat-Panel Display NOTE: To continue the installation, attach either a pen tray (see below) or a controller (page 19).
NOTE: Depending upon where and how the interactive whiteboard is mounted, you may need to perform the following steps by touch due to reduced visibility. CAUTION Don’t connect the interactive whiteboard to the computer until after you've installed SMART Board software. For more information, see page 5. 1. Remove the thumbscrews from the pen tray bracket. You need these thumbscrews for step 3. Thumbscrews 2. Slide the holes in the pen tray over the threaded posts on the pen tray bracket.
4. Connect the MOD8 cable to the pen tray (see the next illustration). You’ll connect the other end of this cable to your computer when you complete the installation. 5. Connect the DB9 end of the SMART USB adapter cable to the pen tray. You’ll connect the other end of this cable to your computer when you complete the installation.
To attach the controller CAUTION Don’t connect the interactive whiteboard to the computer until after you’ve installed SMART Board software. For more information, see page 5. If you purchased the SMART Board for Flat-Panel Displays interactive whiteboard without the pen tray, you must install a controller unit. NOTE: Depending upon where and how the interactive whiteboard is mounted, you may need to perform the following steps by touch due to reduced visibility. 1.
4. Connect the MOD8 cable to the controller. MOD8 Cable Controller 5. Connect the DB9 end of the SMART USB adapter cable to the controller. You’ll connect the other end of this cable to your computer when you complete the installation. DB9 Connector OR If you ordered a straight-through DB9-to-DB9 serial cable with your interactive whiteboard, connect one end to the controller. You’ll connect the other end of this cable to a serial port on your computer when you complete the installation.
To complete the installation 1. Connect the MOD8 cable to the corresponding port on the back of the overlay. You connected the other end of this cable to either the pen tray or the controller earlier. Port NOTE: Your configuration may have a controller instead of a pen tray. MOD8 Cable 2. Connect the power supply connector to the overlay’s power port. Power Port Power Connector Power Supply NOTE: Your configuration may have a controller instead of a pen tray.
3. Connect the power cable to both the power supply and a power outlet. Power Supply Power Cable NOTE: Your power cable might look different because your interactive whiteboard comes with a power cable that works with your country’s power outlets. 4. Connect the SMART USB adapter cable to a USB port on your computer. You connected the other end of this cable to either the pen tray or the controller earlier.
6. Attach the eraser’s retaining wall and place the eraser in its slot. Eraser Retaining Wall 7. Place the four pens in the appropriate locations.
24 Installing the Interactive Whiteboard 99-00667-00 B0
Preparing the Interactive Whiteboard for Use When you’ve installed SMART Board software (page 5), set up your SMART Board for Flat-Panel Displays interactive whiteboard and connected it to the computer (page 7), the interactive whiteboard still isn’t quite ready to use.
To orient the interactive whiteboard 1. Press the SMART Board icon in the system tray (Windows computers) or in the Dock (Macintosh computers), and press Orient. The orientation screen appears. 2. Follow the on-screen instructions, pressing your finger squarely on each target. NOTE: If you press on the targets out of sequence or inaccurately, a Bad Orientation Point dialog box appears. Use the mouse to click OK, because touch awareness isn’t available. 3.
4. If you know to which port you connected the interactive whiteboard, select Manually choose COM port. The Select COM Port dialog box appears. Highlight the correct port from the list, and press Select. OR If you’re unsure of the correct port, click the Automatically Detect SMART Hardware button. SMART Board software locates the correct port for the attached interactive whiteboard. The Ready light in the pen tray should change to green to indicate that the interactive whiteboard is now touch sensitive.
To configure an On-Screen Display Controller 1. If you haven’t already done so, connect the flat-panel display to your computer. (See the previous procedure.) 2. Press the SMART Board icon in the system tray and press Control Panel. 3. Press SMART Board Settings. 4. Select Display Control Settings from the drop-down list. 5. Select the Manufacturer, the Model of your flat-panel display and the Communications Port on your computer that you've connected the serial cable to. 6.
To activate the SMART Bulb Saver 1. Connect a serial cable from the flat-panel display to an available serial port on your computer. NOTE: You may already have connected the flat-panel display to the computer to activate the On-Screen Display Control (page 28). 2. Open the Windows Control Panel for your computer. 3. Double-click the Display icon. The Display Properties dialog box appears. 4. Press the Screen Saver tab. 5. Select SMART Bulb Saver from the list of screen savers. 6. Press the Settings button.
The table below summarizes the function of each icon in the strip. Press this icon... To do this... Sleep Mode Activation Put the flat-panel display into sleep or standby mode Input Source Selection Select an input source (e.g.
Cleaning and Troubleshooting Cleaning Shut down your computer before you clean the interactive whiteboard. If you touch the interactive whiteboard when the computer is in any other state (for example, with a program open or at the desktop), you can activate program components or scramble desktop icons. Clean the interactive whiteboard surface regularly so that dust buildup doesn’t interfere with the interactive whiteboard’s operation. Don’t spray glass cleaner directly onto the interactive whiteboard.
If you encounter a problem with the interactive whiteboard, check all the cable connections. If this doesn’t solve the problem, note the color of the LEDs described above and contact SMART Technical Support (page 33). Calibrating the Cameras Digital cameras in the corners of the interactive screen track objects such as your finger or a pen tray pen. If the cameras become misaligned for any reason, you can experience “broken ink” (gaps in your writing) or an area of the screen that’s unresponsive to touch.
Customer Support Online Support www.smarttech.com/support Visit the SMART Technologies support site to view and download user’s guides, “how-to” and troubleshooting articles, software and more. Training Visit www.smarttech.com/trainingcenter for free training materials and information about our training services. Contacting SMART Technical Support SMART Technical Support welcomes your call. However, if you experience difficulty with your SMART product, you may want to contact your local reseller first.
Registration To help us serve you, register online at www.smarttech.com/registration. Sending Feedback You can help us improve our technical documentation by e-mailing your comments to Documentation@smarttech.com. Obtaining More Information on SMART Products Visit www.smarttech.
Index A Activating the SMART Bulb Saver 29 B Bad Orientation Point 26 Bracket 7 Bulb Saver see SMART Bulb Saver C Calibrating the Cameras 32 Cleaning 31 Completing the Installation 21 Configuring Display Control Icon Strip 29 Manually Configuring a Port 26 On-Screen Display Controller 28 Control Panel SMART Board Software 3 Controller Installing 19 Installing Completing the Installation 21 Controller 19 Interactive Whiteboard 7 Mounting the Overlay 7 Pen Tray 16 SMART Board Software 5 Interactive Whitebo
U Overlay Introduction 2 Mounting 7 Using Display Control Icon Strip 30 On-Screen Display Controller 28 SMART Bulb Saver 28 P Pen Tray Installing 16 Introduction 2 Preparing the Interactive Whiteboard for use 25 V Video Player SMART Board Software 2 Q Quick Orientation 25 R Recorder 2 Removing the Display Control Icon Strip 30 S Screen Saver 27 Setting Up the On-Screen Display Controller 27 SMART Board see Interactive Whiteboard SMART Board Software Control Panel 3 Floating Tools 3 Further Informatio
SMART Technologies 1207 – 11 Avenue SW, Suite 300 Calgary, AB T3C 0M5 CANADA www.smarttech.com/support www.smarttech.com/contactsupport Support +1.403.228.5940 or Toll Free 1.866.518.6791 (Canada/U.S.