
Maintenance Guide
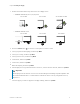

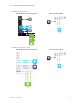
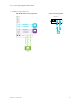
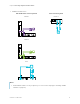

Table Of Contents
- Cover
- Important information
- Contents
- Chapter 1 Welcome
- Chapter 2 Installing the display
- Chapter 3 Connecting computers and other devices

Chapter 2 Installing the display
smarttech.com/kb/171555 31
1. Flick the switch beside the AC power inlet to the ON(I) position.
o
SMARTBoard MX (V2, V2-C, V3, V4) series
55" models
65" models 75" and 86" models
o
SMARTBoard MX series
65" models
75" models 86" models
2.
Press the Power button
on the front control panel or remote control
3.
Select your preferred language, and then tap Next.
4.
Select your country, and then tap Next.
5.
Select your time zone, and then tap Next.
6.
Set the date, and then tap Next.
7.
Set the time, and then tap Next.
8.
Name the display, and then tap Next.
9.
If the display isn’t using a wired network connection, select a wireless network, and then tap Next.
Important
The display needs an internet connection for downloading and installing important updates. Ask
the network administrator to confirm that the network has been correctly configured for the iQ
experience.
10.
Select the apps you want to appear in the Apps Library, and then tap Next.