UF55/UF55w Projector User’s Guide Part of the SMART BoardTM 600i3 Interactive Whiteboard System
Registration Benefits If you register your SMART product, we’ll notify you of new features and software upgrades. Register online at www.smarttech.com/registration. Keep the following information available, in case you need to contact Technical Support: Serial Number Date of Purchase FCC Warning This equipment has been tested and found to comply with the limits for a Class A digital device, pursuant to Part 15 of the FCC Rules.
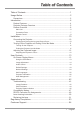
Table of Contents Table of Contents.................................................................................... 1 Usage Notice........................................................................................... 2 Precautions....................................................................................................2 Introduction............................................................................................. 4 Product Features..............................................
Usage Notice Precautions Follow all warnings, precautions and maintenance as recommended in this user’s guide. Warning: Don’t look into the projector’s lens when the lamp is on. The bright light may damage your eyes. Warning: To reduce the risk of fire or electric shock, don’t expose this projector to rain or moisture. Warning: Don’t open or disassemble the projector as this may cause electric shock. Warning: Take the projector down off the Boom before replacing the lamp.
Usage Notice Do • Turn off the product before cleaning it. • Use a soft cloth moistened with a mild detergent to clean the display housing. • Disconnect the power plug from the AC outlet if the product isn’t being used for a long period of time. • Allow 15 minutes before restarting the lamp. This will prolong lamp life. Don’t • Block the ventilation slots and openings on the unit. • Use abrasive cleaners, waxes or solvents to clean the unit.
Introduction Product Features This product is a single chip DLP® projector. Outstanding features include: DLP Technology UF55: • True XGA 0.55" 1024 × 768 resolution • Aspect ratio: 4:3 • Short throw ratio: 0.6 UF55w: • True WXGA 0.65" 1280 × 800 resolution • Aspect ratio: 16:10 • Short throw ratio: 0.51 2000 ANSI Lumens (typical) Computer compatibility: Apple® Macintosh®, iMac®, and VESA® Standards: UXGA, SXGA+, SXGA, WXGA, XGA, SVGA, VGA Video compatibility: • NTSC, NTSC4.
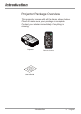
Introduction Projector Package Overview This projector comes with all the items shown below. Check to make sure your package is complete. Contact your dealer immediately if anything is missing. Vol.
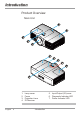
Introduction Product Overview Main Unit 4 5 1 2 3 5 6 2 7 1 4 1. 2. 3. 4. English Lamp cover Focus Projection Lens IR Receiver Introduction 5. Input/Output (IO) cover 6. Diagnostic Indicator LED 7.
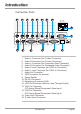
Introduction Connection Ports 1 2 3 4 5 6 7 8 100V - 240V 50 Hz - 60 Hz 9 Audio In Audio In Audio 2 Audio 1 Audio Out Service Control 10 S-video Video Computer (VGA) 2 Computer (VGA) 1 VGA Out 16 15 14 13 12 11 1. Audio-L Connector (for S-Video Connector) 2. Audio-R Connector (for S-Video Connector) 3. Audio-L Connector (for Composite Video Connector) 4. Audio-R Connector (for Composite Video Connector) 5. Audio-2 Input Connector (for VGA2-In Connector) 6.
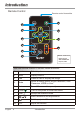
Introduction Remote Control Remote control transmitter 6 1 2 7 9 8 3 Vol. 10 4 5 Model No.:03-00131-20 Remote Control SBP-10X/SBP-20W Projector, UF55 Use the remote control to control these functions: 1. Input Select input source. 2. Menu Display menus. 3. Hide Press to hide or display the image. 4. Mode Select a display mode: Bright Classroom, Dark Classroom, sRGB or User. 5. Mute Turn off the sound temporarily. 6. Power Enter Turn on the power or enter Idle Mode. 7.
Introduction To change the remote control’s battery 1 2 TS C R 20 25 O L 2 LT S 25 3V C R 20 3V O When you use the remote control for the first time, there is a plastic sheet between the battery and its contact. Remove the sheet before use. 25 20 LT R 3V O C M S 3 Procedure 1. Remove the battery holder by holding down the side release firmly and pulling out the battery holder. 2. Insert a CR2025 coin cell battery. Be sure to align the plus and minus ends of the battery properly. 3.
Installation Connecting the Projector Opening and Closing the Input and Output Cover Au dio In Au dio In Au dio 2 Au dio 1 Au dio Ou t Ser vic e Co ntr ol 1 50 V - 240Hz V 100 - 60 Hz 2 3 6 Au dio In Au dio In Au dio 2 Au dio 1 Au dio Ou t Ser vic e Co 4 5 ntr ol 50 V - 240Hz V 100 - 60 Hz Cable management slot Procedure 1. Pull the cable cover forward and leftward to remove the cable cover from the slot. 2.
Installation Turning On the Projector and Putting It into Idle Mode Turning On the Projector The first time you use the projector, you can select your preferred language from the main menu after the startup screen displays. 1. Ensure that the power cord and video signal cable are securely connected. The Power LED is solid Amber. 2. Turn on the lamp by pressing “ ” on the remote control. The Power LED turns green. The startup screen displays in approximately 10 seconds. 3. Turn on your source.
Installation Adjusting the Projected Image Adjusting the Projector’s Focus To focus the image, rotate the Focus Ring until the image is clear.
User Controls On-Screen Display Menus The projector has multilingual On-Screen Display (OSD) menus that allow you to make image adjustments and change a variety of settings. Using the OSD Menus 1. To open the OSD menu, press Menu on the remote control. 2 When the OSD displays, use the buttons to select an item in the main menu. Select an item and press the button to enter a submenu. 3. Use the buttons to select the desired item in the submenu and adjust the settings using the button. 4.
User Controls Image Adjustment Display Mode There are four factory presets optimized for various types of images: Bright Classroom: This mode is recommended for projecting in a bright classroom. Dark Classroom: This mode is recommended for projecting in a dark classroom. sRGB: This mode provides standardized accurate color. User: This mode allows you to apply your own settings.
User Controls Image Adjustment Frequency Frequency, Change the display data frequency to match the frequency of your Tracking, computer’s graphic card. If a flickering vertical bar appears on your H-Position and screen, use this function to make an adjustment. V-Position functions are only supported Tracking Synchronize the signal timing of the display with your computer’s under Analog VGA graphics card. If the image appears to be unstable or flickers, use (RGB) signal. this function to correct it.
User Controls Image Adjustment Saturation To adjust a video image from black and white to fully saturated color: Press on the remote control to decrease the amount of saturation in the image. Press on the remote control to increase the amount of saturation in the image. Saturation, Sharpness and Sharpness Tint functions are To adjust the sharpness of the image: available only when the video source is Press on the remote control to decrease the sharpness. connected.
User Controls Image Adjustment White Peaking This adjustable item utilizes a new color-processing algorithm and system level enhancements to enable higher brightness while providing true, more vibrant colors in picture. The range is from “0” to “10”. If you prefer a more enhanced brightness, select a higher setting. For a smoother, more natural image, adjust toward the lower setting. Degamma Allows you to adjust the color performance of the display.
User Controls Audio Control Volume Press Press on the remote control to decrease the volume. on the remote control to increase the volume. Mute Select On to mute the sound. Select Off to turn off mute. Disable Volume Control Select On to disable the volume adjustment. Select Off to enable the volume adjustment. Closed Captioning Select On to turn on closed captions. Select Off to turn off the captioning feature.
User Controls Default Settings Auto Signal Detect Auto Signal Detect enables the sequential searching of input connectors for a signal. On scans the inputs sequentially until the first input signal is Off keeps the signal detection in one input connector. found. Lamp Reminder Select this option to show or to hide the warning message when the “change lamp” message displays. The message appears 100 hours before the recommended lamp replacement.
User Controls Default Settings Zoom Press on the remote control to digitally magnify a default area of image in the center of the screen. Press on the remote control to zoom out of the image. Projector ID Press or on the remote control to set the projector ID number. The range of numbers is from 01 to 99. Keystone Press or on the remote control to adjust image distortion vertically and make a squarer image.
User Controls Default Settings Startup Screen Startup Screen Use this function to select your desired startup screen. If you change this setting, when you exit the OSD menu, the new setting takes effect the next time you open the OSD open. SMART: The default startup screen. User: Uses the saved picture from the “Capture User Startup Screen” function. Capture User Startup Screen Press screen.
User Controls Default Settings Set to Default Select “Yes” to return the display parameters on all menus to the factory default settings.
User Controls Default Settings Status Display the network connection status. For configuring the network setting, please refer to Web Management on page 27 DHCP Turn the network DHCP on or off. On assigns an IP address to the projector from the DHCP server automatically. Off allows you to assign an IP address manually. Password Reminder Press on the remote control to e-mail the yourself password you set through Web Management. IP Address Display the IP address.
User Controls Network Settings Gateway For configuring the network setting, please refer to Web Management on page 27. Display the default gateway of the network connected to the projector. DNS Display the DNS number. MAC Address Display the physical address. Group Name Display the group name. Projector Name Display the projector name. Location Display the location information. Contact Display the contact information.
User Controls Multi Languages Language This setting lets you choose the language of the OSD. Press to enter the submenu, and then press or or or on the remote control to select your preferred language. Press remote control to apply your selection.
User Controls Projector Information Lamp Hours Display the operating hours since the last lamp timer reset. All functions in Projector Information display the status of the projector only. Input Display the input connector type. Resolution Display the current display resolution. Firmware Version Display the projector firmware version. MPU Version Display the projector MPU version. Network Version Display the projector Network version. Model Number Display the model number.
User Controls Web Management This menu allows you to access Web Management and manage the projector from a remote location. Accessing Web Management If the projector is connected to a network, the IP address appears on the OSD screen. Example Be sure to use JavaScript supportive browser. ® Start the Internet Explorer or Netscape Navigator™ Internet browser and enter the IP Address into the address field. The Web page displays as below. Main Menu Setting Press Submit to apply your selection.
User Controls Home Page The Home Page displays basic information about the projector and allows you to set the OSD language. Language Choose the language for the Web Management interface. Press Submit to apply your selection. Projector Information Display the projector information.
User Controls Control Panel The Control Panel allows you to manage the projector status using a Web browser. Power Select Power ON to turn on the projector. Select Power OFF to put the projector into Idle Mode. Restore All Projector Defaults Select Submit to return the factory default settings. Select Refresh to refresh the current settings. Volume Adjust volume of the projector. Mute Select On to mute the sound. Select Off to turn off mute.
User Controls Control Panel Closed Captioning Select On to turn on closed captions. Select Off to turn off closed captions. Language Choose the closed captioning language. This feature is only supported in CC1 or CC2 mode. CC1 language: American English. CC2 language (depending on the TV channel of the user): Spanish, French, Portuguese, German, Danish.
User Controls Control Panel Display Mode Select a display mode: Bright Classroom, Dark Classroom, sRGB or User. Brightness Adjust the brightness of the image. Contrast The contrast controls the degree of difference between the lightest and darkest parts of the picture. Adjusting the contrast changes the amount of black and white in the image. Frequency Change the display data frequency to match the frequency of your computer’s graphic card.
User Controls Control Panel Sharpness Adjust the sharpness of the image. White Peaking This adjustable item utilizes a new color-processing algorithm and system level enhancements to enable higher brightness while providing true, more vibrant colors in picture. The range is from “0” to “10”. If you prefer a more enhanced brightness, select a higher setting. For a smoother, more natural image, adjust toward the lower setting. Degamma Allows you to adjust the color performance of the display.
User Controls Control Panel Auto Signal Detect Auto Signal Detect enables the sequential searching of input connectors for an signal. On scans the inputs sequentially until the first input signal is found. Off keeps the signal detection in one input connector. Lamp Reminder Select this option to show or to hide the warning message when the “change lamp” message displays. The message appears 100 hours before the recommended lamp replacement.
User Controls Control Panel Keystone Adjust the image distortion vertically and make a squarer image. H-Position (RGB input) Adjust the image to move left or right. V-Position (RGB input) Adjust the image to move up or down. Aspect Ratio Select one of the following aspect ratios to define how the image appears: Fill Screen: The input source scales to fit the full size of projection area. Match Input: The original input source’s aspect ratio is used.
User Controls Control Panel High Speed Fan Adjust the rotational speed of the projector’s fan. Select HIGH to rotate the projector’s fan at high speed if the projector’s temperature is high or if the location is above 6000 ft. altitude. Select NORMAL to use the normal rotational speed. Projection Mode Select the projection mode (Front, Ceiling, Rear or Rear Ceiling). Source Select the input source (VGA-1, VGA-2, Composite or S-Video).
User Controls Network Settings The Network Settings allow you to enable or disable DHCP and set network related addresses and names. DHCP On assigns an IP address to the projector from the DHCP server automatically. Off allows you to assign an IP address manually. IP Address Set an IP address. Subnet Mask Set the subnet mask number. Gateway Set the gateway number. DNS Set the DNS number.
User Controls Network Settings Group Name Allows you to define the group name of the projector. (Maximum characters: 12) Projector Name Allows you to define the projector name. (Maximum characters: 12) Location Allows you to define the location of the projector. (Maximum characters: 16) Contact Allows you to define the contact name of the projector.
User Controls Network Settings SNMP Enable Select On to enable SNMP MIB function. Select Off to disable SNMP MIB function. Read Only Community The Read Only Community string is like a password. It is sent along with each SNMP Get-Requst and allows access to device. The default Read Only Community string is “public”. Read-Write Community The Read-Write Community string is like a password. It is sent along with each SNMP Set-Requst and allows access to device.
User Controls E-mail Alert The E-mail Alert allows you to enter your e-mail alert address and adjust related settings. E-mail Alert Select Enable to turn on the E-mail Alert function. Select Disable to turn off the E-mail Alert function. To Define the e-mail address of the E-mail Alert recipient. Cc Define the e-mail address of the E-mail Alert “copy to” recipient. From Define the e-mail address of the user who sends the E-mail Alert. Outgoing SMTP server Define the outgoing SMTP server.
User Controls E-mail Alert Alert Condition The projector provides three alert conditions (Lamp warning, Low lamp life and Temperature warning). Select the conditions you want to apply, and then press Submit to apply the selection. The projector sends an alert e-mail (SMART Alert) to your e-mail address. Press the E-mail Alert Test to confirm your e-mail address. The projector sends a test e-mail (SMART Alert- Test Mail) to your e-mail address.
User Controls Password Settings This projector provides a security function that allows the administrator to manage usage for the projector. The Password Settings allow you to enable the Administrator Password function. First Time: The Password is 4 digits, default value is “1234”. Password Select Enable to enter a password for access to Web Management. When the password function is enabled, the administrator password will be required to access Web Management.
Appendices Troubleshooting If you experience a problem with your projector, please refer to the following information. If a problem persists, please contact your local reseller or service center. Image Problems No image appears on-screen Ensure that all the cables and power connections are correctly and securely connected as described in the “Installation” section on page 10. Ensure that all of the pins on the connectors are not bent or broken.
Appendices 5. Click Change on the Monitor tab. 6. Click Show all devices, and then select Standard monitor types from the SP drop-down list. Select the resolution mode you need from the Models drop-down list. 7. Verify that the resolution setting of the monitor display is lower than or equal to UXGA (1600 × 1200). If you are using a laptop computer: 1. Follow the steps above to adjust the resolution of the computer. 2.
Appendices Image has vertical flickering bar Adjust Frequency setting in the OSD to correct this issue. See page 15 for more information. Check and reconfigure the display mode of your graphic card to make it compatible with the projector. Image is out of focus Adjust the Focus Ring on the projector lens. The image is stretched when displaying 16:9 DVD title When you play an anamorphic DVD or a 16:9 DVD, the projector displays the image in 16:9 format.
Appendices Projector Status Indication Power LED Diagnostic LED (Green/Amber) (Red) Idle Mode Solid Amber Off Powering Flashing Green Off Green Off Flashing Amber Off Error (Temperature Exceeded) Off Flashing Red Error (Fan Failure)* Off Solid Red Error (Color Wheel Failure)* Off Solid Red Solid Amber Flashing Red Status On (Lamp On) Cooling * Contact your authorized SMART Reseller to solve the problem.
Appendices Message Reminders Fan failure * Contact your authorized SMART Reseller to solve the problem. Fan breakdown: One of the fans has failed. The projector will automatically shut down.* Temperature warning Projector overheated: Air vents might be blocked or the ambient temperature might be over 55℃. The projector will automatically shut down.
Appendices Compatibility Modes VGA Analog Resolution Mode Refresh Rate (Hz) H-Frequency Pixel Clock 720 × 400 720 × 400_85 85.039 37.927 35.5 640 × 480 VGA_60 59.94 31.469 25.175 640 × 480 VGA_72 72.809 37.861 31.5 640 × 480 VGA_75 75 37.5 31.5 640 × 480 VGA_85 85.008 43.269 36 800 × 600 SVGA_56 56.25 35.156 36 800 × 600 SVGA_60 60.317 37.879 40 800 × 600 SVGA_72 72.188 48.077 50 800 × 600 SVGA_75 75 46.875 49.5 800 × 600 SVGA_85 85.061 53.674 56.
Appendices Y/Pb/Pr signals Signal format fh (kHz) fv (Hz) 480i (525i) @ 60 Hz 15.73 59.94 480p (525p) @ 60 Hz 31.47 59.94 576i (625i) @ 50 Hz 15.63 50 576p (625p) @ 50 Hz 31.25 50 720p (750p) @ 60 Hz 45 60 720p (750p) @ 50 Hz 37.5 50 1080i (1125i) @ 60 Hz 33.75 60 1080i (1125i) @ 50 Hz 28.13 50 1080p (1125p) @ 60 Hz 67.5 60 1080p (1125p) @ 50 Hz 56.25 50 S-Video and Composite Video signals Video mode English 48 fh (kHz) fv (Hz) fsc (MHz) NTSC 15.73 60 3.
Appendices RS-232 Connector Pin Assignments 6 1 7 2 8 3 9 4 Pin no. Spec.
Appendices Lens cleaning instruction 1. Avoid touching or scratching the lens. 2. Do not use organic solvents, such as alcohol or ether, to clean the lens. 3. Use clean compressed air to remove dust and debris from the lens. 4. If wiping the lens becomes unavoidable, use protective gloves to dip a soft woven cloth in anti-static solvent and gently wipe from the center to the outer part. Use an anti-static solvent such as Hyperclean® EE-6310 and a cloth such as Purestat ® PW2004 or similar.
Appendices Replacing the lamp When the lamp life is nearing the end of use, you will receive a warning message. When you see this message, please contact your local reseller or service center to change the lamp as soon as possible. Make sure the projector has been cooled down for at least 30 minutes before changing the lamp. Caution: Hot! Let unit cool for 30 minutes before removing lamp module cover. Do not obstruct lens. High pressure lamp may shatter if improperly handled.
Appendices 2 1 3 4 5 Lamp Replacement Procedure 1. Switch off the power to the projector by pressing “ control. ” on the remote 2. Allow the projector to cool down for at least 30 minutes. 3. Disconnect the power cord. 4. Pull the lamp cover carefully. 5. Remove the lamp cover. 6. Use a screwdriver to unscrew the 2 screws from the lamp module. 7. Pull up the lamp handle carefully. 8. Remove the lamp module. To replace the lamp module, follow previous steps in reverse order.
Regulatory Compliance Waste Electrical and Electronic Equipment Regulations Waste Electrical and Electronic Equipment regulations apply to all electrical and electronic equipment sold within the European Union. When you dispose of any electrical or electronic equipment, including SMART products, we strongly encourage you to contact your local WEEE recycling agency for recycling and disposal advice. Your SMART product required the extraction and use of natural resources for its production.
Customer Support Online Support Visit www.smarttech.com/support to view and download user’s guides, “how-to” and troubleshooting articles, software and more. Training Visit www.smarttech.com/trainingcenter for training materials and information about our training services. Contacting SMART Technical Support SMART Technical Support welcomes your call. However, if you experience difficulty with your SMART product, you may want to contact your authorized SMART reseller first.
SMART Technologies 1207 – 11 Avenue SW, Suite 300 Calgary, AB T3C 0M5 CANADA www.smarttech.com/support www.smarttech.com/contactsupport Support +1.403.228.5940 Toll Free 1.866.518.6791 (U.S.