
User Guide
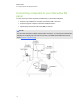
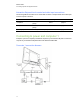
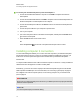
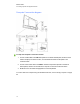
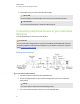

Table Of Contents
- Cover page
- Important information for your interactive flat panel
- Chapter 1: About your interactive flat panel
- Chapter 2: Installing your interactive flat panel
- Chapter 3: Connecting computers and peripheral devices
- Chapter 4: Installing SMART software
- Chapter 5: Using your interactive flat panel
- Turning on and turning off your interactive flat panel
- Understanding presence detection
- Using the infrared remote control
- Getting started with your SMART Board interactive flat panel
- Playing audio files on your interactive flat panel
- Using the USB receptacle
- Chapter 6: Using guest laptops with your interactive flat panel
- Chapter 7: Maintaining your interactive flat panel
- Updating your SMART software and firmware
- Calibrating your interactive flat panel
- Orienting your interactive flat panel
- Replacing a pen nib
- Cleaning the screen
- Cleaning the presence detection sensors
- Cleaning the camera windows and reflective tape
- Maintaining ventilation
- Preventing condensation
- Checking the interactive flat panel installation
- Removing your interactive flat panel
- Transporting your interactive flat panel
- Chapter 8: Troubleshooting for your interactive flat panel
- Appendix A: Adjusting video settings with the on-screen display menu
- Appendix B: Hardware environmental compliance
- Index
g To connect your interactive flat panel to power and computer 1
1. Connect the included VGA cable from computer 1 to the VGA 1 receptacle on the bottom
terminal panel.
2. Connect the included USB cable from the USB 1 receptacle on the inside terminal panel of the
interactive flat panel to a USB receptacle on the computer.
3. Connect the included power cable from the AC IN connector on the bottom terminal panel to a
power outlet.
4. Connect the power cable from your computer to a power outlet.
5. Turn on your computer.
6. Turn on the main power switch on the bottom terminal panel, and then press the Power button
on the front control panel.
7. Press the VGA 1 button on the remote control.
OR
Press the Input button on the front control panel until the input source is VGA1.
Installing computer 2 connection
You can install cabling that enables you to connect a second computer to your interactive flat panel
from another location in the room, such as on a conference table. By installing this connection, you
make use of connection points that might not be accessible when your interactive flat panel is
wall-mounted.
You require a USB cable and a VGA cable to install the computer 2 connection. You may install these
cables and run them through floors or walls to a nearby table.
Alternatively, your users can connect a laptop to the side terminal panel using the more accessible
USB receptacle and HDMI input. For more information, see Connecting a guest laptop on page 47.
For a diagram of the various computer options, see Connecting computers to your interactive flat
panel on page 16.
W A R N I N G
Ensure that any cables extending across the floor to your SMART product are properly bundled and
marked to avoid a trip hazard.
N O T E
You do not require a laptop to install this cabling.
C H A P T E R 3
Connecting computers and peripheral devices
18