
User Guide
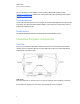
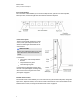
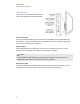
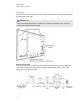
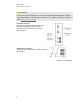
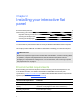
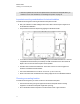
Table Of Contents
- Cover page
- Important information for your interactive flat panel
- Chapter 1: About your interactive flat panel
- Chapter 2: Installing your interactive flat panel
- Chapter 3: Connecting computers and peripheral devices
- Chapter 4: Installing SMART software
- Chapter 5: Using your interactive flat panel
- Turning on and turning off your interactive flat panel
- Understanding presence detection
- Using the infrared remote control
- Getting started with your SMART Board interactive flat panel
- Playing audio files on your interactive flat panel
- Using the USB receptacle
- Chapter 6: Using guest laptops with your interactive flat panel
- Chapter 7: Maintaining your interactive flat panel
- Updating your SMART software and firmware
- Calibrating your interactive flat panel
- Orienting your interactive flat panel
- Replacing a pen nib
- Cleaning the screen
- Cleaning the presence detection sensors
- Cleaning the camera windows and reflective tape
- Maintaining ventilation
- Preventing condensation
- Checking the interactive flat panel installation
- Removing your interactive flat panel
- Transporting your interactive flat panel
- Chapter 8: Troubleshooting for your interactive flat panel
- Appendix A: Adjusting video settings with the on-screen display menu
- Appendix B: Hardware environmental compliance
- Index
l Do not install the interactive flat panel in an area where it will be subjected to strong vibrations
or dust.
l Do not install the interactive flat panel near where the main power supply enters the building.
l Ensure adequate ventilation or provide air conditioning around the interactive flat panel so that
heat can flow away from the unit and the mounting equipment.
l If you mount the interactive flat panel in a recessed area, leave at least 4" (10 cm) of space
between the interactive flat panel and the recess walls to enable ventilation and cooling.
Choosing a mounting height
Consider the general height of your user community when your choose the mounting height for the
interactive flat panel.
C H A P T E R 2
Installing your interactive flat panel
12