
User's Manual
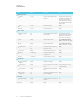
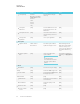


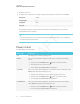
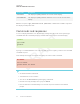

Table Of Contents
- Cover
- Important information
- Contents
- Chapter 1: Welcome
- Chapter 2: Installing the display
- Chapter 3: Connecting power and devices
- Chapter 4: Configuring the display
- Chapter 5: Configuring connected computers
- Chapter 6: Maintaining the display
- Chapter 7: Troubleshooting
- Troubleshooting the display
- Troubleshooting the display’s software
- Referring to the SMART knowledge base for additional troubleshooting information
- Contacting your reseller for additional support
- Appendix A: Using settings
- Appendix B: Remotely managing the display
- Appendix C: Hardware environmental compliance

APPENDIX A
USING SETTINGS
81 smarttech.com/kb/171164
Option Values Function Notes
Audio Properties
Balance
0–100 Sets the audio output from the
speakers
Drag the slider all the way to
the left to have all audio from
the left speaker. Drag the
slider all the way to the right
to have all the audio from the
right speaker.
Bass
0–100 Sets the bass level [N/A]
Treble
0–100 Sets the treble level [N/A]
Date & Time
Automatic Date &
Time
On
Off
Sets the display’s date and time
automatically
Configure the network to
allow Network Time Protocol
(NTP) requests to Internet
time servers. See page33.
Date
[N/A] Sets the display’s date Disable Automatic date &
time to set the date manually.
Time
[N/A] Sets the display’s time Disable Automatic date &
time to set the time manually.
24 Hour Time
On
Off
Shows the display’s time using
the 24-hour clock
[N/A]
Time Zone
[N/A] Sets the display’s time zone [N/A]
Language
[Languages] Sets the language for the
settings menu
[N/A]
Country
[Countries] Sets the display’s country [N/A]
Diagnostics
Touch Calibration
Wizard
[N/A] Calibrate the display [N/A]
Factory Reset
[N/A] Resets all options to their default
values
Only administrators should
reset the display.
Save Log File
[N/A] Copy diagnostic logs to a USB
drive
[N/A]
Improve the
Experience
On
Off
Sends usage statistics and error
reports to SMART
[N/A]
Security
Install certificates
[N/A] Install certificates to connect to a
network
See
Clean up
[N/A] [N/A] [N/A]