
User's Manual

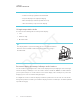
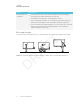

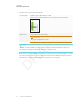
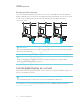
Table Of Contents
- Cover
- Important information
- Contents
- Chapter 1: Welcome
- Chapter 2: Installing the display
- Chapter 3: Connecting power and devices
- Chapter 4: Configuring the display
- Chapter 5: Configuring connected computers
- Chapter 6: Maintaining the display
- Chapter 7: Troubleshooting
- Troubleshooting the display
- Troubleshooting the display’s software
- Referring to the SMART knowledge base for additional troubleshooting information
- Contacting your reseller for additional support
- Appendix A: Using settings
- Appendix B: Remotely managing the display
- Appendix C: Hardware environmental compliance

CHAPTER 2
INSTALLING THE DISPLAY
19 smarttech.com/kb/171164
l Use M8 screws to fasten the wall bracket.
Screw length 12 mm + x mm < M8 < 45 mm + xmm
where x is the combined thickness of the wall bracket and washer
Fasten force
97.36–177.01 in-lb. (11–20 N·m)
CAUTION
Do not over-tighten the screws.
NOTE
SMART recommends M8 × 30 mm mounting screws for standard installations where the
total wall mount bracket and washer thickness is less than 7 mm.
l Because the receptacles might not be easily accessible after you mount the display, consider
connecting cables for power, room computer and other devices while the display is still in its
packaging (see Chapter 3: Connecting power and devices on page21).