
Installation Instructions


Page 2 of 4
190710
Important to know
1. Read all instructions carefully before installation and operation.
2. If you are not familiar with state and local electrical codes, it is recommended that you consult with a qualified
electrician.
3. Do not use in wet locations, use indoors only.
4. Non-replaceable LEDs.
5. Caution: LEDs emit bright light. Avoid looking directly into the light source for prolonged periods to avoid eye
damage.
6. Not to be used with a dimming circuit or any other electronically controlled switch.
7. The light can not be installed in a ceiling where thermal radiation is generated.
8. The hook can hang the chain but not the power cable.
9. Specification:
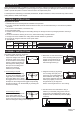
Turn off the power at fuse or circuit box.
1. Select suitable location that can
support the weight of the fixture
and has an outlet on the ceiling
to ensure that the fixture hangs
properly. Determine method of
mounting before drilling. Make
two spots on the ceiling 39 in.
apart for the mounting
hardware (not included).
46.25 3.375
Dimension(inch)
Item #.
348-1442
A
B
C
3.875
Watts
Weight
(lbs)
58 2.86
1
39 in
2. For Mounting to Drywall:
Drill 1/4 in. holes in the ceiling
to ensure the closed flaps of the
toggle bolt (not included) clear
the ceiling. Make sure to fasten
the toggle bolt into the butterfly nut before inserting
the flaps into the ceiling with the toggle bolt protruding
through the ceiling. Lock the assembly by screwing the
hook into the ceiling.
For Mounting to Wood:
Drill 1/16 in. diameter pilot hole
in the ceiling. Make sure to
fasten the combo wood-machine
end into the metal hook (not included)
before screwing into ceiling to lock and tighten.
Drywall
2.1
Wood
2.2
Before beginning assembly, installation or operation of product, make sure all parts are present. Compare parts with
package contents list and diagram on previous page. If any part is missing or damaged, do not attempt to assemble,
install or operate the product. Contact customer service for replacement parts.
Tools Required for Assembly (not included): Screwdriver, Phillips Screwdriver, Pliers, Electrical Tape, Wire Cutters,
Safety Glasses, Ladder, Wire Stripper.
ASSEMBLY INSTRUCTIONS
PREPARATION
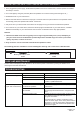
A
B
C
A
A
A
4. Hang fixture body (A) by placing
one mounting chain (AA) over
each hook (not included) that has
been installed in the ceiling. You
may need to adjust the mounting
chains (AA) slightly on the hooks
for light fixture (A) to hang level.
Fixture must hang at lease 3 in. from ceiling.
4
3. Attach the “S” hook at the bottom
of the mounting chain (AA) to the
hanger on the light fixture (A).
Repeat this step on the other
side of the light fixture (A).
3
“S” Hook
BB
AA
AA
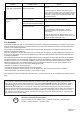
5. Fold the excess cord and fasten it using a
cable tie (not included). Plug power cord into
ceiling outlet. The attached pull chain can be
lengthened with an additional pull chain (BB) if
necessary.
5
ASSEMBLY INSTRUCTIONS
4