
Installation Instructions


LED Linkable
Cage Light
with Remote Control
MODEL No:
M-0007-EGAC
PACKAGE CONTENTS
INSTALLATION INSTRUCTIONS
OPTIONAL
REMOTE OPERATION
ADDITIONAL WARNINGS
3 YEAR LIMITED WARRANTY
This product is guaranteed against failure due to factory defects in materials or workmanship for three (3) years from the date of
purchase. This warranty is non-transferable and applies only to the original owner. Proof of purchase is required for repair or
replacement. This warranty does not cover normal wear of parts or damage resulting from any misuse of the product. Misuse of the
product includes, but is not limited to: washing the product, using in extreme weather conditions, opening the product, or trying to
remodel the product. Important: this warranty is only valid if the product has been purchased through an authorized reseller.
WARNINGS
WARNING: Do NOT look directly at LED light sources.
This fixture is rated for indoor/outdoor use damp
locations only.
WARNING: Use only in 120VAC, 60Hz circuits.
SAFETY AND PRECAUTIONS
1. Do NOT install over stoves, heaters or fires.
2. Do NOT look directly at LED light sources.
3. Suitable for indoor and outdoor damp locations only.
4. The LED modules used in this fixture are not serviceable.
5. This product is inspected prior to shipping. Do not use if
product is cracked, broken or missing parts.
6. Suitable for use in operating environments ranging between
-22° to 104°F (-30° to 40° C).
7. Electrical requirements can be found on back of the fixture.
8. If unsure how to install a light fixture, call a qualified electrician.
CUSTOMER SERVICE
For questions regarding this product, please contact us at 303.652.6164, M-F 7am - 4pm MT or e-mail us at
info@stonepointledlighting.com.
This device complies with Part 15 of the FCC rules. Operation is subject to the following two conditions: (1) This device may not cause harmful
interference, and (2) this device must accept any interference received, including interference that may cause undesired operation. Warning:
Changes or modifications to this unit not expressly approved by the party responsible for compliance could void the user’s authority to operate
the equipment. The user is cautioned that any changes or modifications not expressly approved by the party responsible for compliance could
void the user’s authority to operate the equipment. Note: This equipment has been tested and found to comply with the limits for a Class B digital
device, pursuant to Part 15 of the FCC rules. These limits are designed to provide reasonable protection against harmful interference in a
residential installation. This equipment generates, uses and can radiate radio frequency energy and, if not installed and used in accordance with
the instructions, may cause harmful interference to radio communications. However, there is no guarantee that the interference will not occur in
a particular installation. If this equipment does cause harmful interference to radio or television reception, which can be determined by turning
the equipment off and on, the user is encouraged to try to correct the interference by one or more of the following measures: 1) Reorient or
relocate the receiving antenna. 2) Increase the separation between the equipment and receiver. 3) Connect the equipment into an outlet on a
circuit different from that of the receiver. 4) Consult the dealer or an experienced radio/TV technician for help.
TROUBLESHOOTING GUIDE
CLEANING INSTRUCTIONS
Using a soft cloth, clean the fixture using a mild, non-abrasive glass cleaner.
DO NOT use solvents. DO NOT use cleaners containing abrasive agents.
NEVER spray liquid cleaner directly onto the LEDs, fixture or wiring.
Fixture does not turn on.
Problem
Probable Cause
Solution
Circuit breaker trips or fuse blows
when light is turned on.
1. Power is off.
2. Light not plugged in.
3. Remote distance is to far away.
4. Remote battery is dead.
1. Discontinue use
immediately.
1. Verify power supply is on.
2. Plug light in.
3. Decrease the distance.
4. Replace battery.
1. Call customer service at 303.652.6164.
2. Call an electrician.
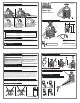
8.5 in.
21,59 cm
6.25 in.
15,88 cm
10.625 in.
26,99 cm
WARNING: DO NOT alter or disassemble the fixture. It is
completely enclosed and does not contain replaceable or
serviceable parts.
WARNING: DO NOT use with extension cord near water or
wherever water may accumulate.
DIMMING
DO NOT USE THIS FIXTURE WITH DIMMERS.
Doing so will void the warranty of this product.
LED Facts:
Color Temperature: 5000K (Daylight)
LED Emitter Life: 50,000 hours
Operating Voltage: 120v
Cord Type: 18/3 SJTW
Cord Length: 5 ft.
1
4
3
2
1. Place the cage light up to the hanging hardware, push the gate of the carabiner clip against the hanging hardware until it opens (Fig. 1) and
captures the hardware (Fig. 2). The installation is now complete. Plug the fixture in (Fig. 3).
The safety cable should be used if you are installing the cage light as low bay lighting (Fig. 4).
To install the safety cable,
feed the large loop end around one of the cage rings, pull the carabiner through the loop and pull the cable all the
way through
(Fig. 5)
. Attach the carabiner clip to structure to secure the light
(Fig. 5)
.
1. To turn the cage light on and off, press the button on the remote control unit and
aim at the base of the light. For best results, aim the remote at a 30° angle. (Fig. 6).
The remote control unit will work up to 30 feet away.
CAUTION: Personal injury can occur, along with damage
to the fixture and/or mounting surface may result if the
fixture is pulled from the surface. To prevent premature failure
from overheating, fixture should only be installed in
environments where the operating temperatures are between
-22° to 104°F (-30° to 40° C)
.
WARNING: This product has a grounded plug (two contact
blades and a grounding prong) as a feature to reduce the
risk of electric shock. The plug is fashioned to only fit in a
grounded outlet one way. If it does not fit, contact a qualified
electrician. Never use with an extension cord unless plug can be
fully inserted. DO NOT ALTER THE PLUG OR CORD.
Fig. 1 Fig. 2
Fig. 3
Fig. 6
Fig. 4
Fig. 5
WARNING: For outdoor utilizations use ONLY with
a GFCI protected outlet.
Revision Date: 09-25-2018
Metal
Cage
LEDs
Remote Control
Handle/
Hanging Hook
Carabiner Clip
Locking Buckle
Safety Cable
Carabiner Clip
Outlet Access Door
Grounded
Linking Outlet
5’ Cord 18/3 SJTW
The cage light is operated using an infrared remote control.
Uses 1: CR2025 3 volt battery (included)
BATTERY REPLACEMENT
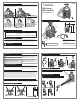
2. The remote battery can be removed by pulling the battery tray from the remote (Fig. 7).
Dispose of the battery in accordance with local laws. Insert a new CR2025 3 volt battery
into the battery tray (Fig. 8) and fully slide it back into the remote (Fig. 9).
Fig. 7
Fig. 8 Fig. 9
The remote uses a replaceable 1 CR2025 3 volt battery.
LINKING ADDITIONAL UNITS
2. Install each additional unit as in STEP 1. When adding units, turn cage light off prior to adding the additional units. Up to 10 total
units can be linked on one string of lights and MUST NOT EXCEED 5A. Open the outlet access door in order to gain access to the
grounded outlet (Fig. 10). Plug each additional light into the preceding unit (Fig. 11). Lock each plug in place by closing the locking
buckle onto the plug (Fig. 12 - 14). Repeat as necessary. Plug in the first unit and use the remote to turn the lights on individually one
by one after installing all the units you want linked.
OPTIONAL: The outlet is powered and can be used without the light on to plug in powered items.
Fig. 10 Fig. 11
Fig. 12 Fig. 13
Fig. 14
30 ft. Max. Distance