
Installation Instructions

INSTALLATION INSTRUCTIONS FOR LED
COMBO EXIT/EMERGENCY LIGHT
IMPORTANT
READ AND FOLLOW ALL
SAFETY INSTRUCTIONS
SAVE THESE INSTRUCTIONS
IMPORTANT SAFEGUARDS:
When using electrical equipment, always adhere to basic safety precautions including the following:
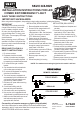
Connection of remote emergency lights (If Applicable)
Use Yellow & Blue wires for remote fixture(s). Route wires outside of fixture
separately or with AC supply wires. Make sure to keep all wires out of the way
of the EXIT LEGEND so there are no shadows.
The battery in this unit may not be fully
charged. After electricity is connected
to unit, let battery charge for at least
24 hours, then normal operation of this
unit should take effect. To check, press
TEST button. The emergency LED lamps
should illuminate.
INSTALLATION (CEILING MOUNT)
INSTALLATION (WALL MOUNT)
1. Remove faceplate and backplate and
set aside.
2. Connect 20-inch jumper leads to AC
input leads in J-Box. Fasten J-Box
bracket to J-Box. Use black wire for
120V. Use orange or red wire for 277V.
White wire is common.
3. Remove necessary knockouts and
fasten back plate to J-Box cover.
4. Snap housing on to back plate.
5. Connect and trim input leads and slide
through the hole in the backplate and
connect to supply leads in J-Box.
6. Connect battery connector to PCB only
after continuous AC power can be
provided to the unit.
7. Remove proper chevron(s) as required.
8. Secure face plate(s) to housing.
When re-lamping, use only LED lamps
specified in the fixture. Using other lamp
types may result in transformer damage
or unsafe conditions.
1. Do not use outdoors.
2. Equipment should be mounted
securely in locations and at heights
where it will not be readily subjected
to tampering by unauthorized personnel.
3. Do not mount near gas or electric
heaters.
4. Cap unused wires with enclosed wire
nuts or other approved method.
5. Do not use this equipment for anything
other than its intended use.
6. The use of accessory equipment not
recommended by the manufacturer will
void product listing and warranty and
may cause an unsafe condition.
7. Disconnect AC power before servicing
and installation.
8. Consult local building code for
approved wiring and installation.
9. Use caution when servicing batteries.
10. Any service on this equipment should
be performed by qualified personnel only.
11. Make sure wire terminations are secure
and leads are properly tucked in
appropriate wire channels.
1. Remove faceplate and set aside.
2. Connect 20-inch jumper leads to AC
input leads in J-box. Fasten
J-Box bracket to J-Box. Use black wire
for 120V. Use orange or red wire for
277V. White wire is common.
3. Fasten canopy to J-Box bracket.
4. Remove canopy hole cover on the top
and snap housing to canopy.
5. Connect and trim input leads and slide
through the canopy and connect to
supply leads in the J-Box.
6. Connect battery connector to PCB only
after continuous AC power can be
provided to the unit.
7. Remove proper chevron(s) as
required.
8. Secure face plate(s) to housing
REMOTE CAPABLE
LED
POWERED!
REGULAR
TEST
LAMP
BLUE(-)
YELLOW(+)
+
-
LAMP
BLUE(-)
YELLOW(+)
TRANSFORMER
PCB/LED BOARD
BATTERY
RED(277V)
BLACK(120V)
WHITE(COM)
"READY" LIGHT
BLUE(-)
YELLOW(+)
To Remote Head
TEST
LAMP
BLUE(-)
YELLOW(+)
BATTERY
+
-
LAMP
BLUE(-)
YELLOW(+)
TRANSFORMER
PCB/LED BOARD
"READY" LIGHT
RED(277V)
BLACK(120V)
WHITE(COM)
WIRING DIAGRAM
NOTE: The maximum mounting height for this model is 8.5 feet.
CAUTION:
DO NOT connect YELLOW
and BLUE remote leads
together.
5-YEAR
SKU # 346-9029