
User's Guide
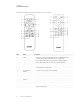
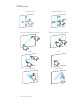

Table Of Contents
- Important information
- Chapter 1: Welcome
- About this guide
- About the display
- Touch
- Writing, drawing and erasing
- Support for additional pens and tools
- iQ experience
- Display
- Audio
- Network connectivity
- Room computers and guest laptops
- Accessory slot
- Convenience panel
- Proximity sensor
- Ambient light sensor
- Remote control and IR sensor
- Temperature and humidity sensors
- Mounting hardware
- Accessory mounting points
- Identifying your specific model
- Accessories
- More information
- Chapter 2: Using basic features
- Chapter 3: Using the iQ apps
- Chapter 4: Connecting computers and other devices
- Chapter 5: Troubleshooting
- The display isn’t turning on
- The display is turning on when it shouldn’t
- The screen is blank or there’s a problem with the image on the screen
- There’s no sound or there’s a problem with the sound
- Touch isn’t working as expected
- The pens and erasers aren’t working as expected
- iQ apps aren’t working as expected
- SMART software on connected computers isn’t working as expected
- The SMART OPS PC module isn’t working as expected
- Contacting your reseller for additional support

CHAPTER 2
USING BASIC FEATURES
13 smarttech.com/kb/171415
Using the convenience panel
The convenience panel contains buttons for turning the display on and off, controlling the volume,
freezing and unfreezing the screen, and showing and hiding a screen shade. It also includes
connectors for USB peripherals and a computer or other input source.
No. Name Procedure
1 Power
l
Press to enter or exit Standby mode (see Waking up the
display and putting it back to sleep on page11).
l
Press and hold for five seconds to turn off the display.
l
Press and hold for 10 seconds to reset the display.
2 Volume increase Press to increase the volume (see Adjusting the volume on
page20).
3 Volume
decrease
Press to decrease the volume (see Adjusting the volume on
page20).
4
Freeze
Press to freeze and unfreeze the screen (see page21).
5
Screen shade
Press to hide screen contents behind a screen shade (see
Showing and hiding the screen shade on page21).
6 USB Type A
connector (×2)
Connect USB drives and other devices that you want to use
with the iQ experience or a connected computer (see
Connecting USB drives, peripherals, and other devices on
page35).
7 HDMI 3 input
connectors
Connect a computer or other input source to use with the
display (see page31).