QuadKVM Quadruple View KVM Switch View four different analog/digital video sources simultaneously on one screen with USB keyboard and mouse support. Installation Manual Made in the U.S.A. www.smartavi.com www.smartavi.
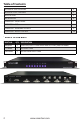
Table of Contents TECHNICAL SPECIFICATIONS 3 INTRODUCTION / FEATURES 4 APPLICATIONS 5 INSTALLATION 6 OPERATION - FRONT PANEL 7 OPERATION - OSD 8 OPERATION - KEYBOARD HOTKEYS 9 OPERATION - RS-232 CONTROL 10 What’s in the Box? PART NO. QTY SMQKVM 1 4-Port DVI, USB 1.1 KVM switch with PiP/Dual/Quad/Full modes CCPWR06 1 6ft Power Cable CBLDB906 1 6ft DB9 Serial RS232 Cable 2 DESCRIPTION www.smartavi.
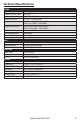
Technical Specifications VIDEO Format Maximum Pixel Clock Input Interface Output Interface Input Resolution Output Resolution DDC Input Equalization Input Cable Length Output Cable Length USB Signal Type Input Interface Output Interface CONTROL Front Panel Keyboard RS-232 OTHER Power Dimensions Weight Approvals Operating Temp. Storage Temp.
Introduction The QuadKVM Switch allows you to view up to four different analog and digital video sources simultaneously on one display device. It also supports keyboard and mouse functionality, allowing you to access all four sources with one set of interface controls. Connections to video sources are managed via DVI-I connectors. Advanced viewing options include dual-mode, quad-mode, full-screen mode, and PiP (Picture in Picture) mode.
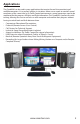
Applications The QuadKVM can be used in many applications that require the real-time monitoring of multiple computers. It is a perfect solution in situations where a user needs to monitor several computers at the same time. In Air Traffic Control environments, several computers need to be monitored for the progress of flights and flight information.
Installation USB USB INPUTS (to computers) POWER RS-232 UPDATE DVI-D INPUTS (to computers) DVI USB OUTPUTS (to keyboard/mouse) DVI-D OUTPUT (to display) 1. Power off all computers and the display. 2. Connect the USB output of each computer to the USB inputs on the QuadKVM using male-to-male A to B USB cables. 3. Connect the DVI-I/D output of each computer to the DVI-D inputs on the QuadKVM using male-to-male DVI-D cables. 4. Connect the USB keyboard and mouse to the USB outputs on the QuadKVM. 5.
Front Panel Operation QuadKVM Front Panel Buttons and Indicators The QuadKVM operates in much the same way as a conventional KVM. To view and control any input, simply press the corresponding button on the front of the QuadKVM. For example, press 1 for the first input, 2 for the second input, and so on. The LED lights will change accordingly. Setting the Resolution The first time you connect a display to the QuadKVM, you will need to set the output resolution to that of your display.
On-Screen-Display (OSD) Operation The QuadKVM has an OSD that is accessible by pressing MENU on the front panel. To select an option: • press 1/2/3/4 on the front panel (1-4 only) • use the keyboard up and down arrow keys, pressing enter to select, left arrow to go back. • press the corresponding F-key To exit the OSD, press MENU or escape. SMARTAVI QUADKVM F1 . SYSTEM F2 . MODE F3 . CONFIGURATION F4 . VIDEO F5 . HELP Screenshot of the QuadKVM’s Main OSD. SYSTEM MODE F1 . HOTKEY CFG F2 .
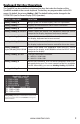
Keyboard Hot-Key Operation The QuadKVM can be controlled via keyboard hot-keys that make the functions of the QuadKVM available at the console keyboard. The hot-keys are programmable via the OSD menus. By default, the primary HotKey is Ctrl. The default hotkey can be changed in the SYSTEM OSD (see On-Screen-Display (OSD) Operation). HOTKEY SEQUENCE FUNCTION HotKey, HotKey, O Brings up the On Screen Display (See OSD Operation). HotKey, HotKey, I Displays an informational status screen. See below.
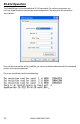
RS-232 Operation The QuadKVM may also be controlled via RS-232 commands. To use these commands, you must use HyperTerminal or an alternate terminal application. The settings for the connection are as follows: Once you have connected to the QuadKVM, you will see resolution information for the connected sources and a command prompt. The screen should look similar to the following: 10 www.smartavi.
RS-232 Operation (continued) Once you have entered the correct password, the following commands may be issued: Help and a list of options ? Information i Dual Mode d[LEFT 1-4][RIGHT 1-4] Full-Screen f Quad-Mode q PiP-Mode p[1-4] Output Resolution o[0-XGA|1-HD|2-WUXGA] Set the EDID E [1-WUXGA|2-VGA|3-HD](for 1) [1-WUXGA|2-VGA|3-HD](for 2) [1-WUXGA|2-VGA|3-HD](for 3) [1-WUXGA|2-VGA|3-HD](for 4)
At SmartAVI, we offer a complete line of audio/video solutions for high-quality signal switching and distribution. Our devices support multiple signal types including VGA, DVI, HDMI, USB, RS232, IR and more.