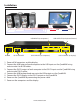
Installation Manual QuadKVM Quadruple View KVM Switch View four different analog/digital video sources simultaneously on one screen with USB keyboard and mouse support. www.smartavi.
Table of Contents PRODUCT FEATURES 3 TECHNICAL SPECIFICATIONS 4 APPLICATIONS 5 INSTALLATION 6 OPERATION - FRONT PANEL 7 OPERATION - OSD 8 OPERATION - KEYBOARD HOTKEYS 9 OPERATION - RS-232 CONTROL 10 Introduction The QuadKVM Switch allows you to view up to four different analog and digital video sources simultaneously on one display device. It also supports keyboard and mouse functionality, allowing you to access all four displays with one set of interface controls.
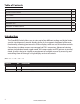
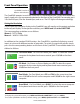
Features • • • • • • • • • • • • View up to four computers on a single monitor at the press of a button Supports USB keyboard and mouse On-screen display (OSD) makes setup and switching easy Change views by pressing the tact switches, keyboard hotkeys, and RS-232 Display each computer with clean and crisp high-resolution video Supports DVI-D resolutions up to 1900 x 1200 @ 60 Hz Supports VGA resolutions up to 1600 x 1200 @ 60Hz Quad-mode splits the screen to show four computers on one screen Dual-mode spli
Technical Specifications VIDEO Format DVI-D Single Line Maximum Pixel Clock 165 MHz Input Interface (4) DVI-D 29-pin female Output Interface (1) DVI-D 29-pin female Resolution DVI-D up to 1920 x 1200 @60Hz VGA up to 1600 x 1200 @60Hz DDC 5 volts p-p(TTL) Input Equalization Automatic Input Cable Length Up to 20 ft. Output Cable Length Up to 20 ft. USB Signal Type USB 1.1 and 1.
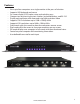
Applications QuadKVM Mac PC The QuadKVM can be used in many applications that require the real-time monitoring of multiple computers. It is a perfect solution in situations where a user needs to monitor several computers at the same time. In Air Traffic Control environments, several computers need to be monitored for the progress of flights and flight information.
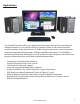
Installation USB USB INPUTS (to computers) POWER RS-232 UPDATE DVI-D INPUTS (to computers) DVI-D USB OUTPUTS (to keyboard/mouse) DVI-D OUTPUT (to display) 1. Power off all computers and the display. 2. Connect the USB output of each computer to the USB inputs on the QuadKVM using male to male A to B USB cables. 3. Connect the DVI-D output of each computer to the DVI-D inputs on the QuadKVM using male to male DVI-D cables. 4. Connect the USB keyboard and mouse to the USB outputs on the QuadKVM. 5.
Front Panel Operation QuadKVM Front Panel Buttons and Indicators The QuadKVM operates in much the same way as a conventional KVM. To view and control any input, simply press the corresponding button on the front of the QuadKVM. For example, press 1 for the first input, 2 for the second input, and so on. The LED lights will change accordingly. Setting the Resolution The first time you connect a display to the QuadKVM, you will need to set the output resolution to that of your display.
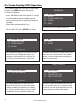
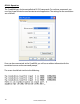
On-Screen-Display (OSD) Operation The QuadKVM has an OSD that is accessible by pressing MENU on the front panel. To select an option: • press 1/2/3/4 on the front panel (1-4 only) • use the keyboard up and down arrow keys, pressing enter to select, left arrow to go back. • press the corresponding F-key To exit the OSD, press MENU or escape. SMARTAVI QUADKVM F1 . SYSTEM F2 . MODE F3 . CONFIGURATION F4 . VIDEO F5 . HELP Screenshot of the QuadKVM’s Main OSD. SYSTEM MODE F1 . HOTKEY CFG F2 .
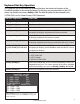
Keyboard Hot-Key Operation The QuadKVM can be controlled via keyboard hot-keys that make the functions of the QuadKVM available at the console keyboard. The hot-keys are programmable via the OSD menus. By default, the primary HotKey is Ctrl. The default hotkey can be changed in the SYSTEM OSD (see On-Screen-Display (OSD) Operation). HOTKEY SEQUENCE FUNCTION HotKey, HotKey, O Brings up the On Screen Display (See OSD Operation). HotKey, HotKey, I Displays an informational status screen. See below.
RS-232 Operation The QuadKVM may also be controlled via RS-232 commands. To use these commands, you must use HyperTerminal or an alternate terminal application. The settings for the connection are as follows: Once you have connected to the QuadKVM, you will see resolution information for the connected sources and a command prompt. The screen should look similar to the following: 10 www.smartavi.
RS-232 Operation (continued) Once you have entered the correct password, the following commands may be issued: Help and a list of options ? Information i Dual Mode d[LEFT 1-4][RIGHT 1-4] Full-Screen f Quad-Mode q PiP-Mode p[1-4] Output Resolution o[0-XGA|1-HD|2-WUXGA] Set the EDID E [1-WUXGA|2-VGA|3-HD](for 1) [1-WUXGA|2-VGA|3-HD](for 2) [1-WUXGA|2-VGA|3-HD](for 3) [1-WUXGA|2-VGA|3-HD](for 4)
© Copyright 2012 SmartAVI, All Rights Reserved NOTICE The information contained in this document is subject to change without notice. SmartAVI makes no warranty of any kind with regard to this material, including but not limited to, implied warranties of merchantability and fitness for any particular purpose. SmartAVI will not be liable for errors contained herein or for incidental or consequential damages in connection with the furnishing, performance or use of this material.