
SI4548-US-10 Manual

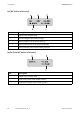


Table Of Contents
- 1 Information on this Manual
- 2 Sunny Island 4548-US/6048-US
- 3 Safety Precautions
- 4 Assembly
- 5 Opening and Closing
- 6 Electrical Connection
- 7 Control Elements
- 8 Initial Start-Up
- 9 Switching On and Off
- 10 Operation
- 11 Archiving Data on an SD Card
- 12 Additional Functions
- 12.1 Load Shedding
- 12.2 Sleep Mode
- 12.3 Time-Controlled Operation
- 12.4 Overload and Short-Circuit Behavior
- 12.5 Mixed Operation with Sunny Island inverters of Different Power
- 12.6 Device Faults and Autostart
- 12.7 Automatic Frequency Synchronization
- 12.8 Time-Controlled Standby
- 12.9 Behavior in the Event of a Failure in a Three-Phase System
- 13 Battery Management
- 14 Connecting External Sources
- 14.1 Generator
- 14.1.1 Parallel Connection
- 14.1.2 Generator Start Options
- 14.1.3 Generator Operation
- 14.1.4 Manual Generator Operation
- 14.1.5 Automatic Generator Operation
- 14.1.6 Limits and Power Control
- 14.1.7 Run Times
- 14.1.8 Operation Together with PV Inverters and Wind Power Inverters
- 14.1.9 Stopping the Generator
- 14.1.10 Stopping the Sunny Island
- 14.1.11 Disturbances
- 14.2 Grid
- 14.2.1 Limits of the Voltage Range and Frequency Range
- 14.2.2 Starting the Sunny Island
- 14.2.3 Operation in the Event of Grid Failure in a Grid-Tie Backup Configuration
- 14.2.4 Backup Operation and Anti-Islanding
- 14.2.5 Grid Reconnection
- 14.2.6 Grid Operation
- 14.2.7 Grid Failure
- 14.2.8 Disturbances
- 14.2.9 Limits and Power Control
- 14.2.10 Operation Together with PV Inverters and Wind Power Inverters
- 14.3 Generator and Grid
- 14.1 Generator
- 15 Relays
- 16 Multicluster Operation
- 16.1 Communication between the Sunny Island inverters
- 16.2 Initial Start-Up of the Multicluster System
- 16.3 Switching a Multicluster System On and Off
- 16.4 Generator Operation
- 16.5 Behavior with Different States of Charge
- 16.6 Testing the Multicluster Communication
- 16.7 Automatic Frequency Synchronization
- 16.8 Updating the Firmware
- 16.9 Error Handling in the Multicluster System
- 16.10 Grid Operation
- 16.11 Generator Emergency Operation
- 17 PV Inverters
- 18 Maintenance and Care
- 19 Parameter Lists
- 20 Troubleshooting
- 21 Accessories
- 22 Technical Data
- 23 Glossary
- 24 Contact

10 Operation SMA America, LLC
82 SI4548_6048-US-TB_en-13 Technical description
10.3 Direct Access - Direct Access to the Parameters
The "600# Direct Access" menu gives you direct access to the selected parameter using the
parameter name or number.
Via the Select Name sub-menu, you have direct access to the following functions:
•GnManStr: manual starting of the generator (see Section 14.1.4 "Manual Generator
Operation", page 121)
• ManChrgSel: manual starting of equalization charge (see Section 13.4.3 "Equalization
Charge", page 112)
Via the Select Number menu, you have direct access to every parameter by entering the parameter
number.
10.4 Compact Meters
The "150# Compact Meters" menu is intended primarily to help the installer commission the device.
The display gives you information at a glance on the following areas:
•Battery 1
•Battery 2
• Inverter (AC values)
•InvTot
• Grid/generator (external)
•ExtTot
•Inverter status
Example
Using the menu 600#, you can select the "222.01 BatChrgCurMax" parameter, for example,
to set the maximum battery charging current.
The direct access must be entered as a five-digit number, for example, 22201. Here, the first
three digits describe the menu number and the last two describe the parameter number.
Exit the menu level after the parameter has been set.
Selecting the area
You can select the different displays of the compact meters using the up/down arrow buttons.
Here, you can also use the "Wrap around" function.
The displays are always shown from the upper left to the lower right.