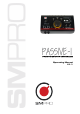
Pa ssiv e M o nito r Co ntro ller Operating Manual V1.
Contents 1 SAFETY INSTRUCTIONS ............................................................................................................ 3 2 FOREWARD ................................................................................................................................. 4 2.1 3 Important Notes: .................................................................................................................. 4 INTRODUCTION ....................................................................
1 SAFETY INSTRUCTIONS CAUTION: To reduce the risk of electrical shock, do not remove the cover or rear panel of this unit. No user serviceable parts inside. Please refer servicing to qualified personnel only. WARNING: To reduce the risk of fire or electrical shock, do not expose this appliance to rain or moisture. DETAILED SAFETY INSTRUCTIONS: All safety and operation instructions of this manual should be read and adhered to before operation.
Fall 2 08 FOREWARD Dear Customer, Thank you for purchasing this SM Pro Audio product. The PASSIVE-1 is designed to be a comprehensive studio monitor controller for home, project and professional studios, sound equipment rental companies, repair centers, schools and fixed installations — in short, virtually any and all venues where audio products are used.
3 INTRODUCTION The PASSIVE-1 expands on the core audio control capabilities of the venerable M-Patch 2, with four selectable signal sources, USB I/O, talkback with built-in condenser microphone, ducking, mute, mono summing and dual independent headphone amplifiers. Featuring entirely passive operation from signal input to output, the PASSIVE-1 delivers the purest signal path possible, giving you clean, transparent sound with no added audio artifacts or coloration.
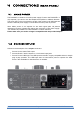
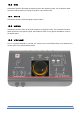
4 CONNECTIONS (rear panel) 4.1 Mains Power The PASSIVE-1 includes a 9V mains power supply. Power to the PASSIVE-1 is only required if you wish to use the headphone amplifiers or talkback features. The power LED on the front panel (to the left of the volume knob) will illuminate when the external power supply is connected and mains power is present. Note: Mains power is not required for the audio signal path.
4.3 Outputs Outputs is the description of the 4 output connectors. They are line level signal for plugging in your active studio monitors or to the inputs of a power amplifier that is driving your passive monitors. • • • Outputs A and B are the stereo 6.5mm or ¼ inch jacks Output 2T (2 Track) is the 6.5mm stereo output that includes the talkback signal Source D is the USB output with Legacy driver built in. USB does not need mains power to operate.
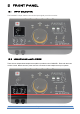
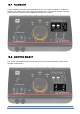
5 FRONT PANEL 5.1 Input Selector The PASSIVE1’s input selector chooses the input signal you wish to monitor. 5.2 Headphone Amplifiers There are two independent headphone amplifiers provided on the PASSIVE-1. Each with their own volume control. Note that mains power must be connected for the headphone amp to operate.
5.3 Dim Activate this switch to decrease the listening level of the outputs by 20db. This is helpful to allow discussion without having to change the position of the volume knob. 5.4 Mute Activate this switch to mute the signal from the outputs. 5.5 Mono Activate this switch to listen to the audio outputs in monophonic mode. This combines the stereo audio signal into a monophonic signal, which helps to check for any phase cancellation issues in the stereo signal. 5.
5.7 Talkback A built-in talkback microphone, automatically ducks the Control Room outputs by -20dB when engaged. The talkback mic can be sent to the headphones or to the 2TRACK output. Note that power must be connected for the TALKBACK microphone to operate. 5.8 Monitor Select The monitor select switches activate the audio to the A & B outputs respectively. Both can be selected simultaneously.
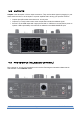
6 APPLICATION Connecting Active speakers directly to the output of the PASSIVE-1 Monitor Controller. When connecting PASSIVE speakers, you must first connect the output of the PASSIVE-1 to your amplifier and then connect the amplifier to the speakers.
7 SPECIFICATIONS Frequency Response: Line Level Inputs and Outputs +0.2 - -0.
8 WARRANTY 8.1 Warranty Registration To be protected by this warranty, please register your purchase using our online registration form at http://www.smproaudio.com/index.php/en/service/register 8.2 Warranty SM ProAudio warrants the mechanical and electronic components of this product to be free of defects in material and workmanship for a period of three (3) years from the original date of purchase, in accordance with the warranty regulations described below.
Connection or operation of the unit in any way that does not comply with the technical or safety regulations applicable in the country where the product is used. Damages/defects that are caused by any other condition beyond the control of SM Pro Audio. Any repair carried out by unauthorized personnel will void the warranty. Products which do not meet the terms of this warranty will be repaired exclusively at the buyer‘s expense. SM Pro Audio will inform the buyer of any such circumstance.
9 FCC and CE Regulation This device complies with Part 15 of the FCC Rules. Operation is subject to the following two conditions: (1) this device may not cause harmful interference, and (2) this device must accept any interference received, including interference that may cause undesired operation. Caution: Any changes or modifications in construction of this device with are not expressly approved by the party responsible for compliance, could void the user's authority to operate equipment.