
Installation & Assembly
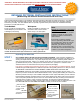

OPTIONAL QUICK START
INSTALLATION PAGE
Page 6 of 6
Rev A. SAS-100-F&S 04/16
After reviewing page one and completing Step 1 -
If you have previously installed a Slide-A-Shelf
TM
made-to-fit slide-out organizer...or are familiar with the
concept/process, feel free to reference this Quick Start page to install your slide-out(s).
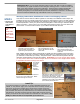
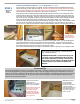
•
In the target cabinet opening lay the left
and right cabinet rails into place parallel
with each other, overlay the template
between the rails aligning the front L-
brackets with the template’s corner
access holes.
•
Position the rails between the template
to be parallel and square to the front of
the shelf/cabinet, making certain both
inner rail extenders clear the opening by
sliding them out and back in. Using the
#6 x 5/8” pan head screws provided
drive a screw thru the small round hole
in both the front and rear L-brackets of
the right rail. Do not use the oval holes.
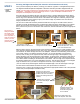
•
Holding the template in place with both
rails up against the left and right edges
of the template, as you did on the right
side/rail, drive a pan head screw into
the center of the oval holes in both the
front and rear L-brackets of the left rail.
Remove the template.
•
For both rails, slide the INNER ball
bearing carriage all the way forward to
the stop, then insert the slide-out shelf
or organizer into the cabinet rails as
shown and test the in and out glide
motion to be sure it is smooth, not too
tight and not too loose.
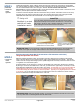
•
The end of the shelf rails are placed into
the plastic guide clip of their
corresponding cabinet rail. If the shelf
seems to tight or loose, loosen the screws
in the oval holes of the left rail L-brackets
and nudge the rail to the right or left as
needed and re-tighten. Re-test the motion
and repeat to your satisfaction.
•
When you are satisfied that the rail
alignment results in smooth sliding
action, remove the slide-out/organizer
and drive a screw into the round hole
of each L-bracket on the left rail. This
will lock the rails into position.
CONGRATULATIONS! Your slide-out installation is complete. We are confident you will enjoy your
made-to-fit Slide-A-Shelf
TM
for years to come. Comments? Questions? Call toll-free 800-507-0522.
Cabinet base level
Template placed
between rails over
front L-brackets
KEEP RAIL AGAINST THE
LEFT EDGE OF TEMPLATE
Align with left and
right cabinet rail
Back of slide-out shelf
1. Engage the
back end of the
shelf rails into
the cabinet rails
2. Push shelf
into cabinet
firmly
Loosen
screw in oval
hole to
adjust rail
Voila!
Hold rail against
template edge
square to the front
NEW!
Adjustable rail bracket
Oval hole
Round
hole