
Installation & Assembly
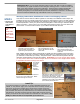

FINAL NOTE: During
our manufacturing
process we have
allowed for a tolerance
at the front of each
slide-out shelf where the
sides attach to the front.
If present a slight gap
here is normal.
Cosmetic
Front
Side
Assembly
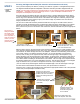
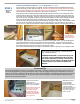
Inserting Your Slide-out Shelf (pictured) or Organizer (not pictured)
Once the rails are secure inside your cabinet, be sure to slide the inner rail assembly back into the
cabinet rail housing...BUT with your finger tip, pull the inner ball-bearing carriage all the way forward
until it touches the plastic track clip/insert at the front of the cabinet rail. This will make engaging the
rails attached to the slide-out much easier. (See photo on left below.)
Now take the slide-out shelf/organizer and aligning the right and left sides to the cabinet rails in the
opening place the back end of the silver shelf rail into the black or gray plastic track clips at the very
front of the inner rail carriage. Note the upper and lower grooves in the clips and align the shelf rails
into those grooves. Keeping the slide-out centered and parallel to the floor, gently engage the back
ends of the steel shelf rails and push the slide-out into the cabinet slowly. You will feel some
resistance as the rail channels engage the ball-bearing carriages on both sides. Push FIRMLY all the
way, but do not excessively force the slide-out if it stops abruptly. Once the slide-out unit is all the
way in, move it in and out several times to help the three different sections to engage with each other.
STEP 5
•
All slide-out
cabinet
organizers
Now, you’re “up and running”…OR as we like to
say, “smoothly sliding”!
CONGRATULATIONS! It’s quick and easy and
you save a money installing made-to-fit slide-
out cabinet organizers yourself. Follow these
same steps for each made-to-fit Slide-A-Shelf
TM
cabinet organizer you have purchased and
ENJOY!
Voila!
Align with left and right
cabinet rail
Back of slide-out
shelf
1. Engage the
back end of the
shelf rails into
the cabinet rails
Page 5 of 6
Rev A. SAS-100-F&S 04/16
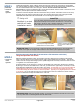
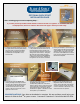
Once you complete this step, and are happy with the in and out glide motion, (see Install Tip below)
you should extend the unit out to have access to the left L-brackets. In the front and rear add an
additional screw in the round hole adjacent to the oval hole of both L-brackets. This will assure that
the cabinet rails will not shift out of position over time with usage.
Also see the Troubleshooting flyer included in the Master Carton for other tips and to adjust the rails.
Final Install Tip!
Once the cabinet rails are secured, if you determine your slide-out shelf or organizer is too tight (or even to loose), you
can make rail adjustments by simply removing the slide-out unit and slightly loosening the screws that are in the oval
holes of the left steel L-brackets. Shift the rail to the right or left and re-tighten. Re-install your slide-out, test and repeat
if necessary. See the photo below for an up close look at further securing these brackets with two additional screws
placed in the round holes if desired.
Loosen these screws to
make make rail
adjustments if necessary.
Don’t forget to re-tighten.
NOTE: With weight on the
slide-out and over time
with usage, the glide
motion will smooth out.
Extending and retracting
the slide-out will be easy
and convenient!
Slide ball-bearing
carriage forward
Loosen screw
in oval hole to
adjust rail
Although optional,
this extra screw
prevents rails from
moving over time
2. Push shelf
into cabinet
firmly
Front