
Installation & Assembly

STEP 3
(continued)
•
All slide-out
cabinet
organizers
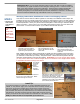
Holding the template in place, making certain the right rail is against the right edge of the template,
use your #2 Phillips screwdriver, ideally one with a magnetic tip, and drive a #6 x 5/8” panhead screw
into the small ROUND hole in the front right L-bracket...do not use the oval hole here!
IMPORTANT: For proper rail alignment ALL screws must be driven into the center of the hole on each
bracket. (See the photos below for additional detail.)
Continue to hold the template down and reach back with your driver and another screw set on its tip
and drive the screw into the small round hole in the L-bracket at the back end of the right rail. BE
CERTAIN THAT THE RAILS DO NOT MOVE off of the 90 degree square position.
Install Tip!
If you are using manual screw drivers you will want to pre-punch a
starter hole for the tip of the screw to set down into. You can use a
nail punch to do this or even a medium sized nail. Doing so will
make starting the screw easier and more accurate!
☼ Using a lit
flashlight in a dark
cabinet will make
installation easier!
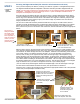
IMPORTANT INFO: It is not necessary to slide the template backwards prior to securing the rear
L-bracket on the right rail. Simply make certain the rail is held in place against the template.
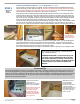
Drive each screw into to center of
the round L-bracket hole
Also keep front edge of template
parallel to the front of the cabinet
Reach in and drive the screw into
the round hole of back right L-
bracket
Page 4 of 6Rev A. SAS-100-F&S 04/16
KEEP RAIL AGAINST THE
RIGHT EDGE OF TEMPLATE
STEP 4
•
All slide-out
cabinet
organizers
Securing the Left Cabinet Rail (Full extension & Full extension soft-close)
Using the adjustable oval holes!
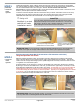
With the template still held in place, and similar to the right cabinet rail, be certain that the bottom
edge of the left cabinet rail is up against the left edge of the template the entire length. This should
result in the left and right rails being in perfect parallel alignment and ready receive the slide-out shelf
or organizer once secured into place.
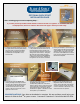
As pictured below on the left, drive a screw into the middle of the oval hole in the left front L-bracket.
By driving a screw into the middle of the oval hole, you will have the opportunity if necessary to make
slight alignment adjustments to the rail position very easily. Occasionally once you insert the slide-out
shelf/organizer it may be too tight or too loose requiring you to loosen the front and/or the rear left
screws and shifting the rail to a wider or narrower position. Typically a very slight adjustment is all that
is necessary. As you did with the right rail, now reach back to the rear L-bracket on the left rail and
secure a screw down through the middle of the oval hole.
IMPORTANT INFO: Slide the template forward, up and out from between the rails. Be sure to save
it for any other slide-out shelf/organizer with the same width.
LEFT RAIL
KEEP RAIL AGAINST THE
LEFT EDGE OF TEMPLATE
RIGHT RAIL
Template
Hold rail against
template edge