
Installation & Assembly

STEP 3
•
All slide-out
cabinet
organizers
Securing the Right Cabinet Rail (Full extension & Full extension soft-close)
Once you have emptied your cabinets, securing your slide-out organizer is a straightforward process.
The alignment/install template and adjustable L-brackets make the procedure straightforward and
simple. For ease and convenience, as mentioned above, we recommend a battery operated drill-type
screwdriver….preferably one that is a right-angle version…a plain old Phillips screwdriver will be
adequate, but will require a bit more effort!
Place the right and left cabinet rails (the ones with the steel L- brackets attached) inside the cabinet
on the floor/cabinet base or the existing shelf where you want the slide-out organizer. The horizontal
bottom ‘leg’ of the L-brackets face the center of the cabinet. For single door cabinets, justify the rails
to the non-hinge side of the opening to give you as much margin as possible in the event the door
hinges protrude into the opening.
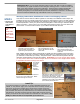
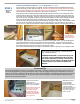
The front end of both rails should be placed flush with the front edge of the shelf surface, which is
typically in-line with but behind the back of cabinet face frame. Be aware, depending on your cabinet
design, the front edge of the existing shelf may not be touching the back of your cabinet frame(s).
Also, if the back of your door sets into the door frame area, set both rails back 3/8” (see far right photo
below).
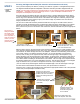
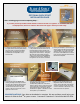
With the rails in place on the left and right of the opening as described above, roughly parallel to each
other, place the template between the two rails on top of the front L-brackets so that the holes in the
front brackets are visible through the holes in the template. Slide the inner ball-bearing tracks forward
to be certain it clears your cabinet opening by at least 1/16” on both rails/sides (see inset photo
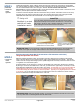
above!). Now, focusing on the right rail to start, make sure the right edge of the template is snug
against the base of the rail the full length of the template...as shown below. Keeping the right edge of
the template against the rail, align the front edge of the template with the front of the shelf surface or
front cabinet frame if installing on the base/floor of the cabinet. The front edge of the template should
be perfectly parallel to the front of the shelf/cabinet opening. This will assure the rail is at a 90 degree
angle so that the front of your slide out is aligned to the front of your cabinet properly.
(You can check this by measuring the distance the template edge is from the shelf edge on the right
and left. These measurements should be the same.) See photos below for reference.
Check the door to verify it will close all the way and have the appropriate number of #6 x 5/8” panhead
screws and your #2 tip Phillips screwdriver ready.
If your door is a partial or full
frame inset style door...set the
front of the rails back 3/8”
Set rail
back 3/8”
Back of
frame
Leave about a 1/16” gap
between frame and front of rail
Keep the front edge of the
template lined-up with or perfectly
parallel to the front of mounting
surface (the existing shelf in the
cabinet)
Cabinet base level
Template placed
between rails over
front L-brackets
LEFT side RIGHT side
Measurement
should be the
same
Template edge is against
the rail the entire length
(both rails)
Template performs as a
carpenter’s square...rails
should be 90 degrees to
front of cabinet
Page 3 of 6
Rev A. SAS-100-F&S 04/16
Flush up to the back
of the face frame
...or line up with the
shelf edge
90°
angle
The process of
setting the cabinet
rail member inside
your cabinet is the
same regardless of
which rail model you
ordered. (The full
extension rails are
pictured here!)
Extend inner ball-bearing
carriage to be certain it clears
1/16”
gap
Measure from shelf edge to the
edge of the template...both sides