
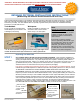
Installation & Assembly

Page 2 of 6Rev A. SAS-100-F&S 04/16
STEP 2
•
Standard, high
sides and box
model slide-out
shelves
Identifying Cabinet Rails, Shelf/Cabinet Locations and Prepping Cabinets
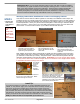
Your slide-out shelf or slide-out cabinet organizer is now ready to be installed. The first step in the
installation process is to identify where the unit will go by referencing the Line/Loc. # label number on
the bottom of each base shelf assembly and matching it to the same # located on it’s corresponding
install template label. Check your printed order summary/Item Location Listing to determine which
cabinet to install in....as the Line/Loc. # on the labels match the line(s) listed. See note above and
photos below. Of course all the contents of your cabinets must first be removed!
Install Tip!
If you will be installing your slide-outs on existing adjustable shelving in your
cabinet, i.e. they rests on pegs, pins or clips that can be moved up or down, you
will need to secure these shelves with a simple steel L-bracket and screws.
They are available at your local hardware store or home center. Simply place
two L-brackets 3/4’s of the way toward the back, one screwed to the left cabinet
wall and shelf...the other screwed to the right cabinet wall and shelf. This will
assure your slide-out will not tip forward once extended out of the cabinet. AND
NOW your slide-out shelves are adjustable up and down too!
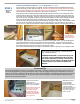
TEMPLATE BOARD
BOTTOM
OF SHELF
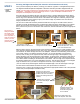
For 3/4 extension rails (3/4) the rollers are
the front end of the cabinet rails. Match
cabinet rail length to each unit.
The # on the label on the
underside of the unit matches
the line/location description you
typed during order placement.
Each unique width slide-out
has a template which can be
used for all slide-outs with the
same width.
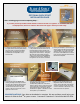
The rail with
the upside
down “U”
shape
channel is
the right
cabinet rail
Numbers will match!
LEFT rail
RIGHT rail
START HERE
FOR
INSTALLING
ALL SLIDE-A-
SHELF MADE-
TO-FIT
ORGANIZERS
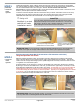
RAIL TYPES: Securing the cabinet rail assembly is virtually the same regardless which rail version
comes with the slide-outs you ordered. Simply be aware that if you ordered more than one version,
you will need to match them up correctly. See photos below. These instructions pertain to the full
extension and full extension soft-close rail systems. REMEMBER, if you have varying cabinet depths
you may receive cabinet rails of different lengths. Be sure to match the correct length cabinet rail pairs
to each slide-out before securing in the cabinet.
This is the order confirmation &
item location listing you should
have printed identifying the
location you want to install your
slide-outs.
Full-extension (FE) and Soft-close (SC)
full-extension rail systems are silver in
color and look very similar. The SC
version will have a spring/piston assembly
integrated on the inside of the cabinet rail
(w/L-brackets) at the back end.
IMPORTANT INFO: You can quickly determine which location each slide-out will be installed in
your cabinets if you typed a location for each during the ordering process. Locate the Line/Loc.#
label on the white underside of each base shelf/level. The line/location number indicated will
correspond to each line # on the Item Location Listing. You should have printed the listing/
summary during Step 4 of the Order Wizard process and maintained for reference. As a back-up
we have included an additional copy in the Master Carton of your shipment.
INSIDE OF CABINET
ITEM LISTING
FE rail SC rail
Soft close
mechanism