
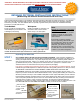
Installation & Assembly

IMPORTANT: BEFORE BEGINNING, FOR A SMOOTH TROUBLE-FREE INSTALLATION, PLEASE READ THESE
INSTRUCTIONS COMPLETELY UPON OPENING THE MASTER CARTON OF YOUR ORDER/SHIPMENT.
DETAILED PICTORIAL INSTALLATION INSTRUCTIONS
(Models using full extension and full extension soft-close rails)
These install instructions apply to our Standard, High Sides and Box model made-to-fit slide-out shelves. Our standard
slide-outs come fully assembled ready to install. The High Side and Box models require minor assembly (separate
instructions provided). For other Slide-A-Shelf
TM
specialty organizers/items please follow the installation/assembly
instructions provided with the item.
Tools Needed:
#1 (bit provided for specialty items)
and #2 Phillips tip screw drivers* and
a flashlight (if necessary)
Workspace:
Ideally, if assembly is necessary you
will need a table or work-surface
with 8-10 sq. ft. of clear space
Manual tools
* For an easier installation, we highly recommend using a right angle version
of either the manual ratchet style screwdriver or a battery operated one.
Note:
Magnetic tip screwdrivers or bit holders
are highly recommended.
All other needed hardware is provided
including a custom-cut ‘easy-install’
template provided for each slide-out
width ordered!
In the event you have to manage
around a protruding obstacle like a gas
line or water valve, which can often be
accommodated with a cut-out to the
shelf back, you will need a coping
handsaw, jig saw or reciprocating saw
to make minor cut-outs in the back and/
or sides of your slide-out/organizer.
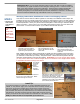
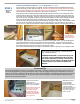
STEP 1
•
All products
Battery and ratchet style tools
Page 1 of 6Rev A. SAS-100-F&S 04/16
Installed
before? See our
‘Quick Start’
Guide on the
back!
•
Made-to-fit slide-
out shelf
•
Custom install
template
•
Pictorial installation
instructions
Lay everything out on
your work surface!
•
Shelf rail members
(attached to shelf)
•
Cabinet rail
members (adjustable
steel L-brackets
attached)
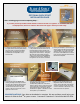
Unpacking Your Slide-outs
Our standard made-to-fit slide-outs ship completely assembled. Once unpacked, installation is
quick and easy by securing the included cabinet rail assemblies to the base inside your cabinet or the
existing full-depth shelf/surface. Only a few simple steps are required to install any Slide-A-Shelf
TM
slide-out organizer/system. Allow 5 to 10 minutes for the first unit you install to get a feel for it. As you
get familiar with the process, subsequent units will take less time...perhaps 3 to 5 minutes each
Please be kind to our environment and recycle your product’s packaging.
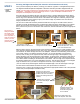
First, begin to carefully unpack each item and be sure to only discard the corrugated materials. Do not
mistake the rigid install templates for cardboard! (Products are typically packed 1 to 4 units per carton).
TO PREVENT CONFUSION IF YOUR SHIPMENT COMES IN MULTIPLE CARTONS, WE
RECOMMEND unpacking, then installing each slide-out/level before unpacking the next carton. It is
helpful if you wait to receive the carton labeled “Master Carton,” opening and installing its contents first.
We have provided one easy-to-use installation template for each unique shelf width you have ordered.
Each template is labeled and will be used to set the proper distance the cabinet rails need to be apart
and to keep them parallel and square to the front of the cabinet while they are being secured with the
hardware that is provided. Under normal circumstances, by using the provided template the
installation of your slide-outs will be quick and easy and you should not need any other hand tools. DO
NOT DISCARD ANY OF THE TEMPLATE PANELS until all your slide-outs are installed.
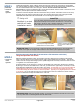
#6 x 5/8” Pan-head
Phillips screws
CABINET RAIL SCREWS