
Install Instructions

14
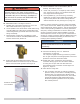
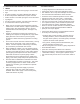
B. Use hand wrench to tighten door hardware and start
with non-hinged side. Use alternating tightening
method from non-hinged side to hinged side to
tighten door equally until sealed without applying
excessive torque. Never tighten hinged side ange
bolt rst or tighten either piece of hardware 100%
without using alternating tightening method
described above.
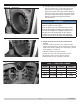
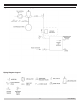
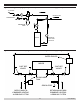
Figure 9 - Oval Liner
Figure 10 - V-Shaped Liner
Figure 11 - 3rd Pass Bafes
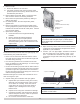
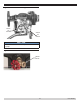
8 - BOILER ASSEMBLY
16. Install oil burner (if not already installed from
factory).
• Check oil nozzle in burner for size, angle and type,
inspect electrode settings, check head setting, check air
band and air shutter settings.
See “Oil Burner, Nozzle,
& Air Settings” on page 31.
• DO NOT install burner without gasket.
• Tighten all 4 hex nuts using diagonal sequence.
• Plug burner power cord into burner harness.
• Attach exible oil hose included in parts box.
Table 4
- BAFFLES & LINERS
Model Liner
Liner
Length
Bafes
Q3-4 Oval 4” 9”
Q3-5 NONE NA 12”
Q3-6 V SHAPE 12” 15”
Q3-7 V SHAPE 14” NONE
NOTICE
When securing burner swing door, make sure door is
drawn-in equally on both sides.
Failure to follow the prescribed procedure could
cause thread damage to casting or a leak in the
door seal. If hinged side is tightened before the
unhinged side, the hinged side of door cannot
be drawn to provide an air-tight seal. Applying
excessive torque will only cause thread damage.
PN 473900000